
In a modern world, it is hard to overestimate the value of time, quality, and performance in software development. All these points can be significantly improved by automating processes and using the right tools.
Automatic code quality checks, code formatting, fast building and compilation of bundles, eventually saves hours every week, allowing you to focus on the development process, catching and preventing bugs, delivering clear and consistent code that is easy to read and maintain. Such practices are widely adopted in development communities and are a must-have for modern teams and open-source development.
Table of content
- The IDE: PhpStorm
- Local development environment: DDEV
- PHP code quality: PHP_CodeSniffer and PHPStan
- JS/CSS/assets handling: Rspack
- JS/TS code quality: ESLint and Prettier
- Styles quality: Stylelint
- Debugging PHP: Xdebug
- Conclusion
The IDE: PhpStorm
Choosing an IDE is a very personal thing. I've tried multiple IDEs and editors, and I am using different ones depending on the task, since I truly believe each tool should be considered in the context of the task. If your task is professional Drupal development, PhpStorm is the right tool, the only right tool. You literally have no other choice.
PhpStorm is the most advanced IDE for Drupal development that saves plenty of time, helping with suggestions, code quality, related languages, tools, and technologies integrations, making the development process really efficient. It may sound obvious for mature developers, but if you still don't use it, it is time!
PhpStorm has many built-in tools in one box, such as terminal, version control, AI tools, DB management, debugger, and so on, playing really smoothly together in a unified UI. PhpStorm integrates perfectly with all tools described in this article. It is possible to use them standalone, but PhpStorm, in most cases, does it automatically in the background and doesn't require extra attention.
I'll provide the PhpStorm configurations for all the recommended tools later in this article, when we get to them in the corresponding sections.
PhpStorm settings and plugins
I won't provide any specific settings for PhpStorm itself, as I don't think it is helpful since it is quite specific for each case and preferences.
I could recommend one general thing — disable all the plugins you know you won't use. PhpStorm, out of the box, came with all the built-in plugins enabled by default, and you may not need some of them.
Go to Settings → Plugins → Installed and disable plugins you don't use now, you can always enable them back when needed.
I personally don't use Vagrant, LESS, WordPress, Joomla, Angular, Vue.js, and some other plugins.
Here and after, I provide the path to the settings for the macOS version of PhpStorm, but it should be more or less similar for other OS as well.
Another recommendation — Install Drupal Extend Plugin. It improves suggestions for many cases.
Go to Settings → Plugins → Marketplace, search for "Drupal Extend", and install it.
Local development environment: DDEV
DDEV is a tool for local development that allows you to spin up Drupal instances in Docker containers. DDEV is not the only existing option, but at the moment of writing, it is the recommended one because:
- DDEV is the official local development tool of Drupal
- It supports not only Drupal but also other platforms as well
- It is highly configurable while providing a recommended configuration out of the box
- It has tools, features, plugins, and integration for almost all possible cases
- It has great support and documentation
Unless you are restricted in the choice of local development setup, there are no objective reasons not to use DDEV. Even if you are completely happy with your current setup, I highly recommend giving it a try to be on the same page with the Drupal community.
DDEV installation and usage
It is quite straightforward to install and start using DDEV for new or existing projects. Here are a few quick links on official documentation:
Here are a couple of examples, mainly copied from documentation, just for the sake of having everything in one place.
New Drupal project setup:
mkdir my-drupal-site && cd my-drupal-site
ddev config --project-type=drupal11 --docroot=web
ddev start
ddev composer create drupal/recommended-project:^11
ddev composer require drush/drush
ddev drush site:install --account-name=admin --account-pass=admin -y
ddev launch
Existing Drupal project setup (assuming it is Drupal 11):
cd my-drupal-site
ddev config --project-type=drupal11 --docroot=web
ddev start
ddev composer install
ddev launch
If you need to spin up an environment to work on one specific Drupal contrib module or theme, take a look at DDEV Drupal Contrib — the integration that is designed especially for such a case.
DDEV plugin for PhpStorm
DDEV has a quite helpful plugin for PhpStorm — DDEV Integration. The most useful features of the plugin are path mappings and PHP interpreter configuration inside the DDEV container.
Go to Settings → Plugins → Marketplace, search for "DDEV Integration", and install it.
In terms of plugin settings, I recommend disabling automatic configuration for Node interpreter. I'll explain the reason behind it later, in the ESLint configuration section.
Go to Settings → Tools → DDEV Integration, and untick "NodeJs interpreter" checkbox.
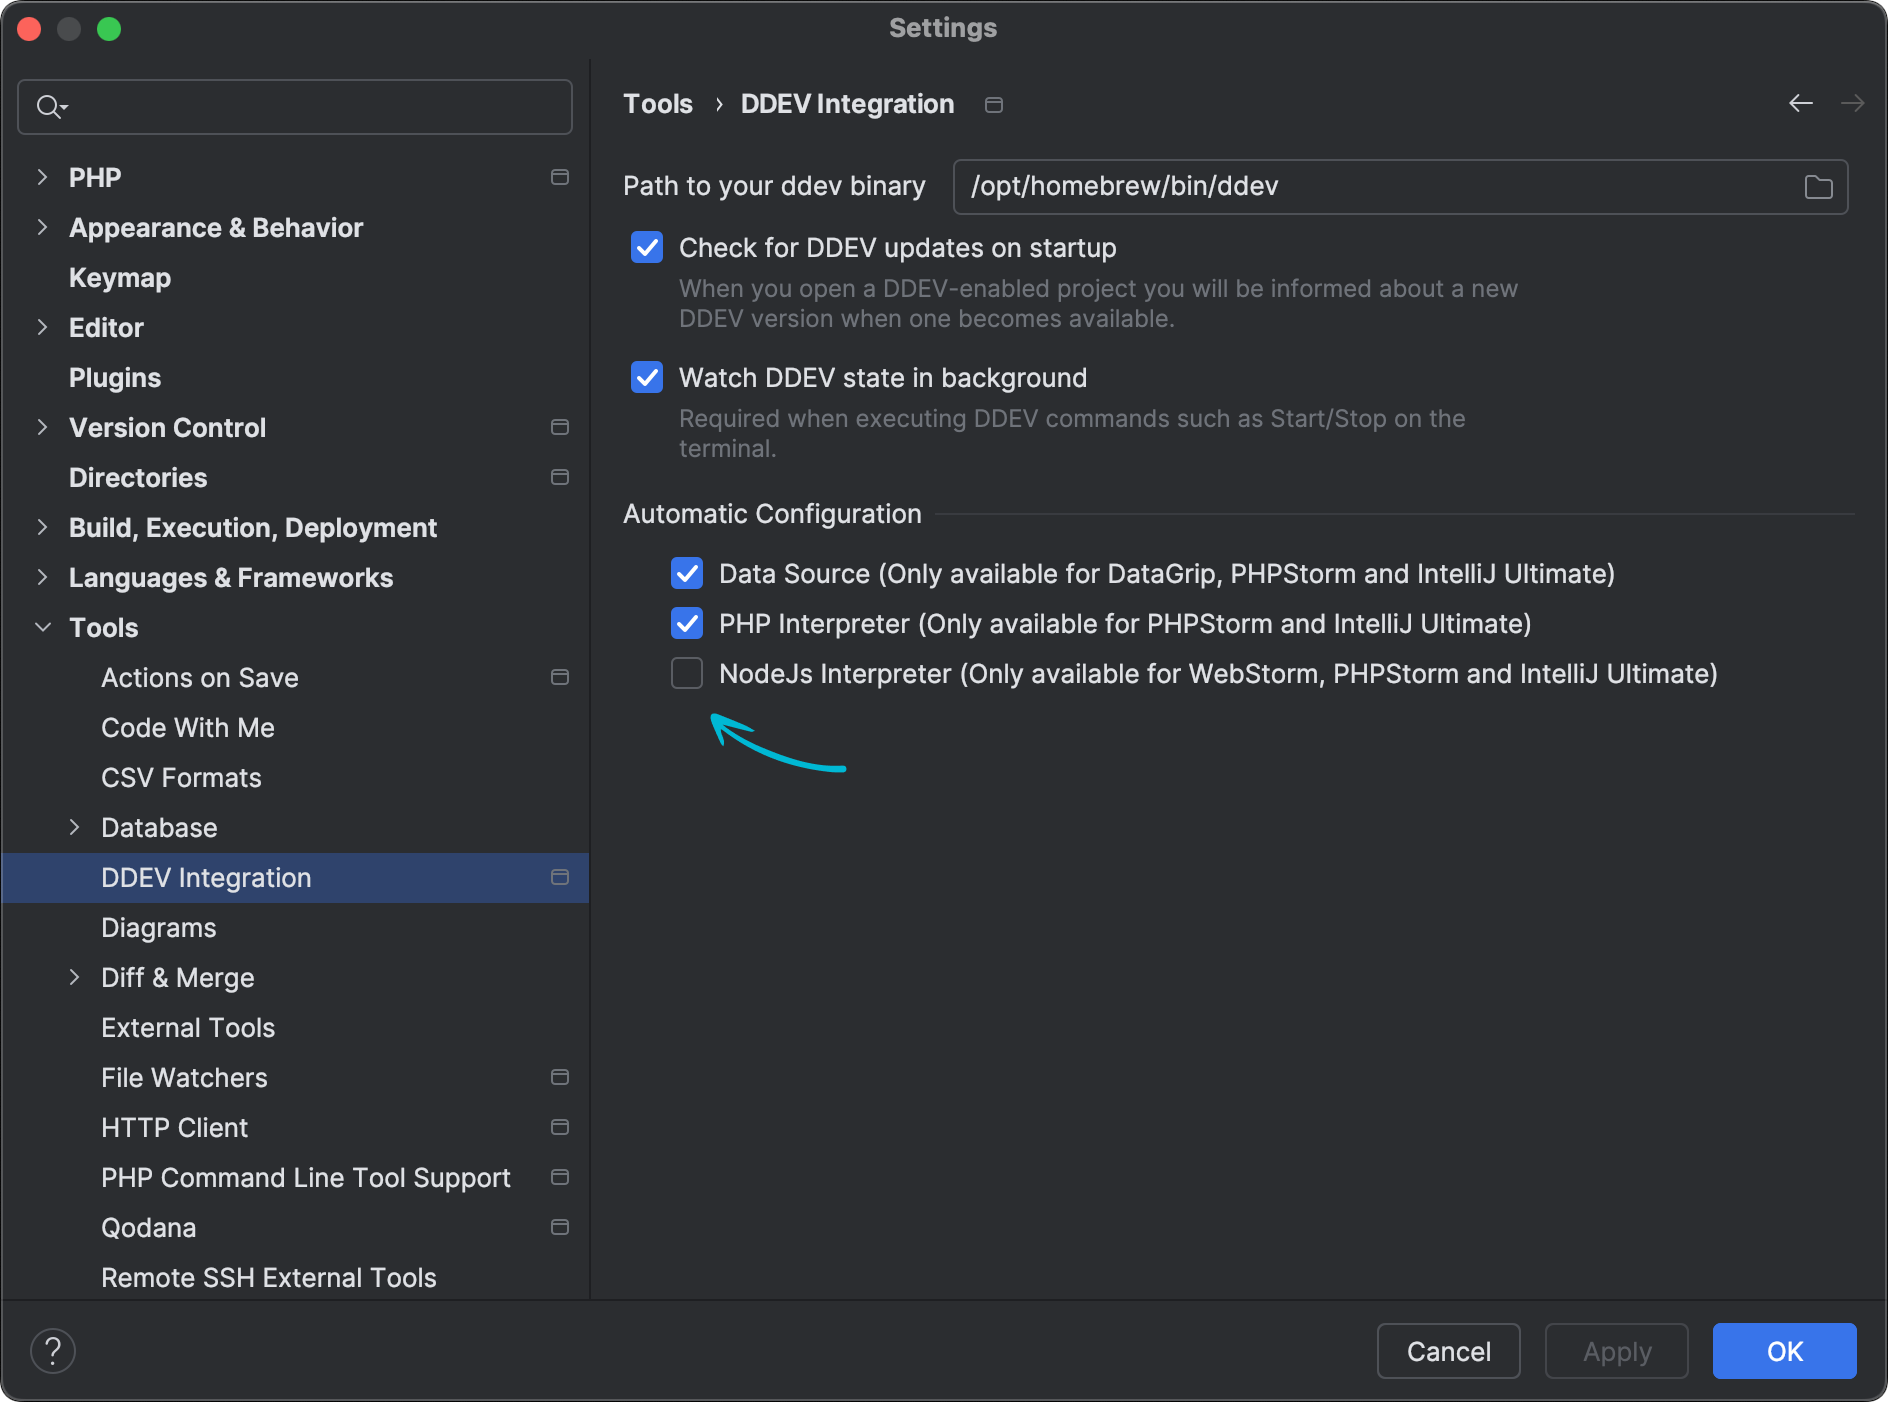 DDEV Integration plugin settings in PhpStorm
In this article, I'll provide example configurations for the PhpStorm and DDEV local environment, since they integrate perfectly with all the tools mentioned. However, I believe the same results can be achieved with other tools for local development, such as Lando or Docker4Drupal.
DDEV project configuration in PhpStorm
DDEV Integration plugin configures your project automatically, but in case you don't use the plugin or need to adjust the configuration, it can be done manually as well. Here is the info about PhpStorm setup in the DDEV documentation.
The most important thing is the PHP settings. Since DDEV executes your project code in a Docker container, it is crucial to let PhpStorm know how to reach the PHP interpreter and how project folders are mapped into the container.
Go to Settings → PHP, and configure "CLI interpreter" and "Path mappings".
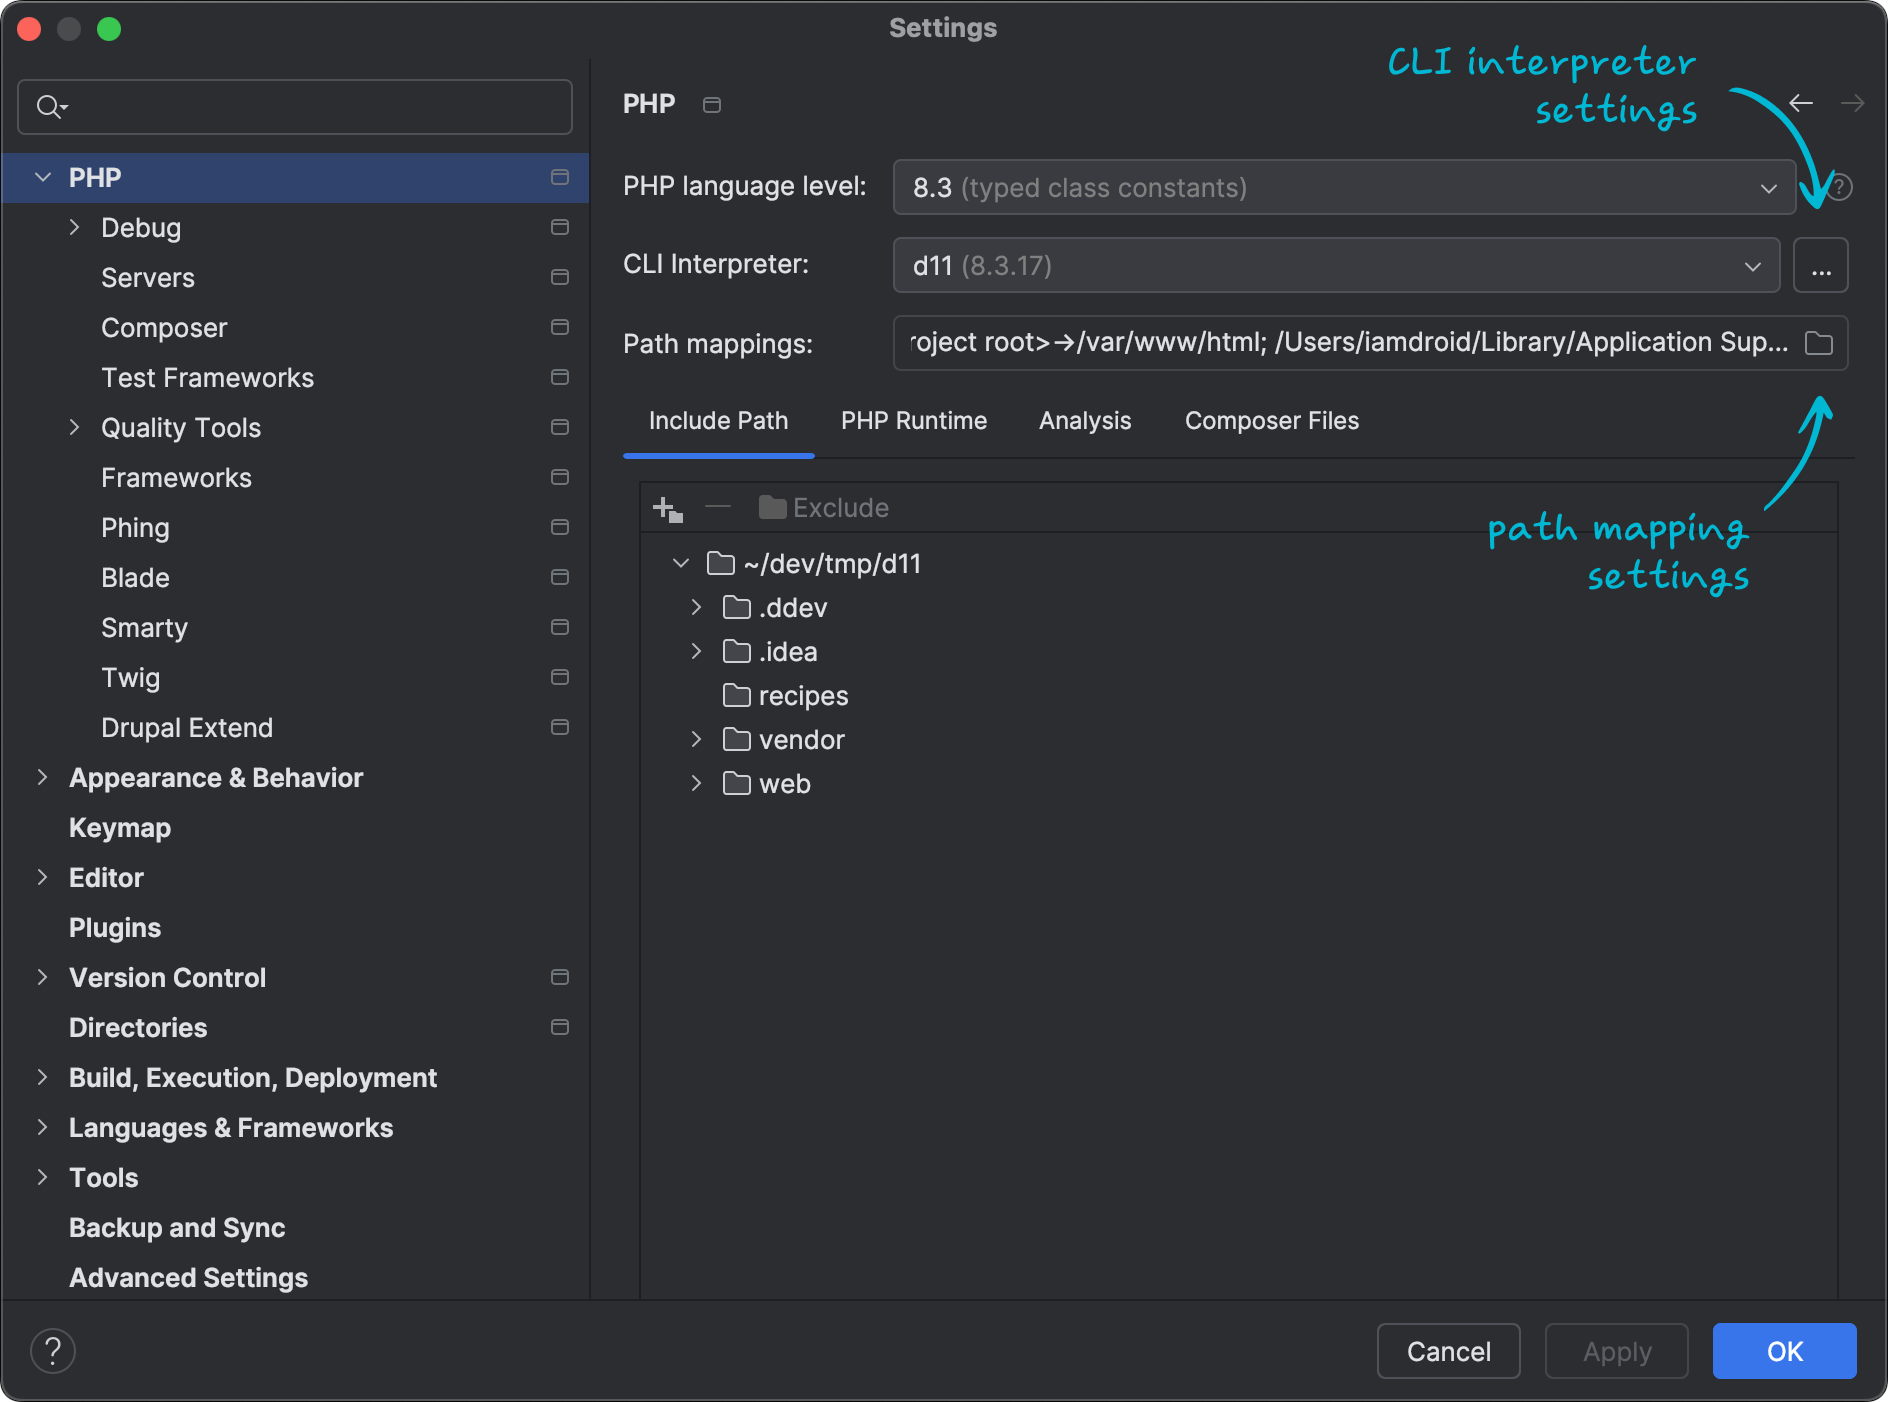 PHP settings in PhpStorm
CLI interpreter settings:
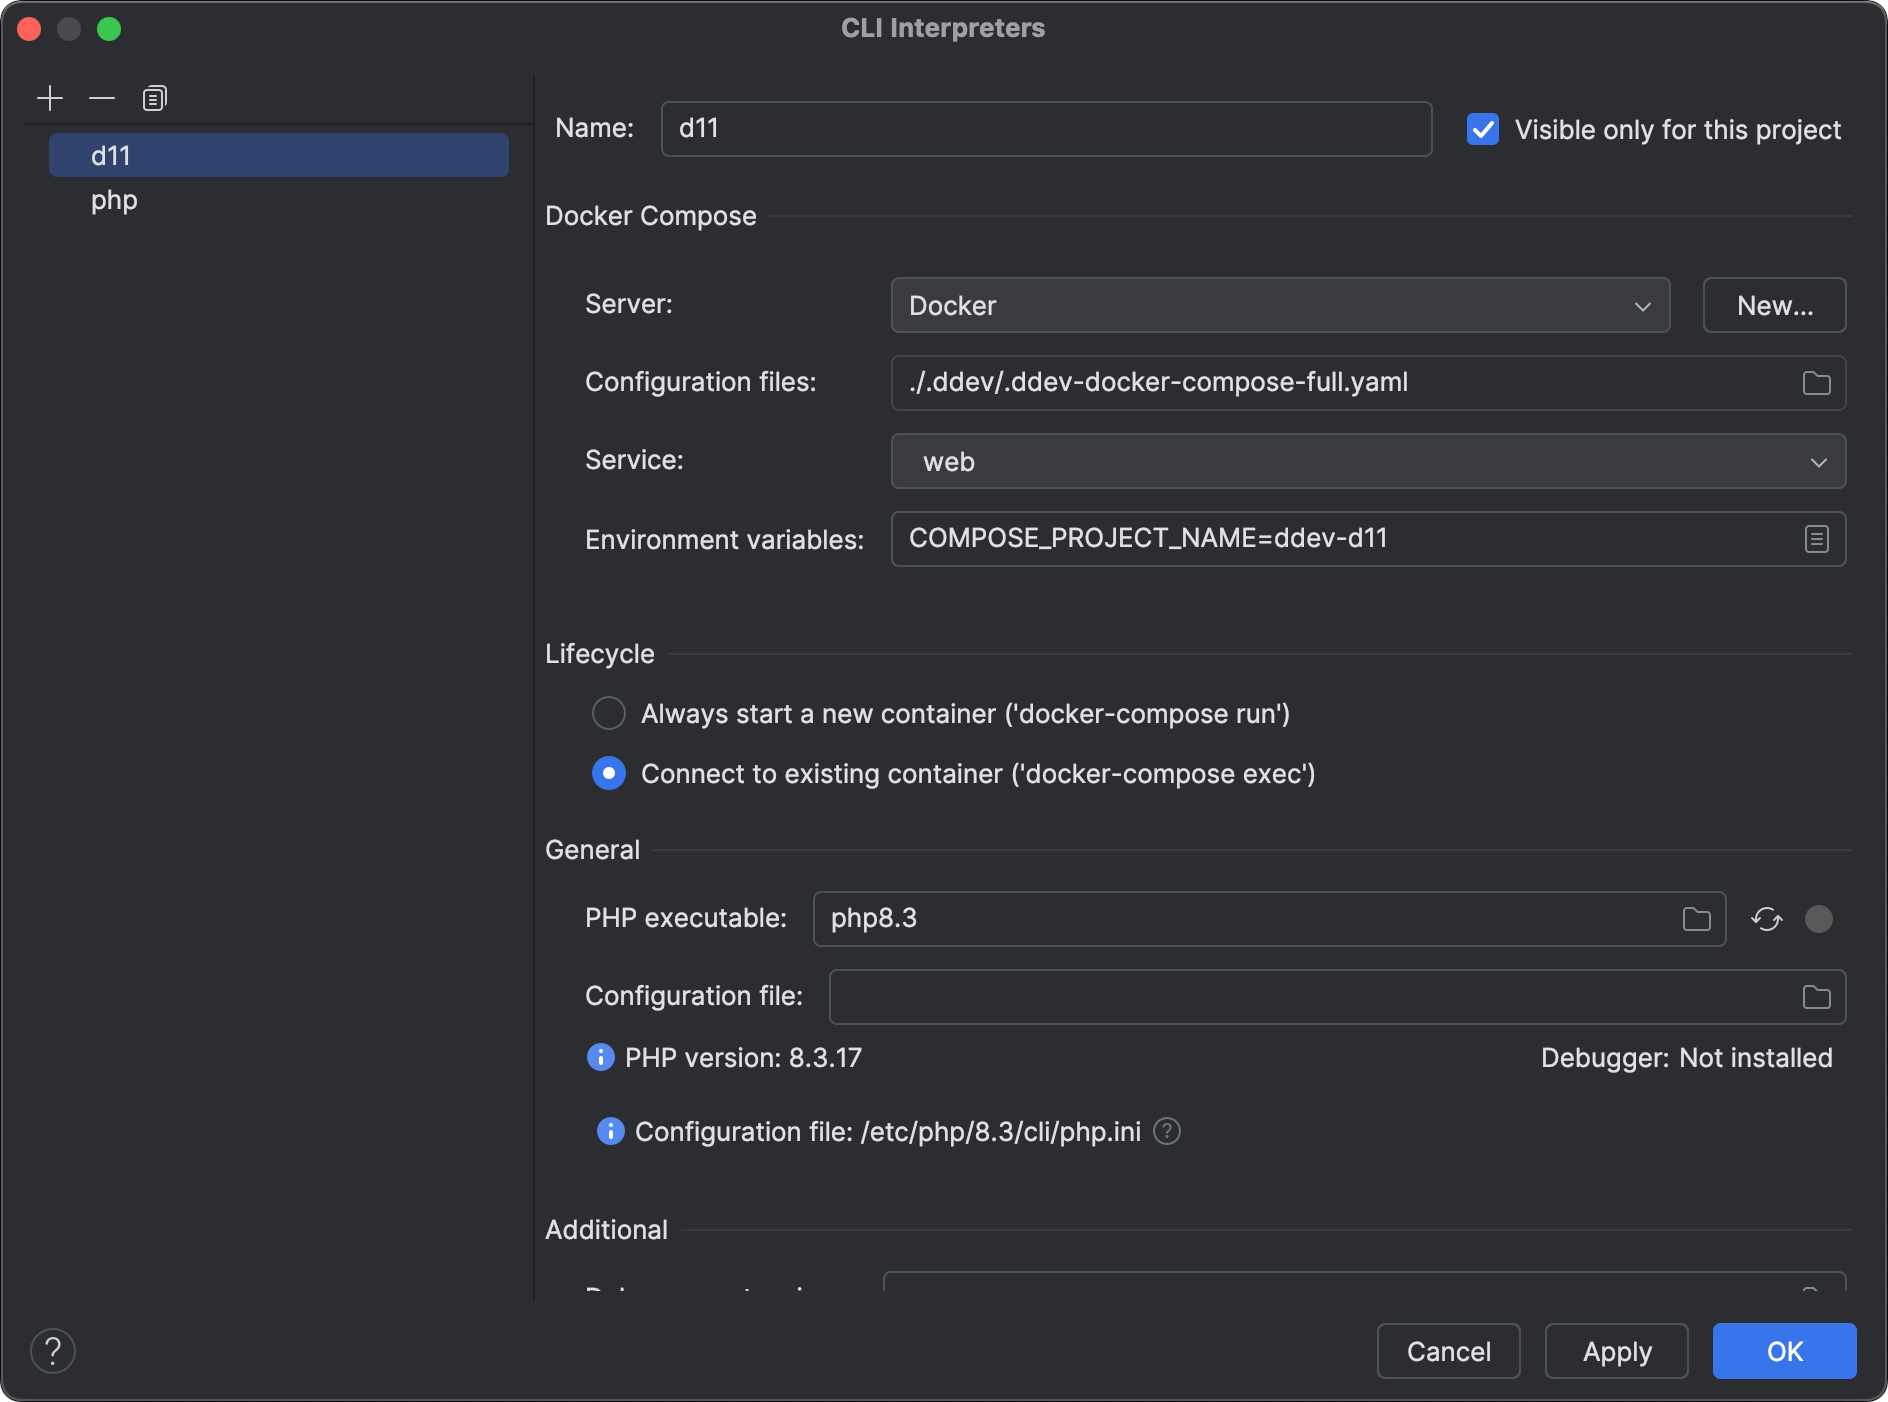 PHP CLI interpreter settings in PhpStorm
If the interpreter does not exist yet, add it by pressing the "+" button in the top left corner.
Path mapping settings:
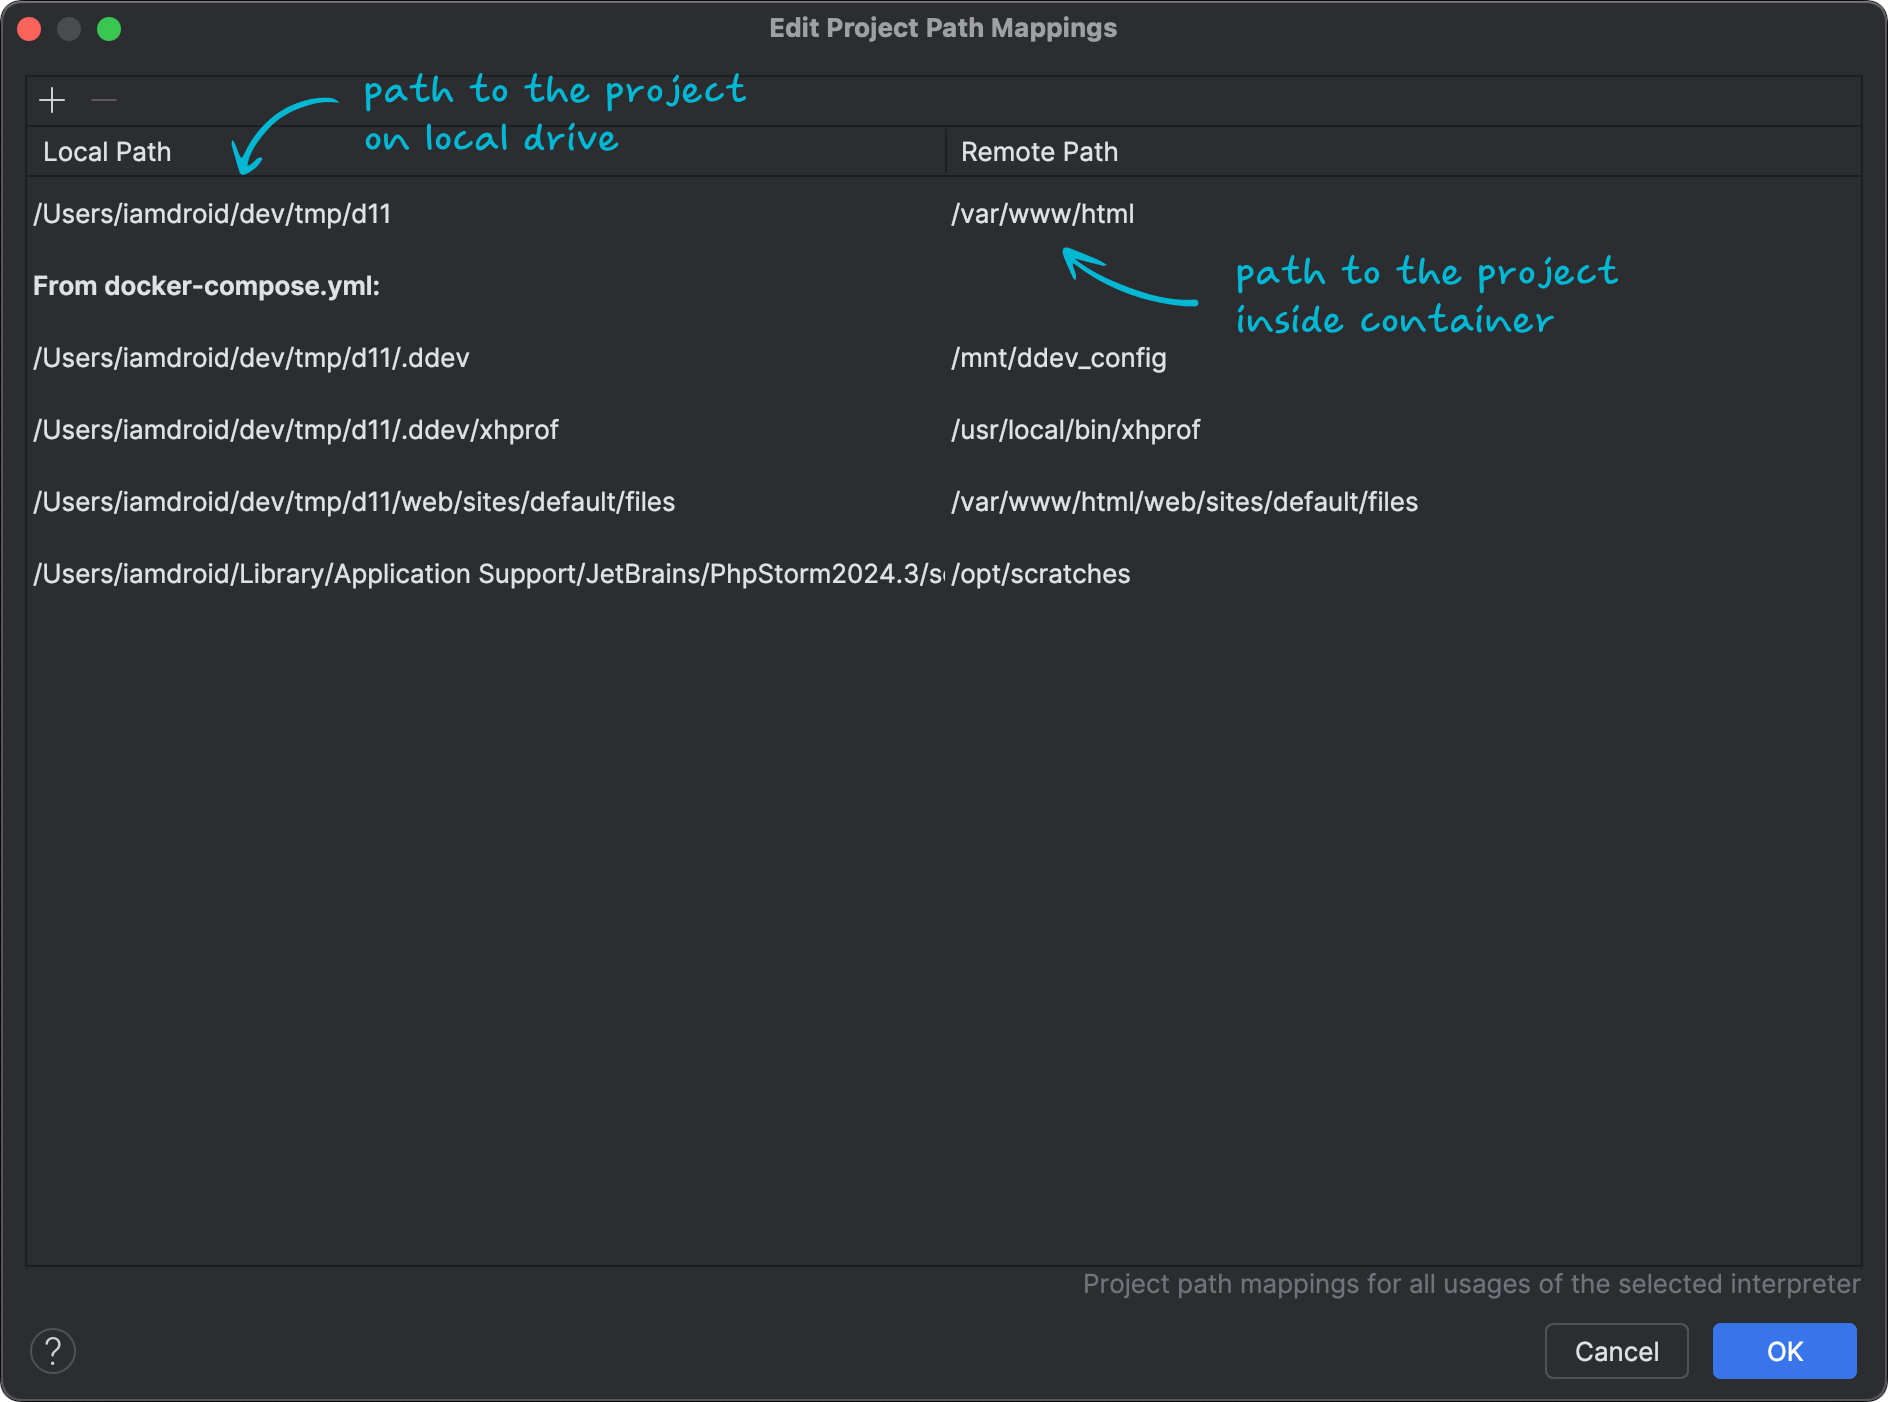 Path mapping settings in PhpStorm
The default path for project inside the container is /var/www/html.
PHP code quality: PHP_CodeSniffer and PHPStan
Code quality, its cohesion, unified approaches, right patterns, type hints, and even consistent formatting are crucial for readability and maintainability of code, especially when you work in a team. Modern tools can take care of such things automatically.
There are two PHP code quality tools widely used in Drupal development — PHP_CodeSniffer and PHPStan.
PHP_CodeSniffer
PHP_CodeSniffer is a set of two CLI tools for checking and fixing coding standards violations.
To use PHP_CodeSniffer for Drupal, I recommend these projects:
- Coder — An official set of coding standards checks from the Drupal community.
- Coder extension — Additional checks related to new PHP features.
These projects are available as Composer packages, and you can install them either globally in the system or locally for the specific project. I recommend local installation, because it allows the tools setup to be transferred among all project contributors. Also, this option doesn't require local PHP and Composer installed, and you can use the ones from the DDEV container.
Installing PHP_CodeSniffer stuff locally:
ddev composer require --dev "drupal/coder" "chi-teck/drupal-coder-extension"
I recommend installing PHP_CodeSniffer as a dev dependency (--dev option), so that it can be omitted for production:
composer install --no-dev
PHP_CodeSniffer configuration
PHP_CodeSniffer configuration sits in the phpcs.xml file, which could be placed in the project root folder. Here is an example of the configuration which you can use as is:
<?xml version="1.0" encoding="UTF-8"?>
<ruleset name="drupal11">
  <description>PHP CodeSniffer configuration for Drupal 11 development.</description>
  <!-- Check custom modules and themes. -->
  <file>web/modules/custom</file>
  <file>web/themes/custom</file>
  <!-- Ignore any files in these paths. -->
  <exclude-pattern>*/.git/*</exclude-pattern>
  <exclude-pattern>*/config/*</exclude-pattern>
  <exclude-pattern>*/icons/*</exclude-pattern>
  <exclude-pattern>*/vendor/*</exclude-pattern>
  <exclude-pattern>*/dist/*</exclude-pattern>
  <exclude-pattern>*/docs/*</exclude-pattern>
  <exclude-pattern>*/node_modules/*</exclude-pattern>
  <exclude-pattern>*rules_export.txt</exclude-pattern>

  <arg name="extensions" value="php,module,inc,install,test,profile,theme,css,info,txt,md,yml"/>
  <!-- For colored cli output -->
  <arg name="colors"/>
  <!-- To show rule names. Equivalent to "phpcs -s" -->
  <arg value="sp"/>

  <config name="drupal_core_version" value="11"/>

  <rule ref="vendor/drupal/coder/coder_sniffer/Drupal">
    <!-- Example how you would disable a rule you are not compliant with yet:
    <exclude name="Drupal.Commenting.Deprecated"/>
    -->
  </rule>
  <rule ref="vendor/drupal/coder/coder_sniffer/DrupalPractice"/>
  <rule ref="vendor/chi-teck/drupal-coder-extension/DrupalExtended74"/>

  <!-- Example how you would disable an external rule you do not like:
  <rule ref="PEAR.Functions.ValidDefaultValue.NotAtEnd">
    <severity>0</severity>
  </rule>
  -->
</ruleset>
This configuration will run code checks for files in the "custom" modules and themes folder.
PHP_CodeSniffer manual usage
Running checks manually:
ddev exec phpcs
Fixing violations that can be fixed automatically:
ddev exec phpcbf
PHP_CodeSniffer configuration for PhpStorm
PhpStorm can run PHP_CodeSniffer checks in the background and show notifications right in the code editor.
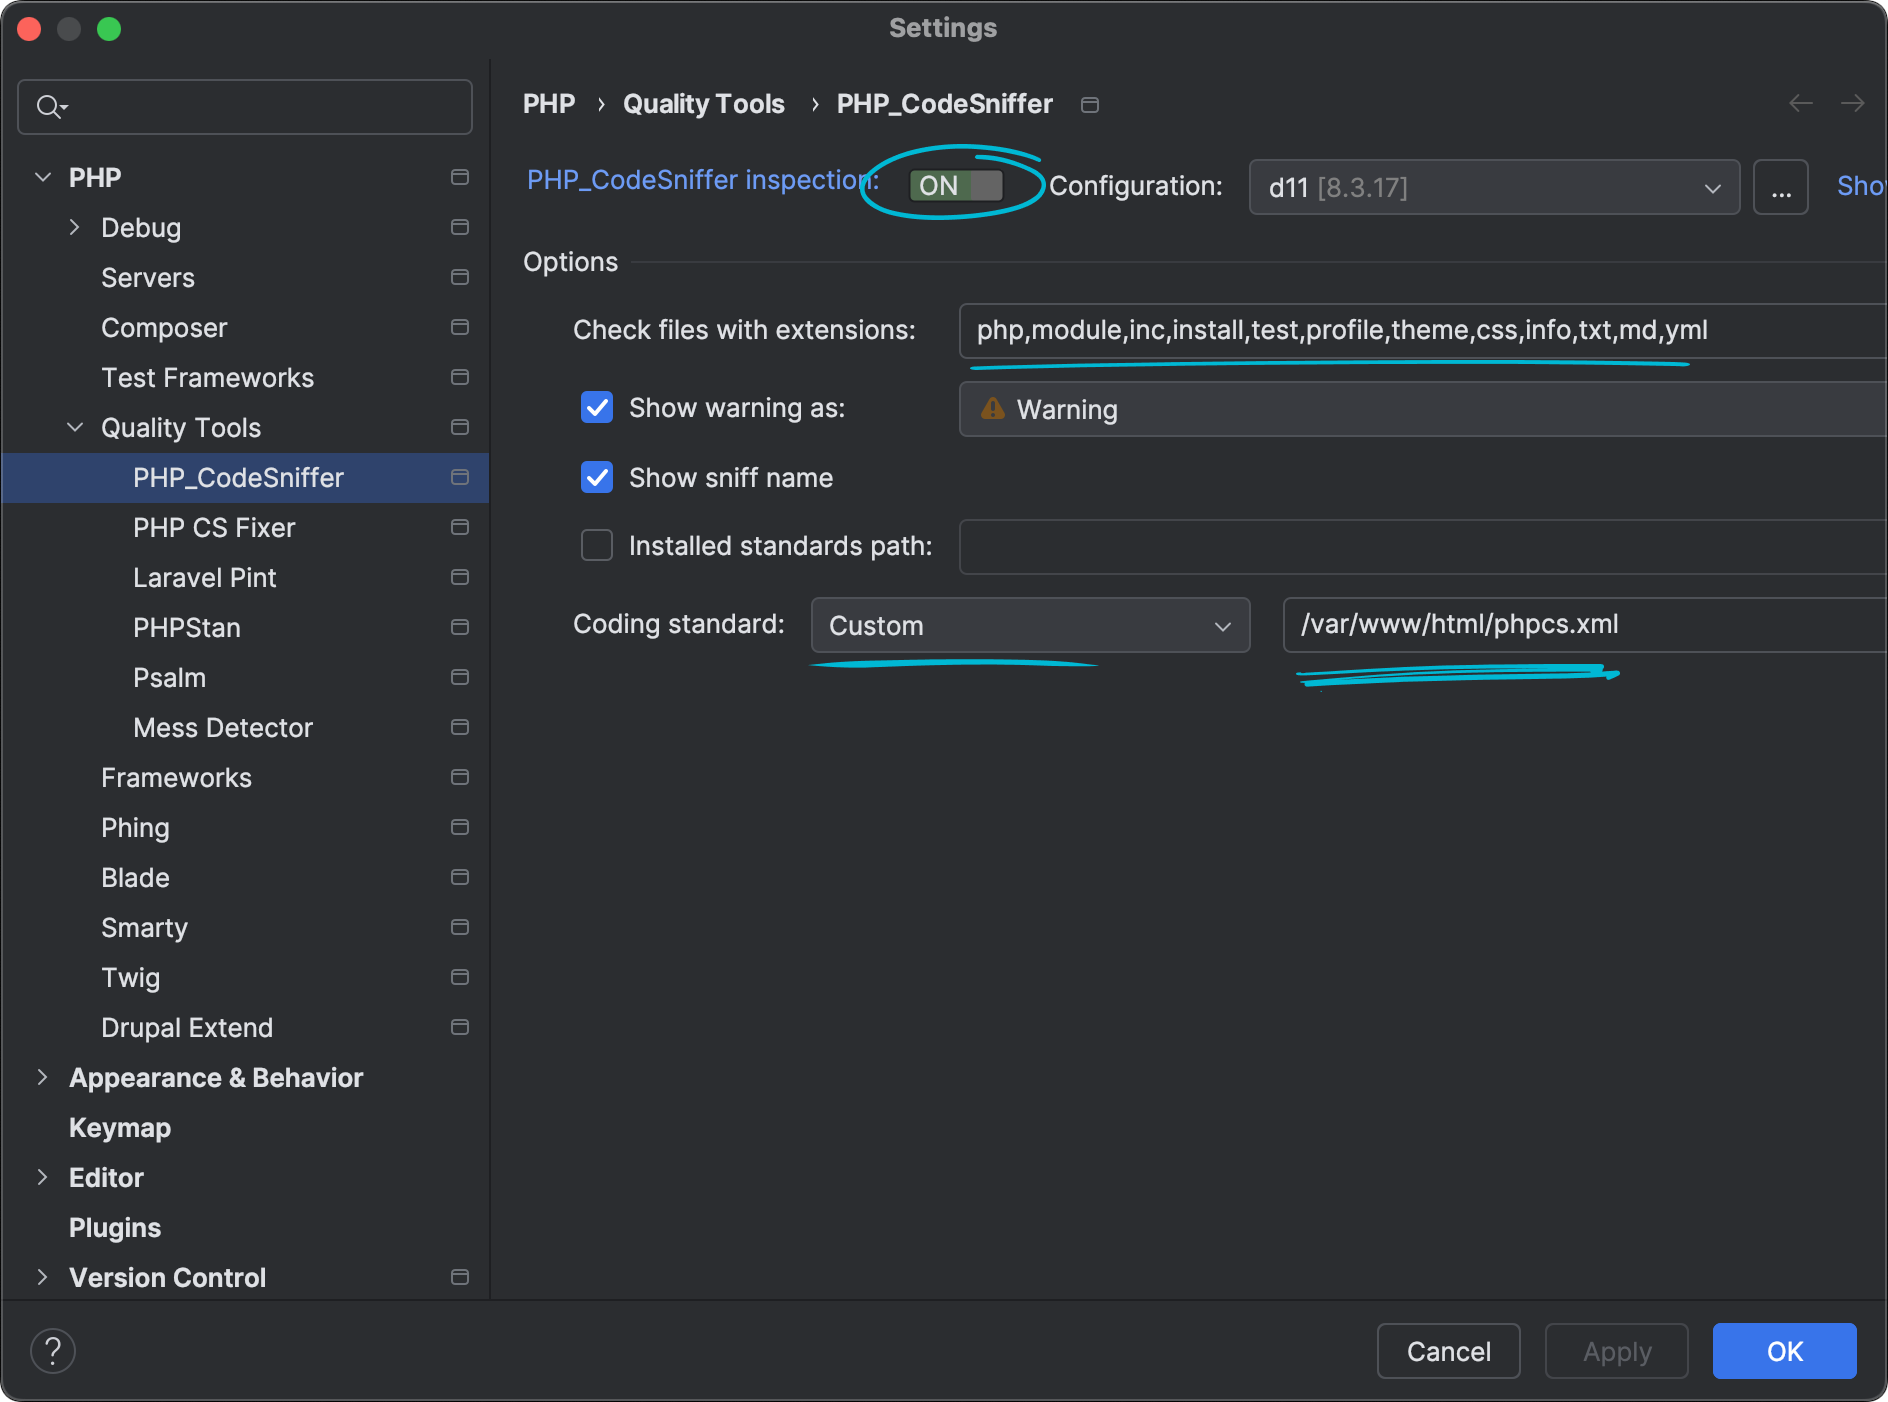
Go to Settings → PHP → Quality Tools → PHP_CodeSniffer, and configure the settings.
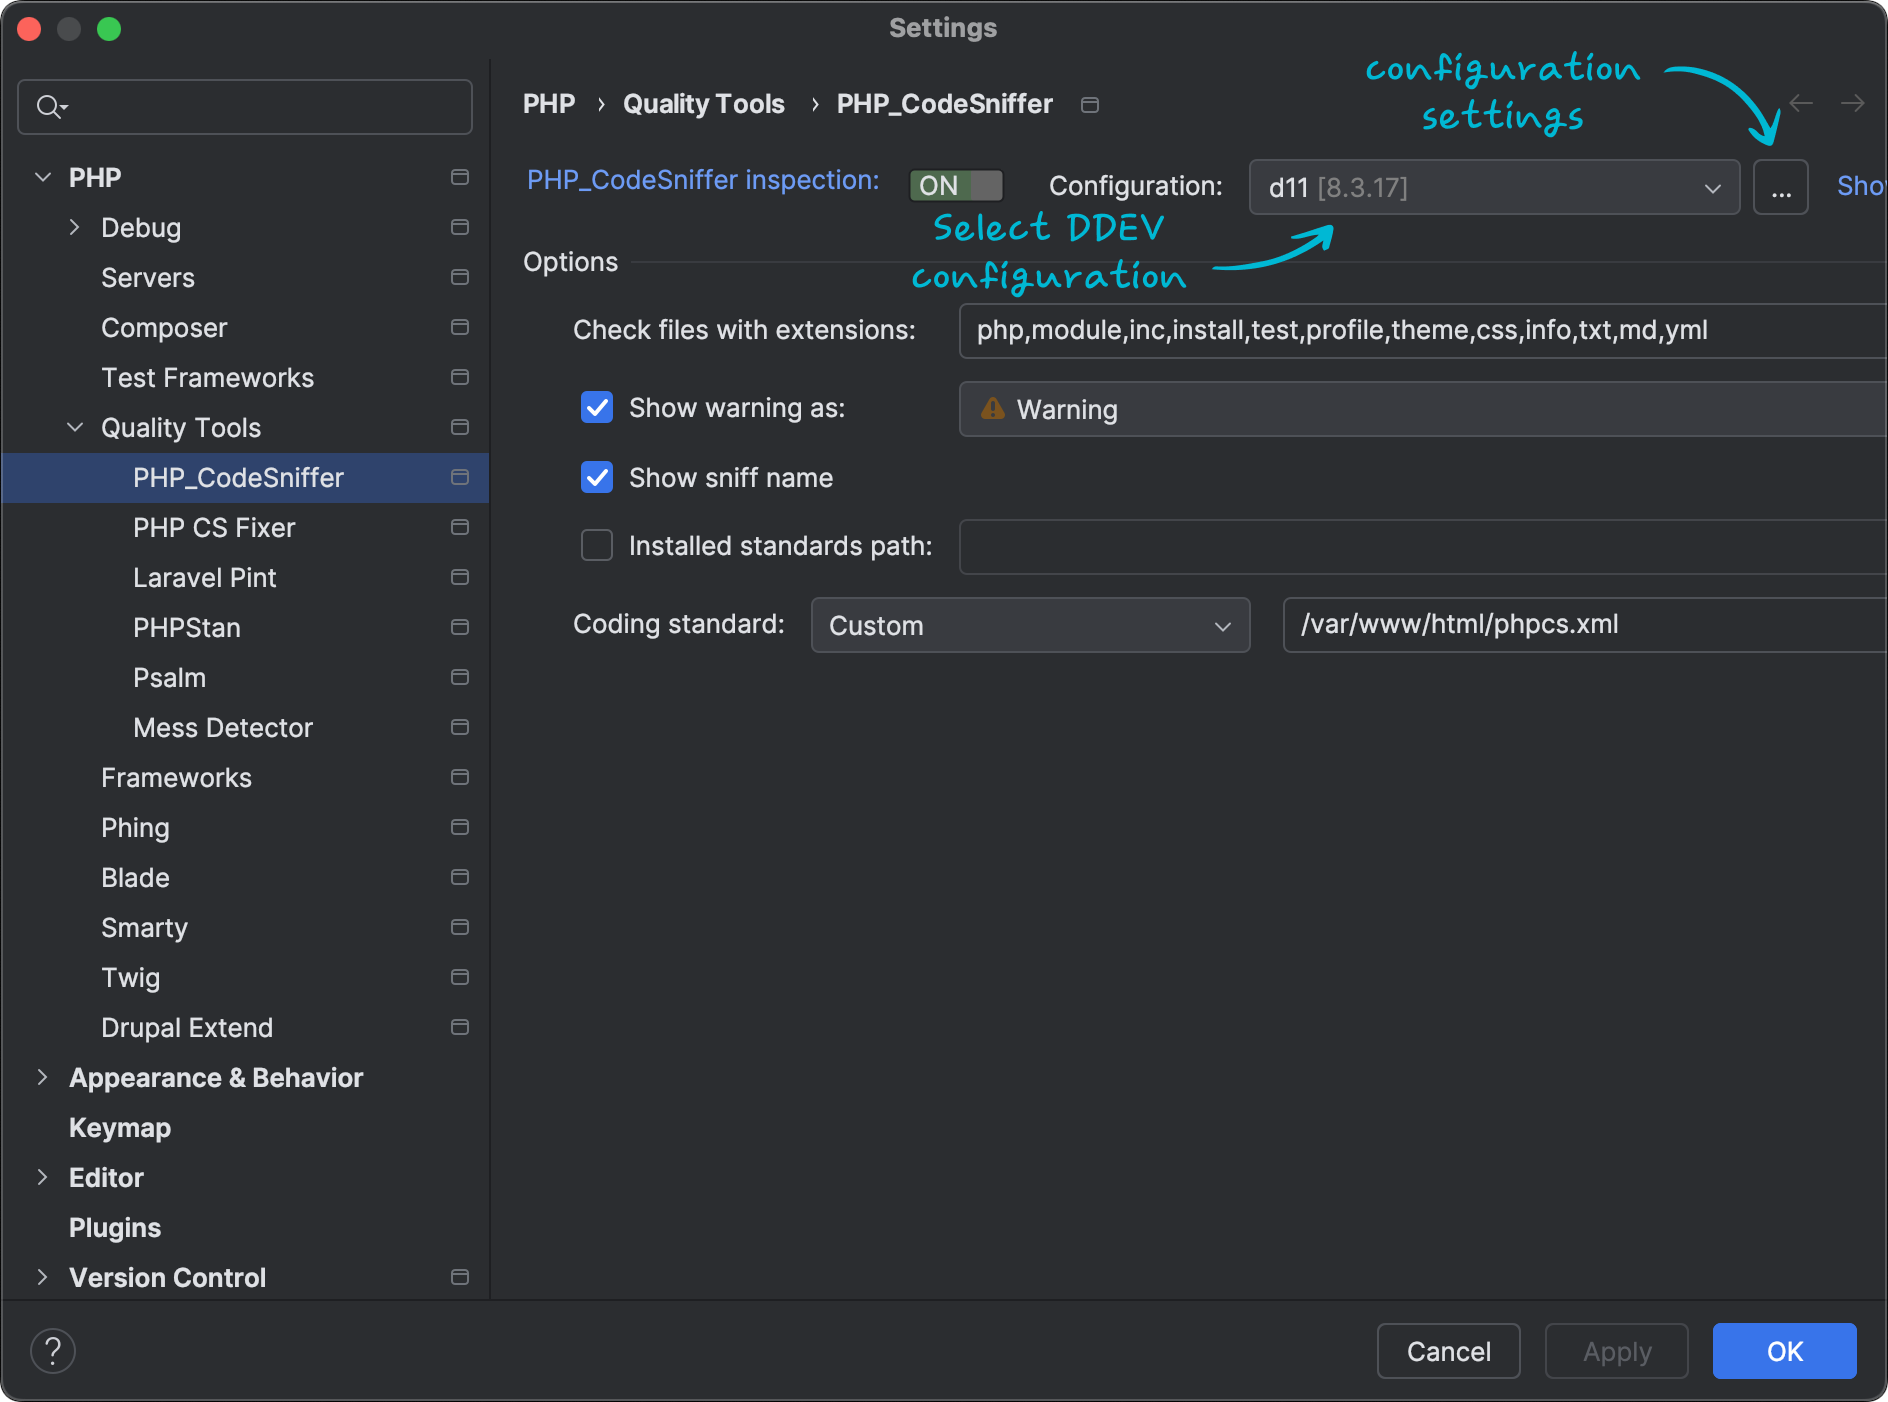 PHP_CodeSniffer settings in PhpStorm
First, select the right environment configuration (it should be the configuration that points to the DDEV container, created by the DDEV Integration plugin or manually), and click on the "..." button.
 PHP_CodeSniffer configuration settings in PhpStorm
Select/add the right PHP CLI interpreter on the left side (feel free to remove the rest of them), and specify these values on the right side:
- "PHP_CodeSniffer path":
/var/www/html/vendor/bin/phpcs - "Path to phpcbf":
/var/www/html/vendor/bin/phpcbf
Apply the settings to get back to the previous window.
 PHP_CodeSniffer settings in PhpStorm
Specify these settings:
- "Check files with extensions":
php,module,inc,install,test,profile,theme,css,info,txt,md,yml - Untick the "Installed standard path" checkbox
- Set "Coding standard" to "Custom" and value to
/var/www/html/phpcs.xml(reopening settings may be needed to make the "Custom" option appear) - Turn on "PHP_CodeSniffer inspection"
Go to Settings → PHP → Quality Tools, and select "PHP Code Beautifier and Fixer" in "External Formatters".
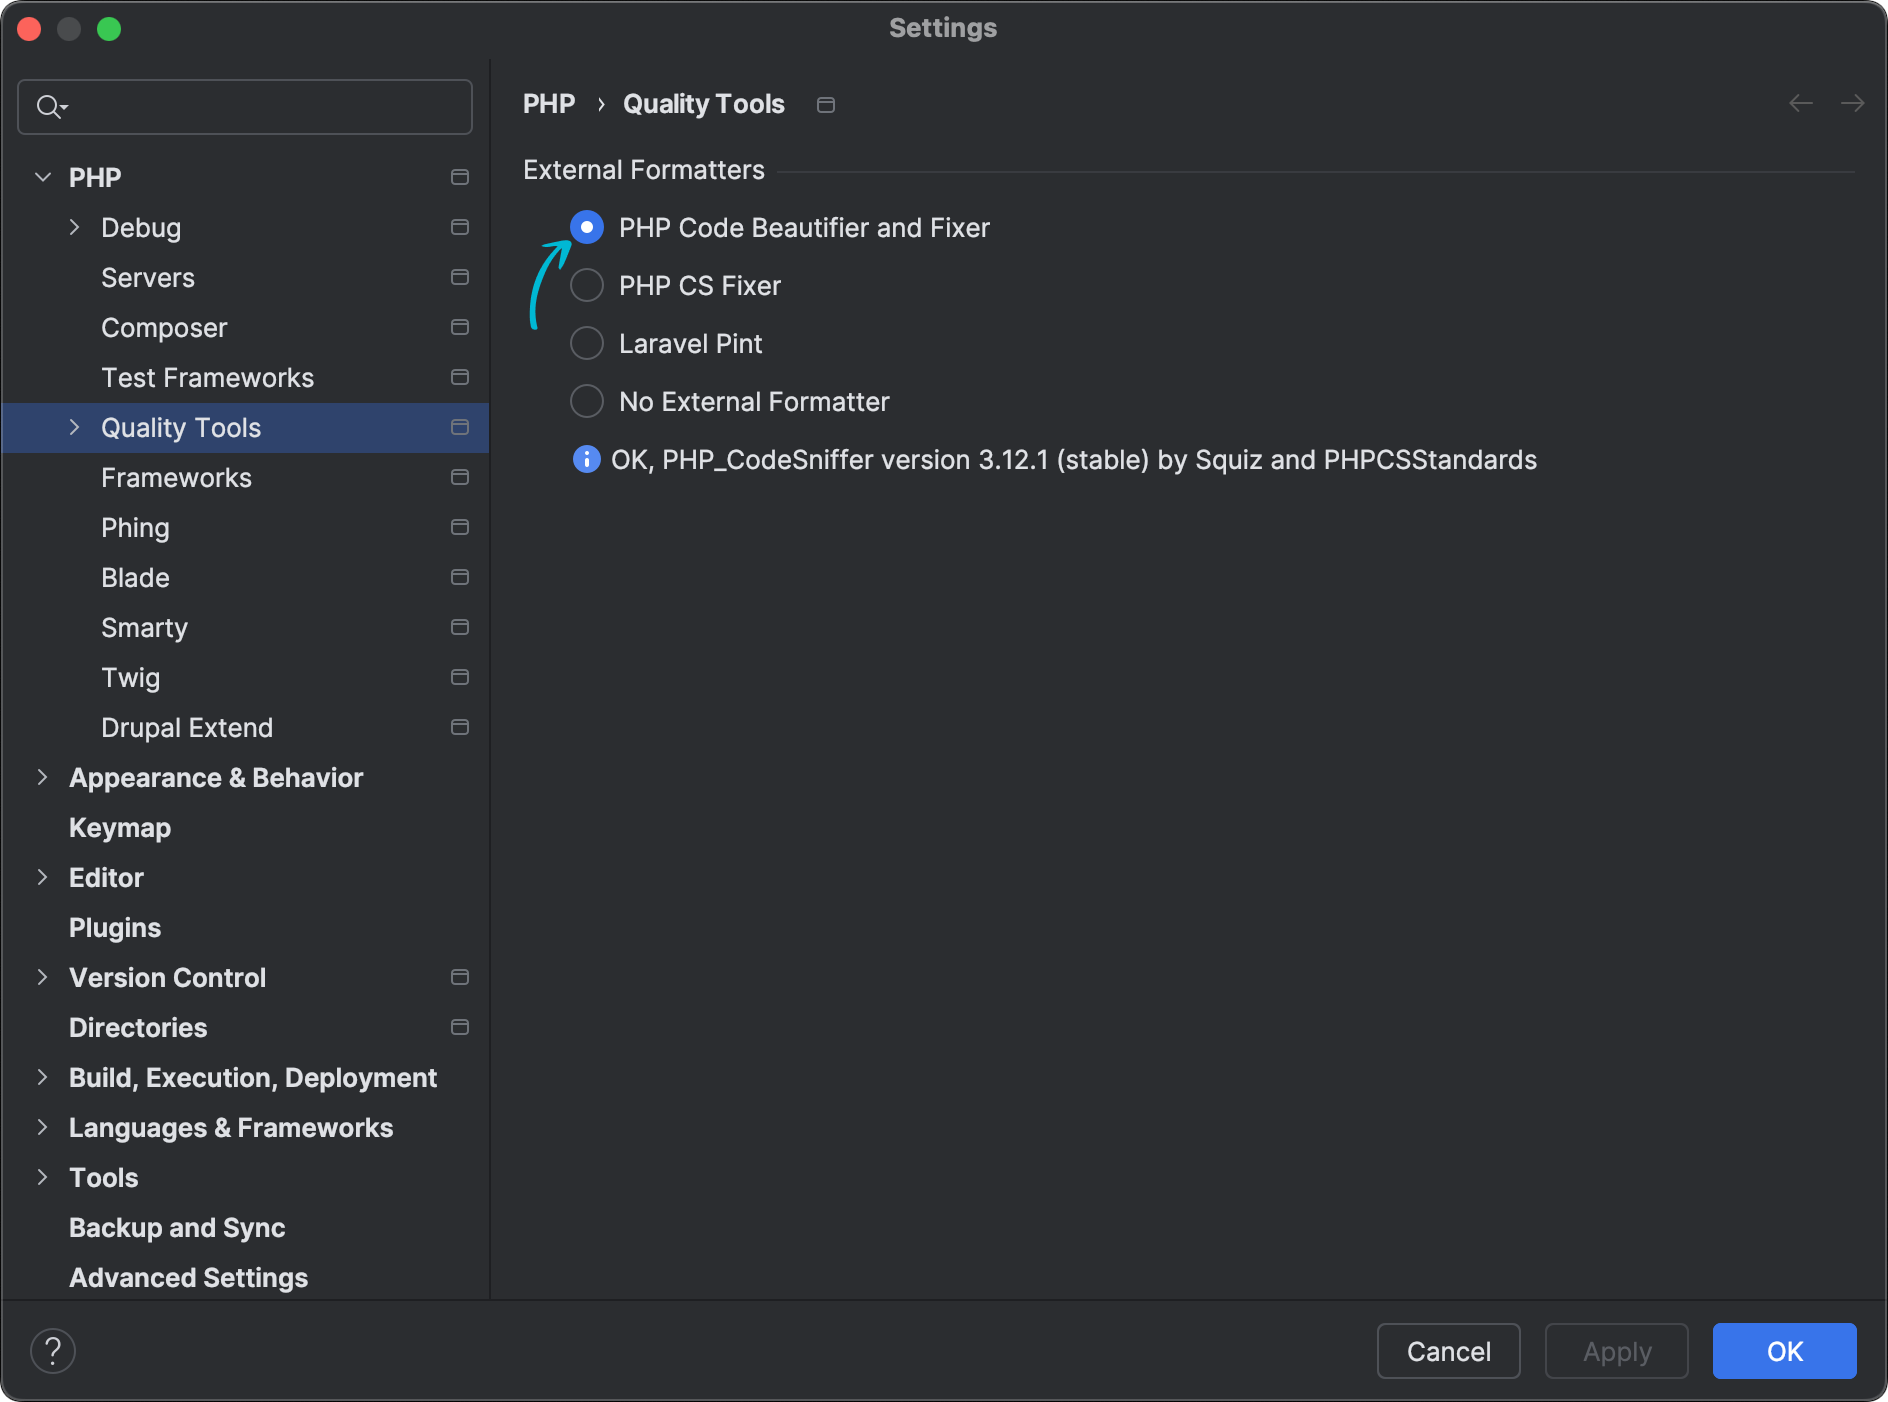 PHP Quality Tools settings in PhpStorm
Now you can run violations fixing by Option/Alt Shift L shortcut or via Code → Reformat code menu item.
If you want to run violations fixing when the file is saved, go to Settings → Tools → Actions on Save, and enable the "Reformat code" action.
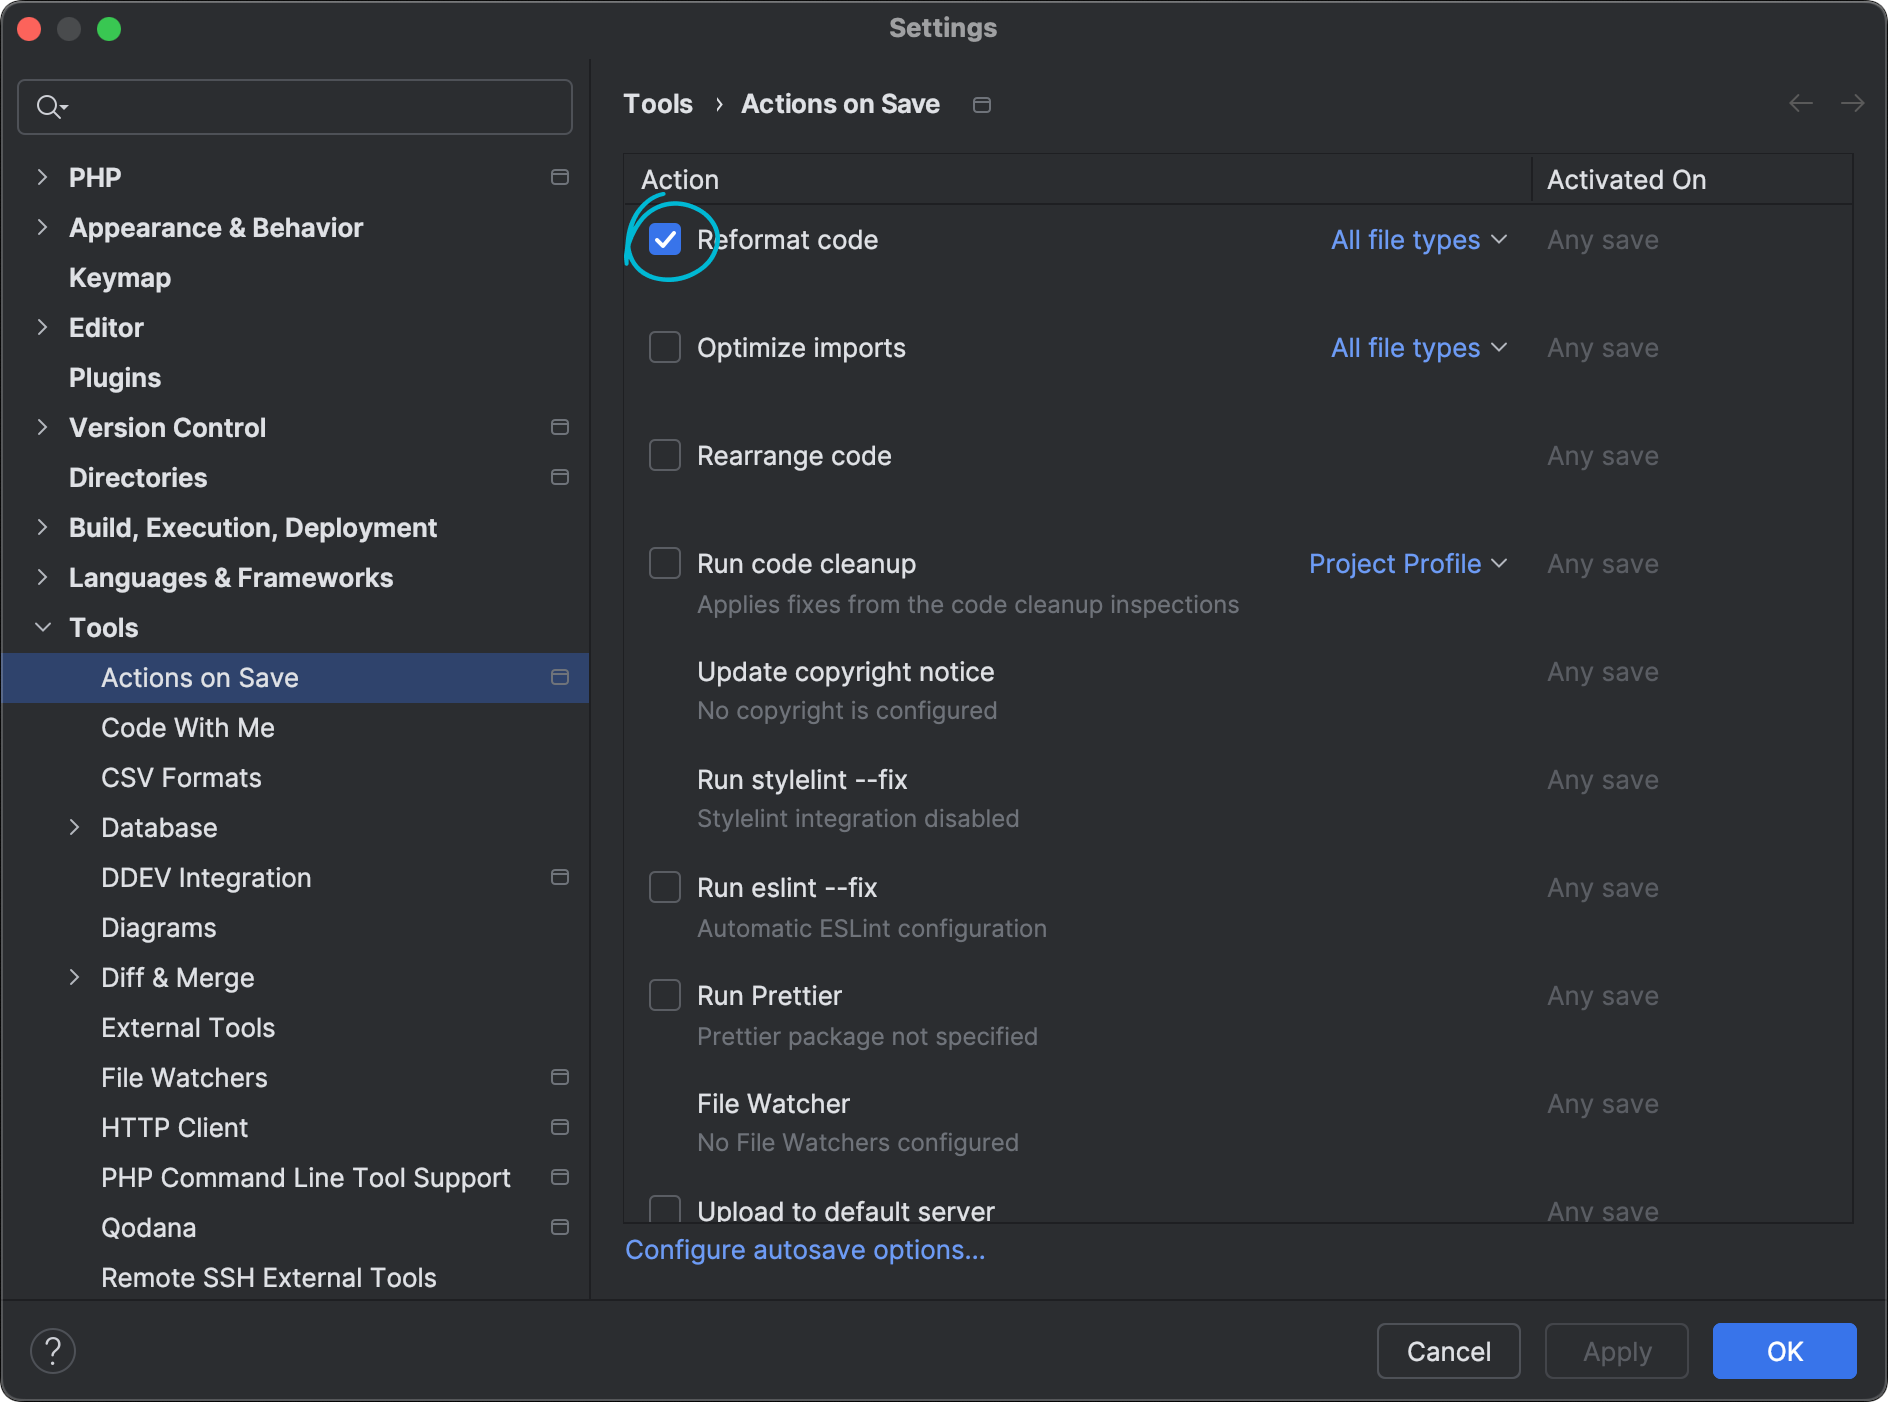 Actions on Save settings in PhpStorm
Ignoring PHP_CodeSniffer issues
Sometimes issues reported by PHP_CodeSniffer can't be fixed for some reason. If you don't want to see them, there are several options:
- Ignore some checks globally. Examples of such options are provided in comments in the
phpcs.xmlfile - Ignore specific files and folders. See the documentation
- Ignore specific code parts or lines. See the documentation
One of the simplest examples for the last case is adding the following comment before or at the end of the line you want to ignore.
// phpcs:ignore
PHPStan
PHPStan is a so-called static code analyzer tool that helps find/prevent bugs in your code.
To use PHPStan for Drupal, it needs to install phpstan-drupal extension alongside PHPStan itself and a couple of its addons. All required packages can be installed with Composer, and I recommend installing them locally per project, the same way as PHP_CodeSniffer.
Installing PHPStan stuff locally:
ddev composer require --dev "phpstan/phpstan" "phpstan/extension-installer" "phpstan/phpstan-deprecation-rules" "mglaman/phpstan-drupal"
PHPStan configuration
PHPStan configuration sits in the phpstan.neon file, which could be placed in the project root folder. Here is an example of the configuration which you can use as is:
parameters:
  level: 2
  paths:
    — web/modules/custom
    — web/themes/custom
  reportUnmatchedIgnoredErrors: false
  ignoreErrors:
    # new static() is a best practice in Drupal, so we cannot fix that.
    — "#^Unsafe usage of new static#"
This configuration will run code analysis for files in the "custom" modules and themes folder.
You can play with "level" value (allowed values are 0-10, higher means stricter), but even addressing level 1 issues is a good starting point.
PHPStan manual usage
Running analysis manually:
ddev exec phpstan
PHPStan configuration for PhpStorm
PhpStorm can run PHPStan analysis in the background and show notifications right in the code editor.
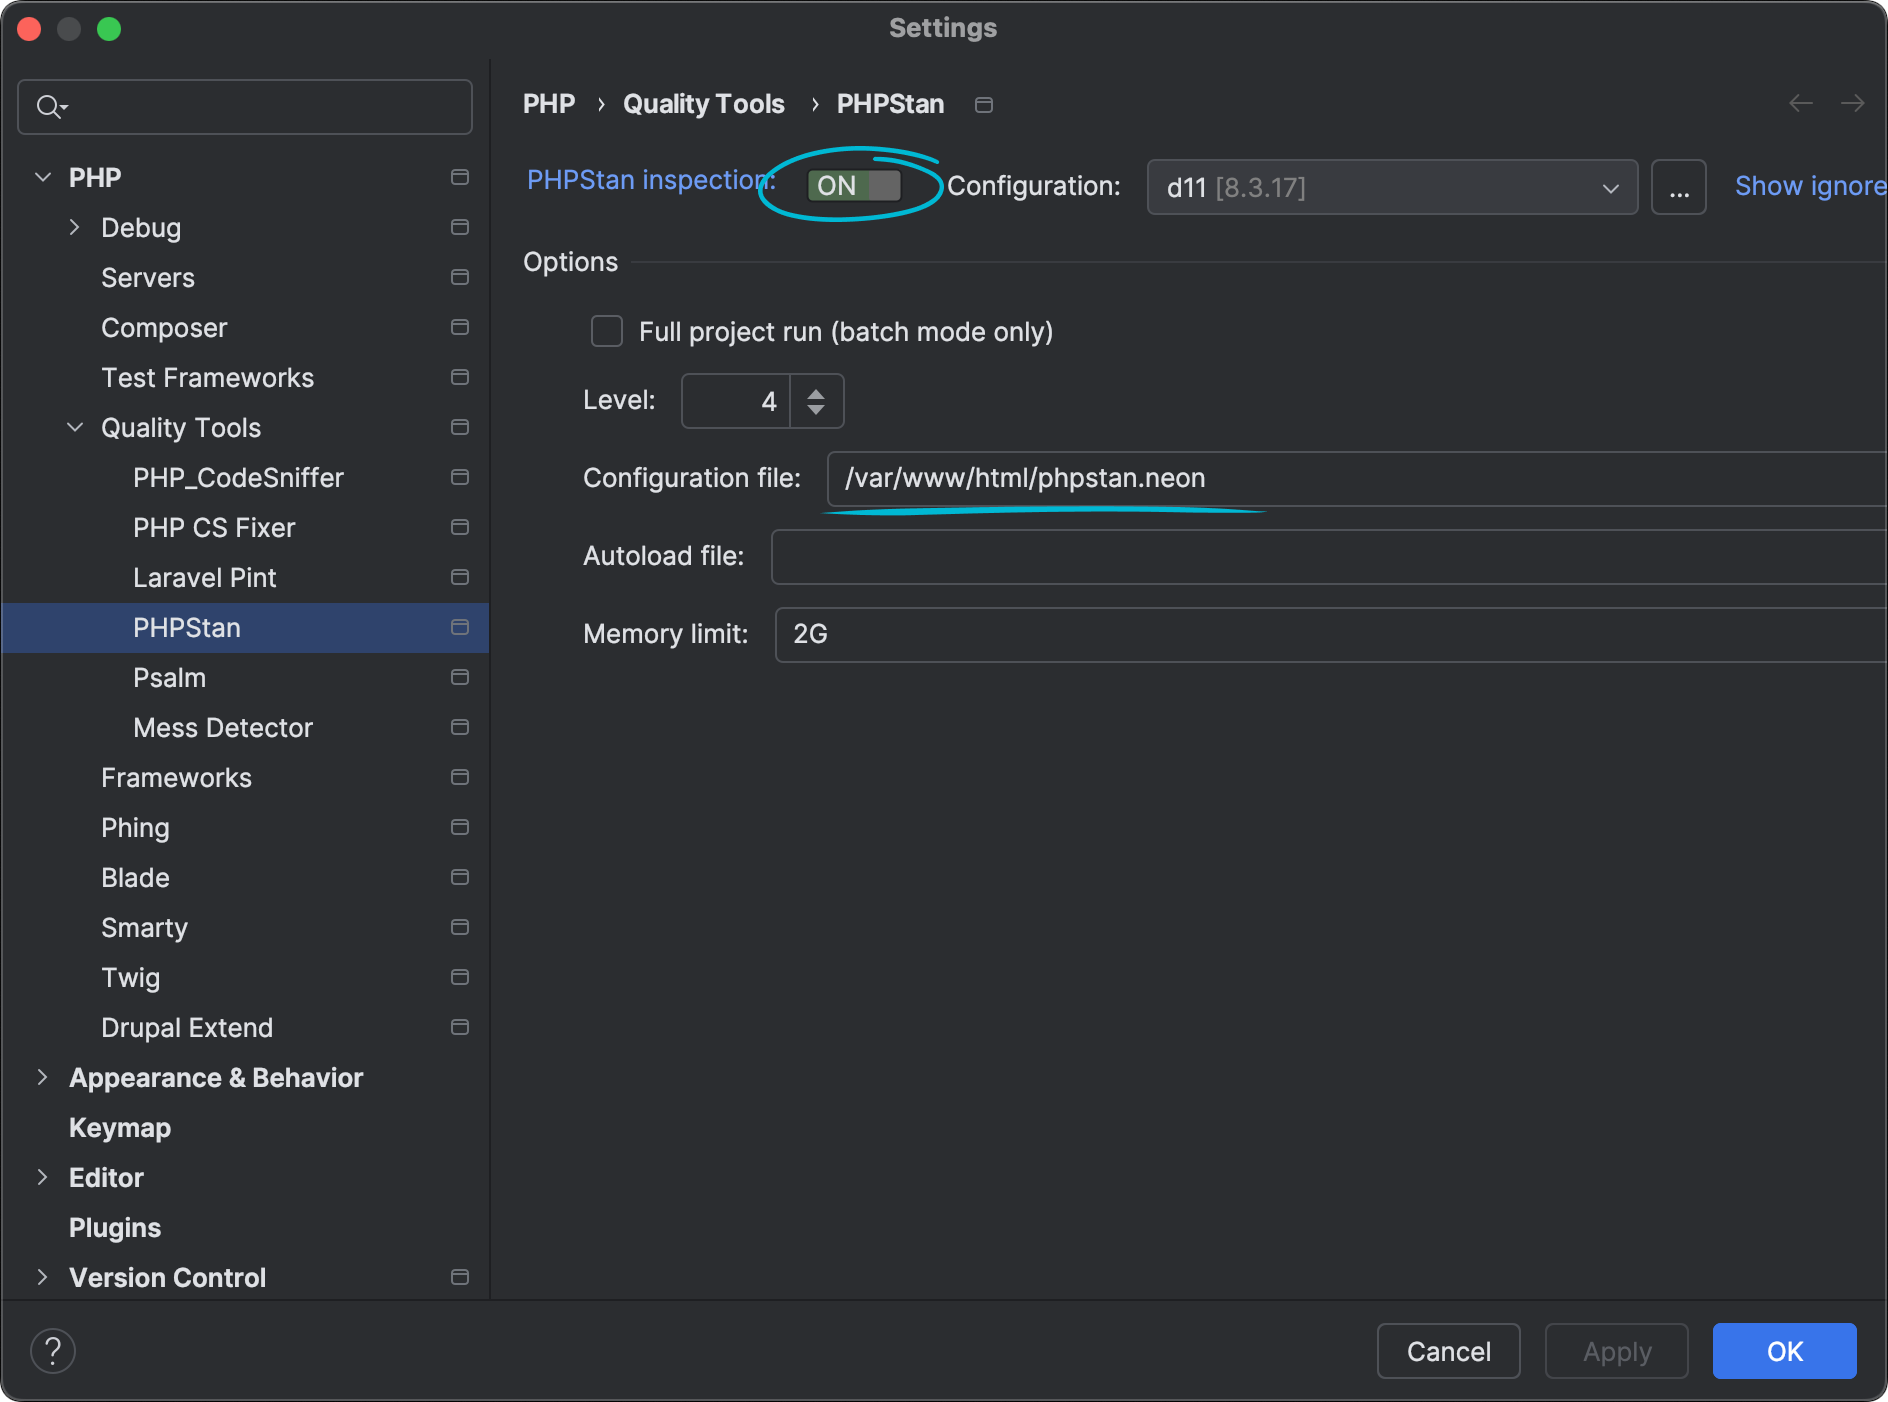
Go to Settings → PHP → Quality Tools → PHPStan, and configure the settings.
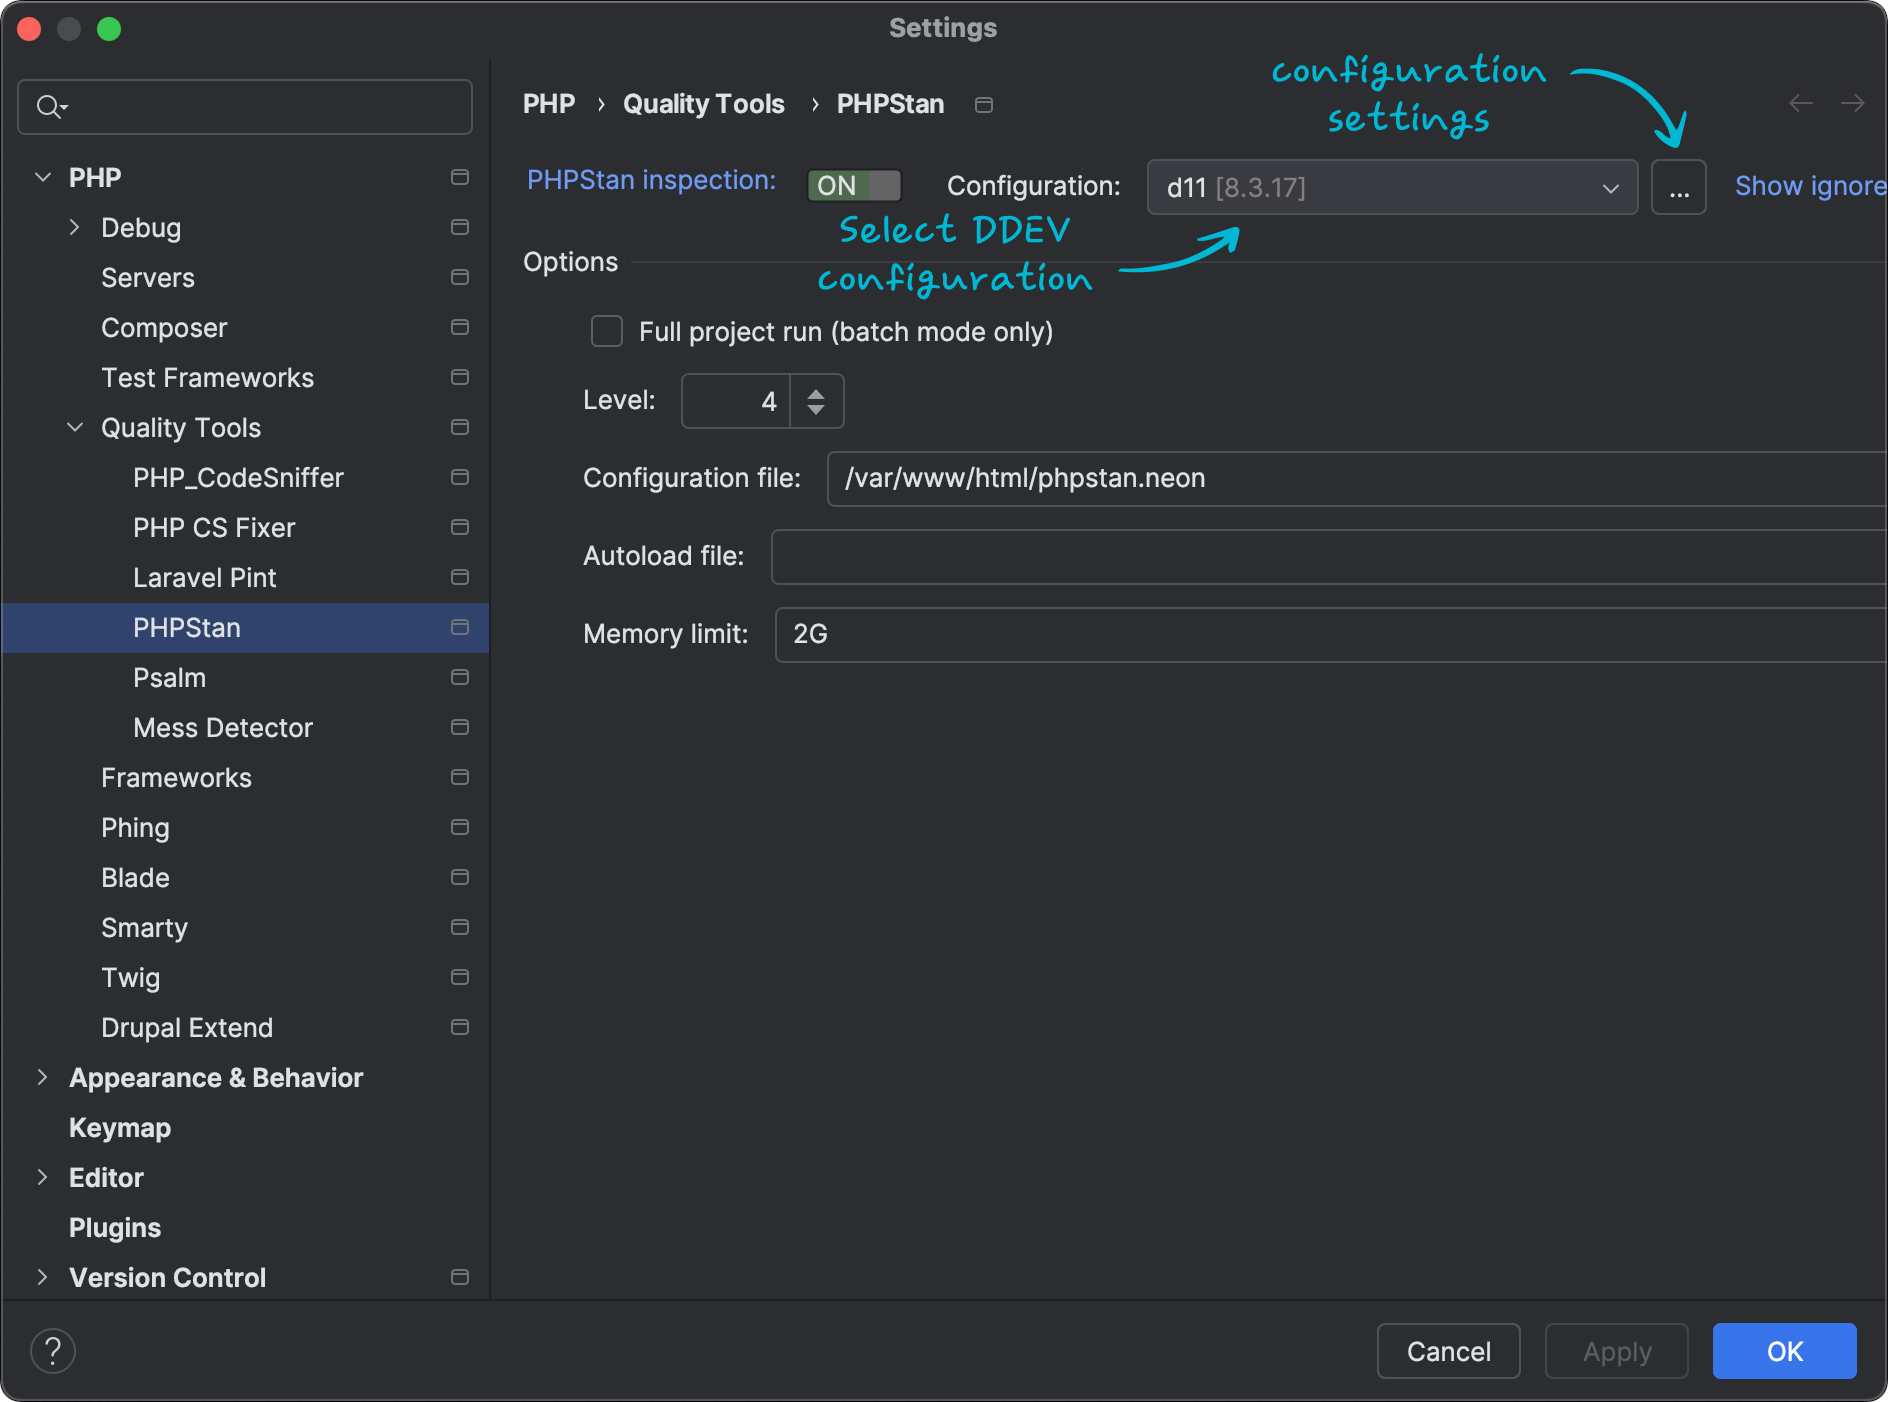 PHPStan settings in PhpStorm
First, select the right environment configuration (it should be the configuration that points to the DDEV container, created by the DDEV Integration plugin or manually), and click on the "..." button.
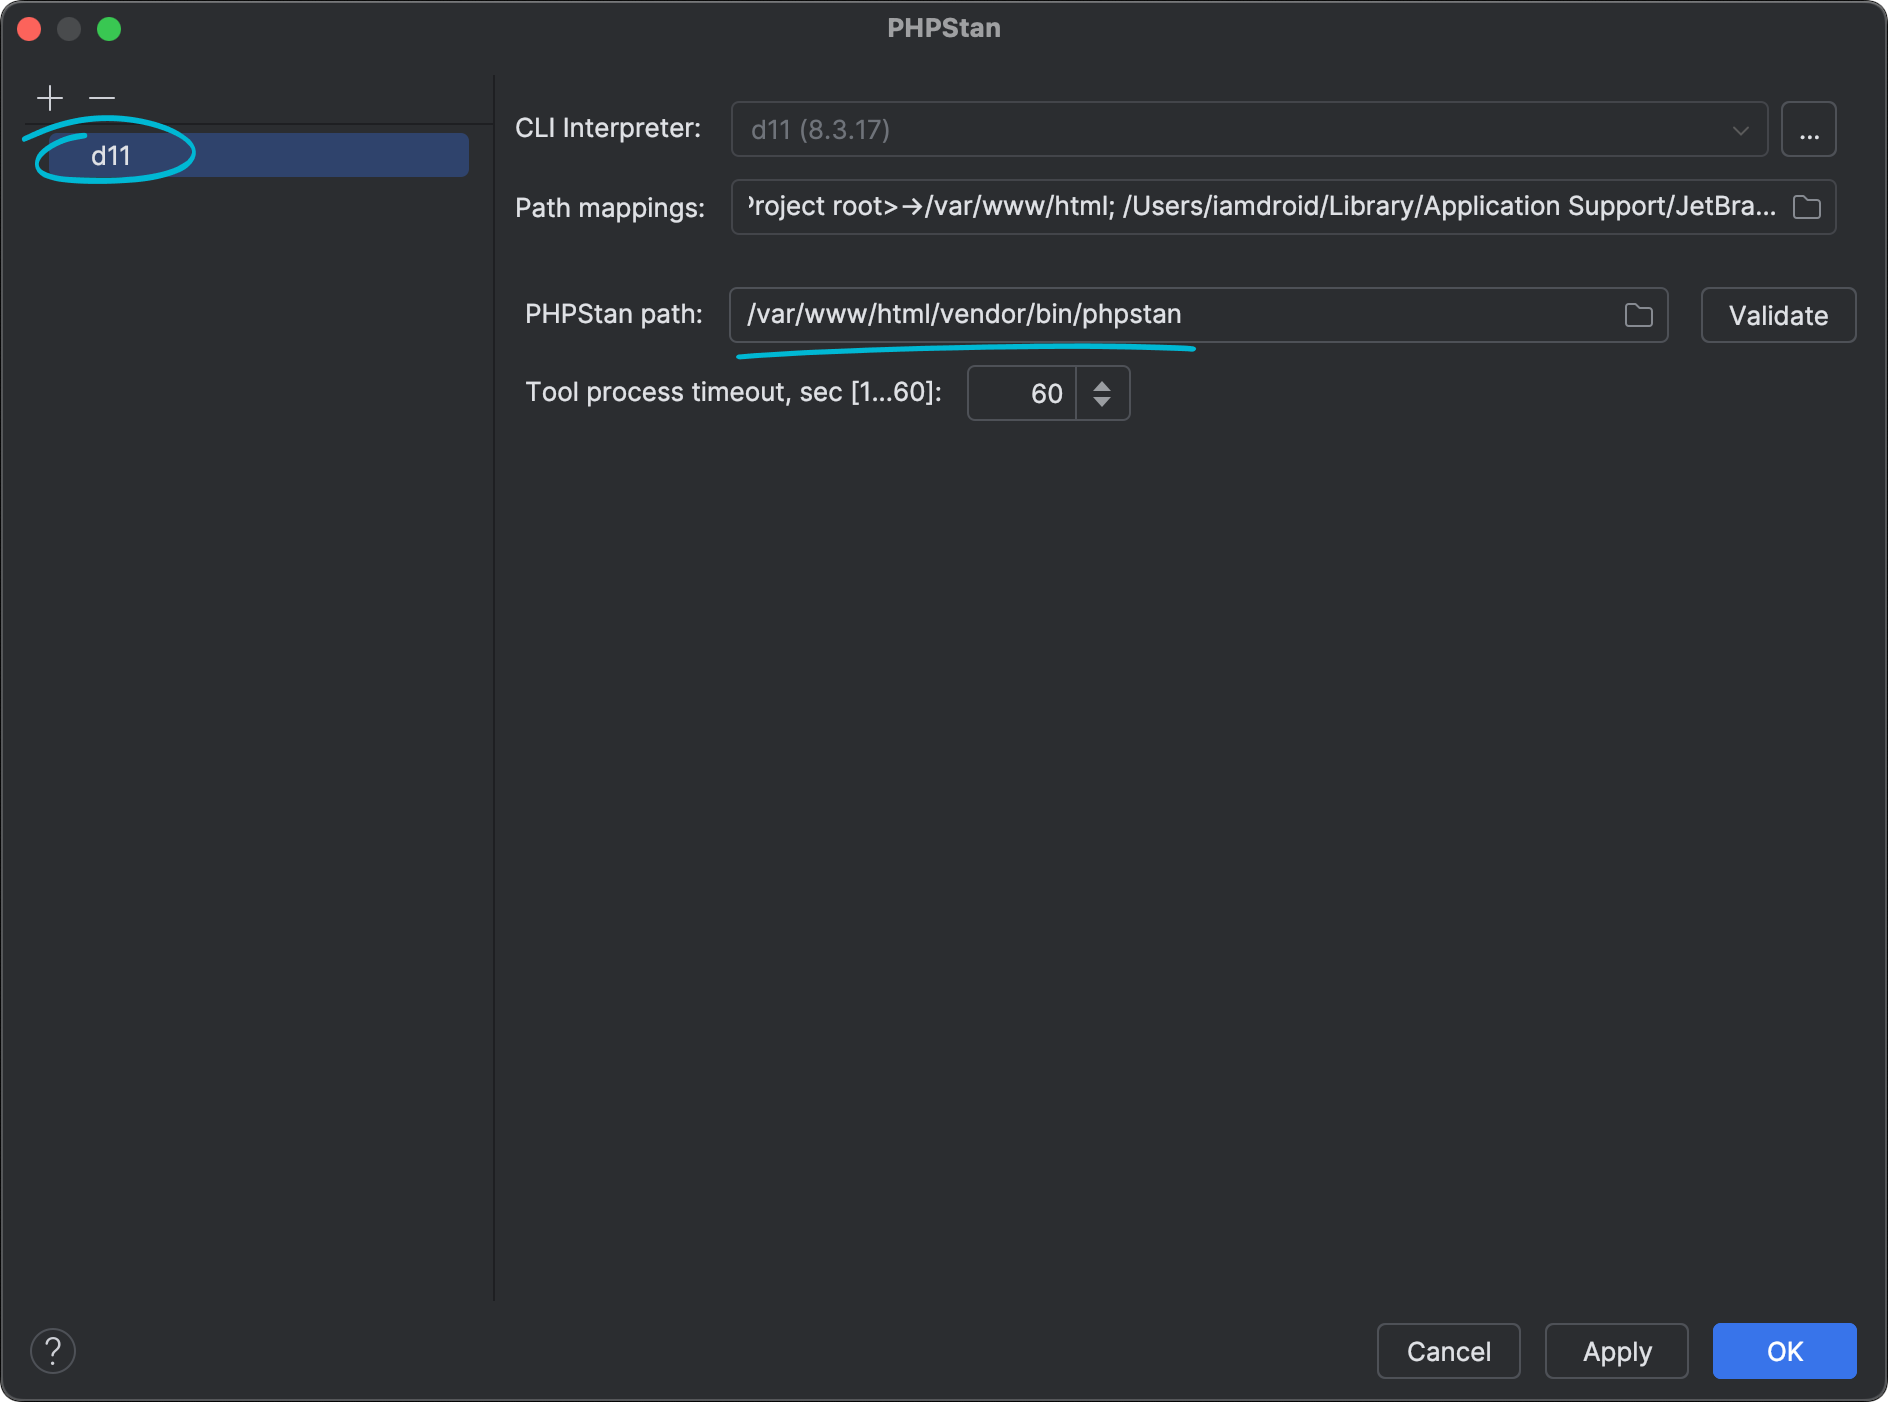 PHPStan configuration settings in PhpStorm
Select/add the right PHP CLI interpreter on the left side (feel free to remove the rest of them), and specify this value on the right side:
- "PHPStan path":
/var/www/html/vendor/bin/phpstan
Apply the settings to get back to the previous window.
 PHPStan settings in PhpStorm
Specify these settings:
- "Configuration file":
/var/www/html/phpstan.neon - Turn on "PHPStan inspection"
The "Level" setting is overridden by the value in the configuration file.
Ignoring PHPStan issues
Sometimes issues reported by PHPStan can't be fixed for some reason. If you don't want to see them, there are several options:
- Create a baseline file that will hold all the errors you want to ignore in your current codebase. See the documentation
- Ignore some checks globally. See the documentation
- Ignore specific code parts or lines. See the documentation
One of the simplest examples for the last case is adding the following comment before the line you want to ignore.
// @phpstan-ignore-next-line
JS/CSS/assets handling: Rspack
Alongside PHP code, Drupal development often involves attaching JavaScript, CSS styles, images, and other assets. Quite often, such assets need to be bundled, compiled, or processed somehow.
In this section, we will focus on handling assets and cover code quality in the next sections separately.
The typical tasks are:
- Sass/LESS compilation to CSS
- JS bundling
- Image optimization
- Sprite generation
- Minification
- Generating
.mapfiles - Watching files for changes and rebuilding in real-time.
There are multiple tools that provide such functionality. For a long time, I've used Gulp and webpack, and they were the great tools for their times. But for today, I recommend Rspack — a rising star in the JS community. It is designed as a replacement for webpack with a compatible API but lightning-fast speed.
In fact, Rspack is not a drop-in replacement for webpack, and there are some incompatibilities, mainly related to webpack plugins. But on the other hand, Rspack provides several built-in alternatives to incompatible plugins, and they play really nicely. The idea in general is the same, and most of the configurations are suitable for both tools. But Rspack performance is a huge advantage, so my choice is obvious.
Module/Theme structure
Unlike PHP tools, it is better to configure Rspack for each module or theme separately.
I am using this generic structure in my modules and themes:
-
MODULE_NAME— project/theme root folder-
assets— a common folder for assets that are referenced directly and shouldn't be processed (may contain subfoldersicons,images, etc.) -
config— Drupal configuration files -
docs— project documentation -
dist— a common folder for processed assets (may contain subfolderscss,js,images, etc.) -
fonts— self-hosted fonts -
icons— icon source files that should be processed (icon sprite generated) -
images— image source files (may contain subfolders) -
js— JavaScript/TypeScript source files -
node_modules— NPM dependencies -
scss— Sass source files -
src— PHP OOP code -
templates— Twig templates -
MODULE_NAME.info.yml— Drupal project definition file -
MODULE_NAME.libraries.yml— Drupal assets definition file -
MODULE_NAME.module— PHP functional code -
package.json— NPM project definition file
-
All folders apart from dist and node_modules are optional depending on project needs. Usually, the project root folder contains several other files, but I omitted them here for the sake of simplicity.
Having all generated code in a single dist folder is important, because it can be either excluded from the repository or the other way around — deployed with the version control system, depending on the presence of a building task in the deployment flow.
Rspack installation
DDEV has Node.js and NPM already installed in the web container, but calling NPM commands outside of the container during setup is not convenient because you will have to specify the working directory for each command. You can get into the container instead and execute commands directly without the ddev command:
ddev ssh
cd PATH_TO_MODULE
Initializing the NPM project:
npm init
Here is an example of starting a package.json file we need:
{
  "name": "MODULE_NAME",
  "version": "1.0.0",
  "description": "MODULE_DESCRIPTION",
  "type": "module",
  "author": "YOUR_NAME",
  "license": "ISC"
}
The key line here is "type": "module" which lets the NPM know that we are going to use ES modules.
Installing Rspack:
npm install -D @rspack/core @rspack/cli
Rspack Configuration
Rspack configuration sits in the rspack.config.js file, which should be placed in the module root folder. Here is a generic structure of the configuration file:
export default {
  entry: {
    // Entry points definition.
  },
  module: {
    rules: [
      // Handlers definition.
    ],
  },
  output: {
    // Result file settings.
  },
  // Other settings.
};
Basic example
As a basic example, let's create a configuration that processes JavaScript code for such a folder structure:
-
mymodule-
dist-
mymodule-lib.min.js
-
-
js-
components-
component1.js -
component2.js
-
-
lib-index.js
-
-
package.json -
rspack.config.js
-
Here is the content of the rspack.config.js file:
import path from 'node:path';

export default {
  entry: {
    'mymodule-lib': './js/lib-index.js',
  },
  module: {
    rules: [
      {
        test: /\.js?$/,
        exclude: [/node_modules/],
        loader: 'builtin:swc-loader',
        type: 'javascript/auto',
      },
    ],
  },
  output: {
    filename: '[name].min.js',
    path: path.resolve(process.cwd(), 'dist'),
  },
  devtool: false,
};
Rspack processes js/lib-index.js file and other files it imports (from components folder), combines them into a single bundle, and writes it into dist/mymodule-lib.min.js. The name of the resulting file is composed of the entry point name based on the pattern in output settings.
Let's add a build command to the scripts section of package.json:
"scripts": {
  "build": "rspack build"
},
Now we can build the JS bundle with this command:
npm run build
Watching files
Let's extend the basic configuration to support file watching and automatic rebuilding on changes. It is very handy during development.
Here is the content of the rspack.config.js file:
import path from 'node:path';

const config = {
  entry: {
    'mymodule-lib': './js/lib-index.js',
  },
  module: {
    rules: [
      {
        test: /\.js?$/,
        exclude: [/node_modules/],
        loader: 'builtin:swc-loader',
        type: 'javascript/auto',
      },
    ],
  },
  output: {
    clean: true,
    filename: '[name].min.js',
    path: path.resolve(process.cwd(), 'dist'),
  },
  devtool: false,
};

export default function (env, argv) {
  if (argv.mode === 'development') {
    config.devtool = 'source-map';
    config.watch = true;
  }

  return config;
}
In this configuration, SourceMap files (.map) are generated only in development mode.
And here is the updated scripts section of package.json:
"scripts": {
  "build": "rspack build --mode production",
  "watch": "rspack build --mode development"
},
Now we can watch file changes with this command:
npm run watch
Multiple configurations
In some cases, you may need to have two different configurations.
For example, one library/file should be bundled for use in the browser and another file for Node.js (for example, a websocket server).
Rspack supports an array of configurations to be returned from rspack.config.js.
const config = [
  {
    // The first configuration.
    // The default target is 'web'.
    entry: {
      // Entry points definition.
    },
    // Other settings.
  },
  {
    // The second configuration.
    target: 'node',
    entry: {
      // Entry points definition.
    },
    // Other settings.
  },
];

export default function (env, argv) {
  if (argv.mode === 'development') {
    // Mode modifications.
  }

  return config;
}
If you need to output bundles from both configurations into the same dist folder, you can't use the clean: true option in the output section.
But you can clean up the dist folder with the rm command before each building.
Here are the corresponding commands in the scripts section of package.json:
"scripts": {
  "dist-clean": "rm ./dist/*",
  "rspack-build": "rspack build --mode production",
  "rspack-watch": "rspack build --mode development",
  "build": "npm run dist-clean && npm run rspack-build",
  "watch": "npm run dist-clean && npm run rspack-watch",
},
TypeScript compilation
SWC loader built into Rspack supports TypeScript compilation out of the box, but we need to install the TypeScript package itself:
npm install -D typescript
If your library is based on React, you may also need to install these packages:
npm install -D @types/react @types/react-dom
TypeScript configuration sits in the tsconfig.json file, which should be placed in the module root folder. Here is an example of the configuration, but most likely you need to adjust it according to your project needs.
{
  "compilerOptions": {
    "outDir": "./dist/",
    "sourceMap": true,
    "strict": true,
    "module": "es6",
    "target": "es6",
    "jsx": "react",
    "allowJs": true,
    "moduleResolution": "node"
  }
}
Here are related properties of the configuration object in rspack.config.js:
const config = {
  entry: {
    // Entry points definition.
  },
  module: {
    rules: [
      {
        test: /\.tsx?$/,
        exclude: [/node_modules/],
        loader: 'builtin:swc-loader',
        options: {
          jsc: {
            parser: {
              syntax: 'typescript',
              tsx: true,
            },
          },
        },
        type: 'javascript/auto',
      },
    ],
  },
  resolve: {
    extensions: ['.tsx', '.ts', '.js'],
  },
  // Other settings.
};
Sass compilation
Rspack has a built-in Lightning CSS loader that can handle CSS files out of the box. But if you need to compile Sass files, the CSS loader has to be chained with the Sass loader.
Installing corresponding dependencies:
npm install -D sass-loader sass-embedded
Let's create a configuration that processes JavaScript code and Sass styles for such a folder structure:
-
mymodule-
dist-
mymodule-lib.min.js -
mymodule-lib.min.css
-
-
js-
lib-index.js
-
-
scss-
components-
component1.scss -
component2.scss
-
-
lib-styles.scss
-
-
package.json -
rspack.config.js
-
Here are related properties of the configuration object in rspack.config.js:
const config = {
  entry: {
    'mymodule-lib': ['./js/lib-index.js', './scss/lib-styles.scss'],
  },
  module: {
    rules: [
      {
        test: /\.js?$/,
        exclude: [/node_modules/],
        loader: 'builtin:swc-loader',
        type: 'javascript/auto',
      },
      {
        test: /\.(sass|scss)$/,
        use: [
          {
            loader: 'builtin:lightningcss-loader',
            options: {
              targets: ['chrome >= 100', '> 5%'],
            },
          },
          {
            loader: 'sass-loader',
            options: {
              // Using `modern-compiler` and `sass-embedded` together significantly improve build performance.
              api: 'modern-compiler',
              implementation: 'sass-embedded',
              webpackImporter: false,
            },
          },
        ],
        type: 'css/auto',
      },
    ],
  },
  output: {
    clean: true,
    filename: '[name].min.js',
    cssFilename: '[name].min.css',
    path: path.resolve(process.cwd(), 'dist'),
  },
  experiments: {
    css: true,
  },
  // Other settings.
};
Similar to handling JavaScript, Rspack processes the scss/lib-styles.scss file and other files it imports (from the components folder), combines them into a single bundle, and writes it into dist/mymodule-lib.min.css. The name of the resulting file is composed from the entry point name based on the pattern in output settings (cssFilename property).
Handling assets
From my experience, I can remember several possible scenarios of handling assets and their combinations:
- No processing required, files referenced directly in their locations and don't need to be copy-pasted into
distfolder (fonts, images, which are already optimized, etc.) - No processing required, but files need to be copy-pasted into the
distfolder - Processing required and processed files need to be placed into the
distfolder - Assets not referenced in JS or styles, but have to be processed and placed into the
distfolder
Here is the configuration for the case when no processing is required and files are served from original locations:
const config = {
  module: {
    rules: [
      {
        test: /\.(png|jpg|jpeg|webp|svg)$/,
        type: 'asset/resource',
        generator: {
          // Do not emit file, since source assets are used.
          emit: false,
        },
      },
    ],
  },
  output: {
    // Use path to the source file for assets.
    assetModuleFilename: '../[file]',
    // Other settings.
  },
  // Other settings.
};
Here is the configuration for the case when no processing is required but files need to be copy-pasted into the dist folder:
const config = {
  module: {
    rules: [
      {
        test: /\.(png|jpg|jpeg|webp|svg)$/,
        type: 'asset/resource',
      },
    ],
  },
  output: {
    // The path to asset source will be reflected in the 'dist' folder.
    // For example, for the file at 'images/bg.jpg' the copy at 'dist/images/bg.jpg' will be created,
    // and new path will be used in JS and styles.
    assetModuleFilename: '[file]',
    // Other settings.
  },
  // Other settings.
};
I will not provide the configuration for the case when files need to be processed, but you can find some hints in Rspack documentation and apply it to the previous example.
Here is the configuration for the mixed case when some assets need to be served from original locations and other ones from the dist folder:
const config = {
  module: {
    rules: [
      {
        test: /\.(png|jpg|jpeg|webp|svg)$/,
        exclude: [/fonts\/.*$/, /icons\/.*$/],
        type: 'asset/resource',
      },
      {
        // Using font files and icons directly from their folders without duplicating them to the `dist` folder.
        test: [/fonts\/.*$/, /icons\/.*$/],
        type: 'asset/resource',
        generator: {
          emit: false,
          filename: '../[file]',
        },
      },
    ],
  },
  output: {
    // The path to asset source will be reflected in the 'dist' folder.
    // For example, for the file at 'images/bg.jpg' the copy at 'dist/images/bg.jpg' will be created,
    // and new path will be used in JS and styles.
    assetModuleFilename: '[file]',
    // Other settings.
  },
  // Other settings.
};
Unlike classic building tools like Gulp and Grunt, Rspack (and webpack) don't scan all files in the folder. Instead, it starts from the entry point file and processes all the imported or referenced files. Defined patterns just tell the Rspack how to deal with files it encounters. Even if it seems a practical approach, sometimes you may need to process files not referenced in JS or styles.
For such a case, I am using an additional entry point js/assets.js that literally references all the files in the folder:
// This file required only for handling assets building.
// It shouldn't be included on the page.

// Helper function for handling assets in Webpack/Rspack.
const requireAll = r => {
  r.keys().forEach(r);
};

// Handling images for optimization in Webpack/Rspack.
requireAll(require.context('../images/', true, /\.(png|jpg|jpeg|webp|svg)$/));
Here is the related configuration:
const config = {
  entry: {
    // Imports all images for handling by Rspack.
    assets: './js/assets.js',
    // Other entry points.
  },
  module: {
    rules: [
      {
        test: /\.(png|jpg|jpeg|webp|svg)$/,
        type: 'asset/resource',
      },
    ],
  },
  output: {
    // The path to asset source will be reflected in the 'dist' folder.
    // For example, for the file at 'images/bg.jpg' the copy at 'dist/images/bg.jpg' will be created,
    // and new path will be used in JS and styles.
    assetModuleFilename: '[file]',
    // Other settings.
  },
  // Other settings.
};
But here we will face another peculiarity of Rspack (and webpack). It generates bundles for each entry point by default, and there is no built-in way to not do this when we don't need it. We solve this issue in the next section.
Handling unnecessary bundles
There can be cases when you may not need to generate a JS bundle.
The most obvious one is when you need to handle a library that doesn't contain JS code but only styles.
Another example is the case above — a service file for handling assets, which is needed only for the building process.
I didn't find an elegant way to not generate the bundle in Rspack.
For webpack, there is a plugin suppress-chunks-webpack-plugin which is designed to address this issue, but it is quite outdated and doesn't work for recent versions of webpack and any version of Rspack.
I followed the same approach and created my own version of this plugin that works for Rspack.
For simplicity, I put it directly in rspack.config.js, file, right above the configuration.
// Rspack version of 'suppress-chunks-webpack-plugin'.
class RspackSuppressChunksPlugin {
  constructor(chunks) {
    this.chunks = chunks;
  }

  apply(compiler) {
    // Hook into the compilation process.
    compiler.hooks.thisCompilation.tap('RspackSuppressChunksPlugin', compilation => {
      // Use the processAssets hook to remove assets at the appropriate stage.
      compilation.hooks.processAssets.tap(
        {
          name: 'RspackSuppressChunksPlugin',
          // PROCESS_ASSETS_STAGE_SUMMARIZE is a common stage for this type of work.
          stage: compiler.webpack.Compilation.PROCESS_ASSETS_STAGE_SUMMARIZE,
        },
        () => {
          this.chunks.forEach(chunkConfig => {
            const chunkName = typeof chunkConfig === 'string' ? chunkConfig : chunkConfig.name;
            const matchPattern = typeof chunkConfig === 'string' ? null : chunkConfig.match;
            const chunk = compilation.namedChunks.get(chunkName);
            if (chunk) {
              for (const file of chunk.files) {
                if (matchPattern) {
                  if (matchPattern.test(file)) {
                    delete compilation.assets[file];
                  }
                } else {
                  delete compilation.assets[file];
                }
              }
            }
          });
        },
      );
    });
  }
}

const config = {
  entry: {
    'mymodule-lib': ['./js/lib-index.js', './scss/lib-styles.scss'],
    // Imports all images for handling by Rspack.
    assets: './js/assets.js',
    // CSS only entries (without JS part).
    fonts: './scss/fonts.scss',
  },
  module: {
    rules: [
      // Handlers definition.
    ],
  },
  output: {
    clean: true,
    filename: '[name].min.js',
    cssFilename: '[name].min.css',
    path: path.resolve(process.cwd(), 'dist'),
  },
  plugins: [
    new RspackSuppressChunksPlugin([
      'assets',
      { name: 'fonts', match: /\.js$/ },
    ]),
  ],
  // Other settings.
};
In this example, the bundle generated for the assets entry point is removed completely, and for the fonts entry point, only the part that matches the pattern (JS bundle) is removed.
Handling Drupal JavaScript API
Writing large JS libraries which include dozens of files is not the often case in Drupal development. Instead, in Drupal themes and modules, we often need to add relatively small pieces of JS written in a single file that utilize Drupal JavaScript API and packed in Drupal.behaviors.
The examples provided above don't play nice with this approach because Rspack modifies JS code and wraps it in additional structures during the bundling. This is absolutely fine for standalone JS libraries or libraries based on JavaScript frameworks such as React. But for pure Drupal libraries, we don't need bundling. It is still better to process the JS code for proper assets linking and minification, but not the other bundling stuff.
For such a case, we can use asset/resource handling type for JS files instead of javascript/auto. Here is the configuration:
const config = {
  entry: {
    'mymodule-lib': ['./js/lib-index.js', './scss/lib-styles.scss'],
  },
  module: {
    rules: [
      {
        // Passing JS files as assets instead of bundling them.
        // JS files for Drupal theme should follow Drupal JS API and don't need to be bundled.
        // Bundling may lead to issues with functions visibility.
        test: /\.js$/,
        exclude: [/node_modules/],
        type: 'asset/resource',
        generator: {
          // The name of target JS file.
          filename: '[name].min.js',
        },
      },
      // Other handlers definition.
    ],
  },
  output: {
    clean: true,
    // Despite JS files passed as assets, Rspack still process them and outputs processed files as well.
    // Setting the name for processed JS files to remove them by RspackSuppressChunksPlugin.
    filename: '[name].bundled.js',
    cssFilename: '[name].min.css',
    path: path.resolve(process.cwd(), 'dist'),
  },
  plugins: [
    new RspackSuppressChunksPlugin([
      { name: 'mymodule-lib', match: /bundled\.js$/ },
    ]),
  ],
  // Other settings.
};
Because of Rspack's "bundling nature", it still generates the bundle files even if we declared JS code as assets.
But we can get rid of them with our suppress chunk plugin.
One more example for the case when you need to combine both approaches, with bundling and without:
const config = {
  entry: {
    'mymodule-lib': ['./js/lib-index.js', './scss/lib-styles.scss'],
    // Imports all images for handling by Rspack.
    assets: './js/assets.js',
  },
  module: {
    rules: [
      {
        // Passing JS files as assets instead of bundling them.
        // JS files for Drupal theme should follow Drupal JS API and don't need to be bundled.
        // Bundling may lead to issues with functions visibility.
        test: /\.js$/,
        exclude: [/node_modules/, /assets\.js/],
        type: 'asset/resource',
        generator: {
          // The name of target JS file.
          filename: 'js/[name].min.js'
        },
      },
      {
        // Handling 'assets.js' separately, since 'asset/resource' can't be removed by RspackSuppressChunksPlugin.
        test: /assets\.js$/,
        exclude: [/node_modules/],
        loader: 'builtin:swc-loader',
        options: {
          jsc: {
            target: 'es2015',
          },
        },
        type: 'javascript/auto',
      },
      // Other handlers definition.
    ],
  },
  output: {
    clean: true,
    // Despite JS files passed as assets, Rspack still process them and outputs processed files as well.
    // Setting the name for processed JS files to remove them by RspackSuppressChunksPlugin.
    filename: '[name].bundled.js',
    cssFilename: '[name].min.css',
    path: path.resolve(process.cwd(), 'dist'),
  },
  plugins: [
    new RspackSuppressChunksPlugin([
      { name: 'mymodule-lib', match: /bundled\.js$/ },
      'assets',
    ]),
  ],
  // Other settings.
};
Handling SVG icon sprite generation
I am a big fan of using SVG icons from SVG sprite, like this <svg><use xlink:href="#icon_id"></use></svg>. I believe it is the most flexible and efficient way that allows keeping control over icon properties and is still quite handy for everyday usage.
There is an SVG sprite loader for webpack, which I used to use for such cases, but unfortunately, it is not working with Rspack.
I didn't find a way to generate an SVG sprite with Rspack, but did find an alternative solution based on svg-sprite tool.
Installing the package:
npm install -D svg-sprite
The svg-sprite configuration sits in the svg-sprite.config.json file, which could be placed in the module root folder. Here is an example of the configuration which you can use as is:
{
  "mode": {
    "symbol": {
      "dest": "dist",
      "sprite": "icons.svg"
    }
  },
  "shape": {
    "id": {
      "separator": ""
    }
  },
  "svg": {
    "xmlDeclaration": false
  }
}
If you need to output a sprite file into the dist folder, you can't use the clean: true option in the output section of rspack.config.js. But as in the case with multiple Rspack configurations, you can run the necessary commands before each build.
Here are the corresponding commands in the scripts section of package.json:
"scripts": {
  "dist-clean": "rm -rf ./dist/*",
  "sprite-check": "if [ $(find ./icons -name \"*.svg\" | wc -l) -gt 0 ]; then echo \"true\"; else echo \"false\"; fi",
  "sprite-build": "if [ $(npm run --silent sprite-check) = \"true\" ]; then npx svg-sprite --config svg-sprite.config.json ./icons/*.svg; else echo \"No SVG files found, skipping sprite generation\"; fi"
  "rspack-build": "rspack build --mode production",
  "rspack-watch": "rspack build --mode development",
  "build": "npm run dist-clean && npm run sprite-build && npm run rspack-build",
  "watch": "npm run dist-clean && npm run sprite-build && npm run rspack-watch",
},
The sprite-build command runs the svg-sprite tool for all SVG files in the icons folder with respect to the prepared configuration file.
This command is triggered before each build/watch command, as well as an additional check for SVG icons' presence in the icons folder.
Rspack manual usage
Running the building outside the container:
ddev npm run build --silent --prefix web/modules/custom/MODULE_NAME
Running the file watching outside the container:
ddev npm run watch --silent --prefix web/modules/custom/MODULE_NAME
Rspack task configuration for PhpStorm
PhpStorm can help you simplify running Rspack tasks.
Go to Run → Edit Configurations..., click on the "+" button at the top left corner, select "Shell Script", and configure the script.
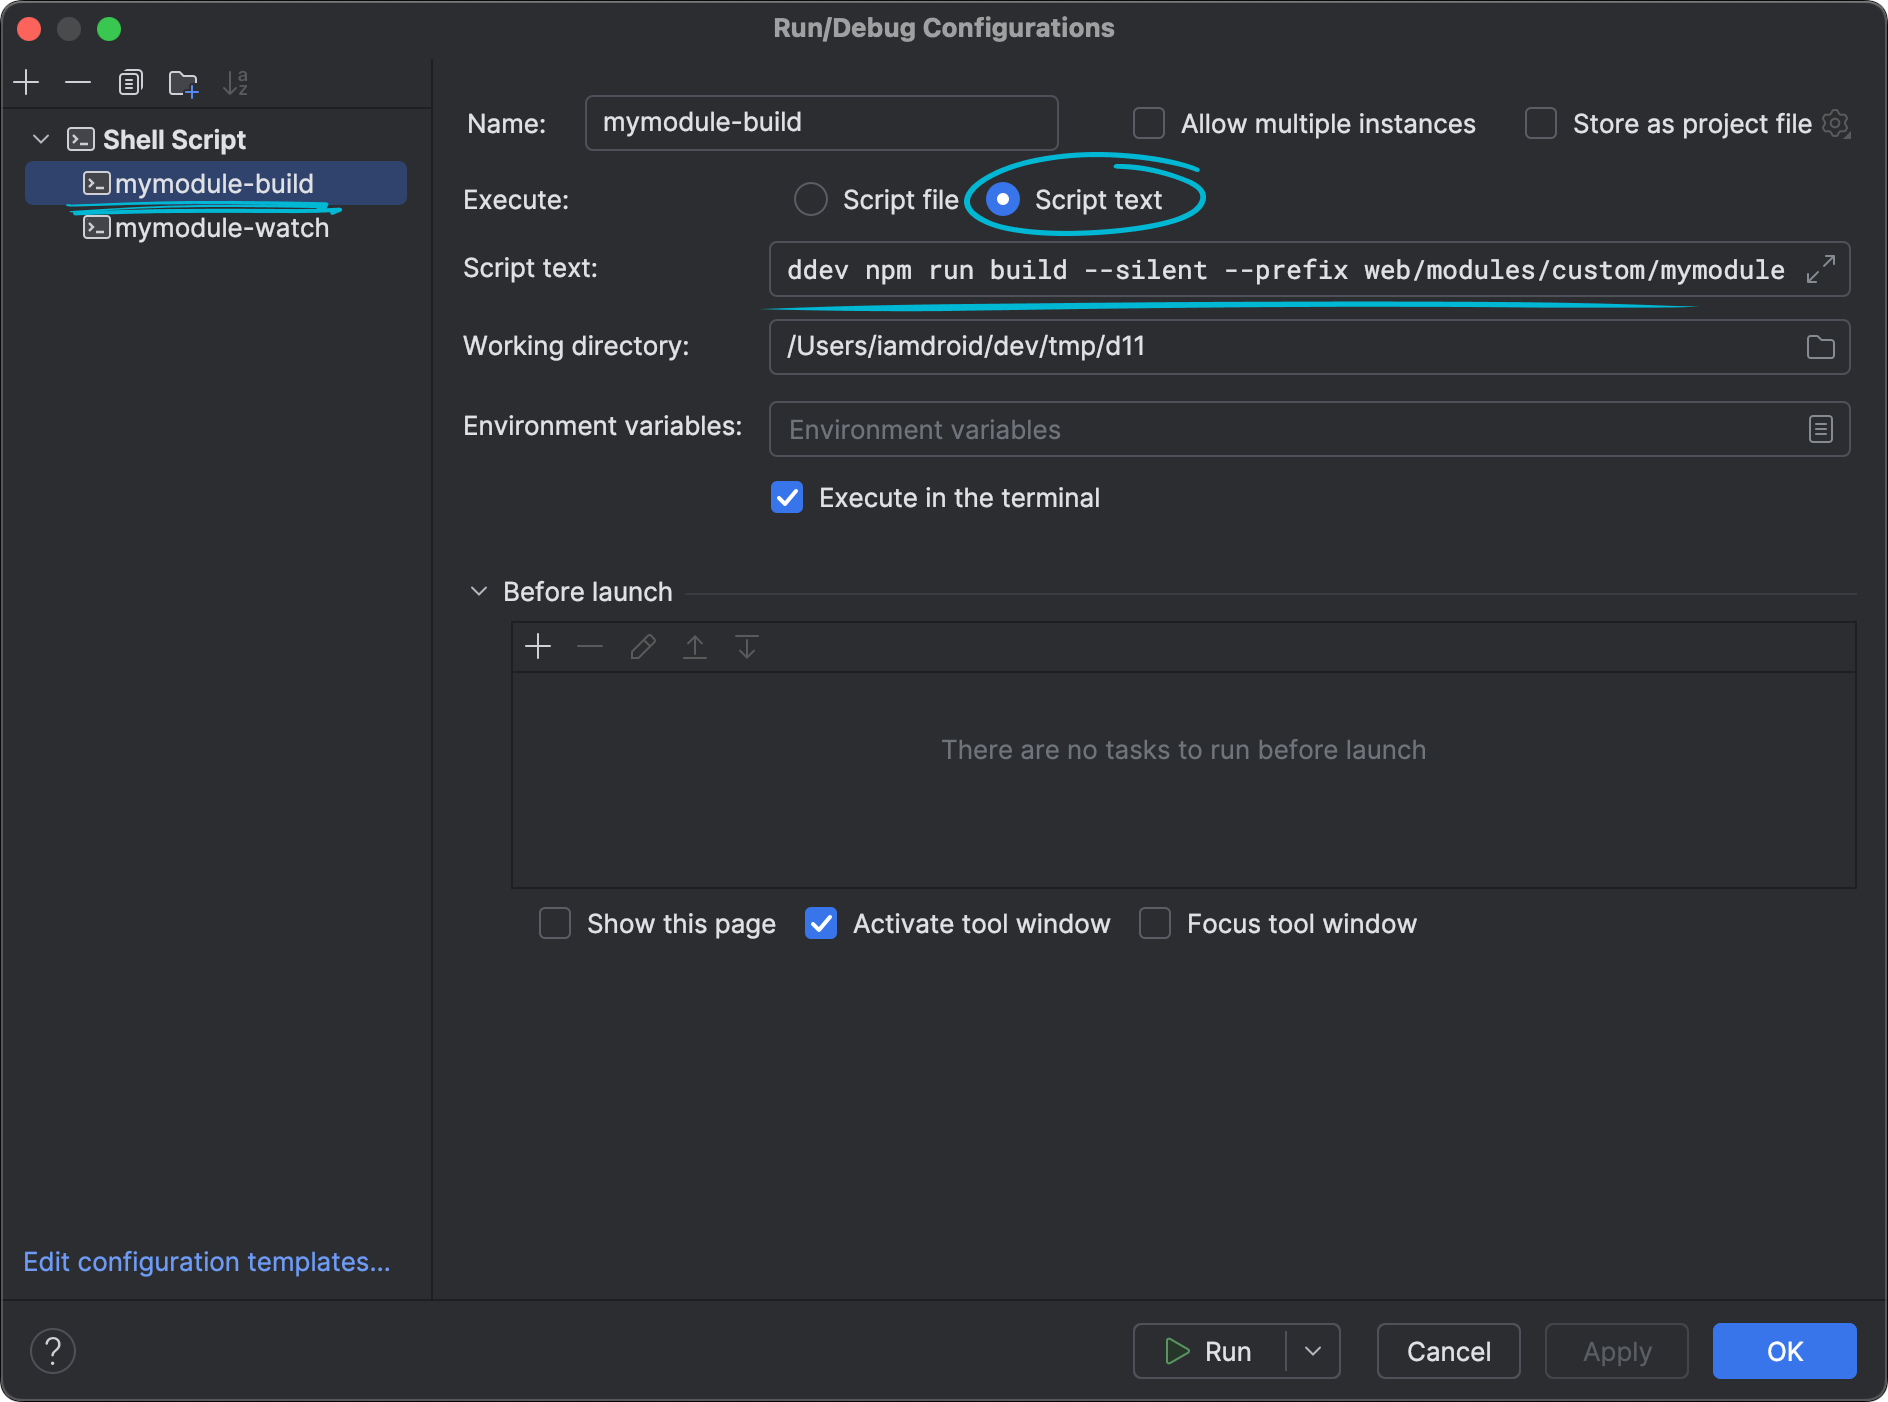 Run Configurations settings in PhpStorm
Now you can run Rspack build/watch tasks via the "Run" menu or from the Run widget on the toolbar.
JS/TS code quality: ESLint and Prettier
Alongside PHP, the quality of JavaScript and TypeScript code is also essential for the same reasons.
The most popular tool for finding and fixing problems in JavaScript/TypeScript code is ESLint. A good companion that is often used in pairs with ESLint is a code formatting tool Prettier.
Both tools are provided as NPM packages, and it is better to install them for each module or theme separately, the same way as Rspack.
Installing tools and necessary dependencies (from the inside of the DDEV container):
npm install -D eslint @eslint/js prettier eslint-plugin-prettier eslint-config-prettier globals
ESLint and Prettier configuration
ESLint configuration sits in the eslint.config.js file, which could be placed in the module root folder. Here is an example of the configuration for the Drupal JavaScript API library, which you can use as is:
import globals from 'globals';
import eslint from '@eslint/js';
import pluginPrettierRecommended from 'eslint-plugin-prettier/recommended';

export default [
  { files: ['**/*.{js,mjs,cjs,jsx}'] },
  {
    ignores: ['dist/', 'src/', 'scss/', '**/node_modules/', 'rspack.config.js'],
  },
  {
    languageOptions: {
      globals: {
        ...globals.browser,
        Drupal: true,
        drupalSettings: true,
        once: true,
      },
    },
  },
  eslint.configs.recommended,
  pluginPrettierRecommended,
];
Prettier configuration sits in the .prettierrc file, which could be placed in the module root folder. Here is an example of the configuration. Feel free to adjust it according to your team standards.
{
  "semi": true,
  "singleQuote": true,
  "arrowParens": "avoid",
  "printWidth": 120
}
Additionally, you may need to create one more configuration file .prettierignore with the following content for excluding files from the dist folder from being formatted:
dist/
And here are package.json scripts for running linting and formatting tasks.
"scripts": {
  "eslint": "eslint .",
  "eslint-fix": "eslint --fix .",
  "format": "prettier --write \"**/*.+(js|cjs|mjs|jsx|json)\"",
},
ESLint configuration for React
If your library is based on React, it needs to install a few additional dependencies:
npm install -D eslint-plugin-react eslint-plugin-react-hooks
Here is an example of the configuration for a React-based library, which you can use as is:
import globals from 'globals';
import eslint from '@eslint/js';
import pluginReact from 'eslint-plugin-react';
import pluginReactHooks from 'eslint-plugin-react-hooks';
import pluginPrettierRecommended from 'eslint-plugin-prettier/recommended';

export default [
  { files: ['**/*.{js,mjs,cjs,jsx,json}'] },
  { ignores: ['dist/', 'src/', 'scss/', '**/node_modules/', 'rspack.config.js'] },
  {
    languageOptions: {
      globals: globals.browser,
    },
    settings: {
      react: {
        version: 'detect',
      },
    },
  },
  eslint.configs.recommended,
  pluginReact.configs.flat['jsx-runtime'],
  pluginReact.configs.flat.recommended,
  {
    plugins: {
      'react-hooks': pluginReactHooks,
    },
    rules: {
      'react/react-in-jsx-scope': 'off',
      ...pluginReactHooks.configs.recommended.rules,
    },
  },
  pluginPrettierRecommended,
];
ESLint configuration for TypeScript
For linting TypeScript files, it needs to install one more dependency:
npm install -D typescript-eslint
Here is an example of the configuration for a TypeScript library based on React, which you can use as is:
import globals from 'globals';
import eslint from '@eslint/js';
import tseslint from 'typescript-eslint';
import pluginReact from 'eslint-plugin-react';
import pluginReactHooks from 'eslint-plugin-react-hooks';
import pluginPrettierRecommended from 'eslint-plugin-prettier/recommended';

export default [
  { files: ['**/*.{js,mjs,cjs,ts,jsx,tsx,json}'] },
  { ignores: ['dist/', 'src/', 'scss/', '**/node_modules/', 'rspack.config.js'] },
  {
    languageOptions: {
      globals: globals.browser,
    },
    settings: {
      react: {
        version: 'detect',
      },
    },
  },
  eslint.configs.recommended,
  ...tseslint.configs.strict,
  pluginReact.configs.flat['jsx-runtime'],
  pluginReact.configs.flat.recommended,
  {
    plugins: {
      'react-hooks': pluginReactHooks,
    },
    rules: {
      'react/react-in-jsx-scope': 'off',
      ...pluginReactHooks.configs.recommended.rules,
    },
  },
  pluginPrettierRecommended,
];
And here is the updated package.json script for formatting files.
"scripts": {
  "format": "prettier --write \"**/*.+(js|cjs|mjs|ts|jsx|tsx|json)\"",
},
ESLint and Prettier manual usage
Running the linting outside the container:
ddev npm run eslint --silent --prefix web/modules/custom/MODULE_NAME
Running the error fixing outside the container:
ddev npm run eslint-fix --silent --prefix web/modules/custom/MODULE_NAME
Running the code formatting outside the container:
ddev npm run format --silent --prefix web/modules/custom/MODULE_NAME
ESLint and Prettier configuration for PhpStorm
PhpStorm can run linting and formatting checks in the background and show notifications right in the code editor.
But unlike the PHP interpreter, unfortunately, we can't use the Node interpreter from the DDEV container, at least at the moment of writing. For the PHP interpreter, there is a setting to connect to the existing container without creating a new one, which is currently missing for the Node interpreter. This is the reason why I recommended unticking "NodeJs interpreter" checkbox in the DDEV Integration plugin settings.
We still can spin up another custom Docker container and do all the job there, but I prefer a simple way — utilize the Node.js installed locally.
If you don't have Node.js already installed, here is the documentation on how to do it.
Ideally, to install Node.js with NVM and pick the major version same as in the DDEV container.
First, let's configure Node.js itself. Go to Settings → Languages & Frameworks → Node.js, and select/add for "Node interpreter" the Node.js installed locally.
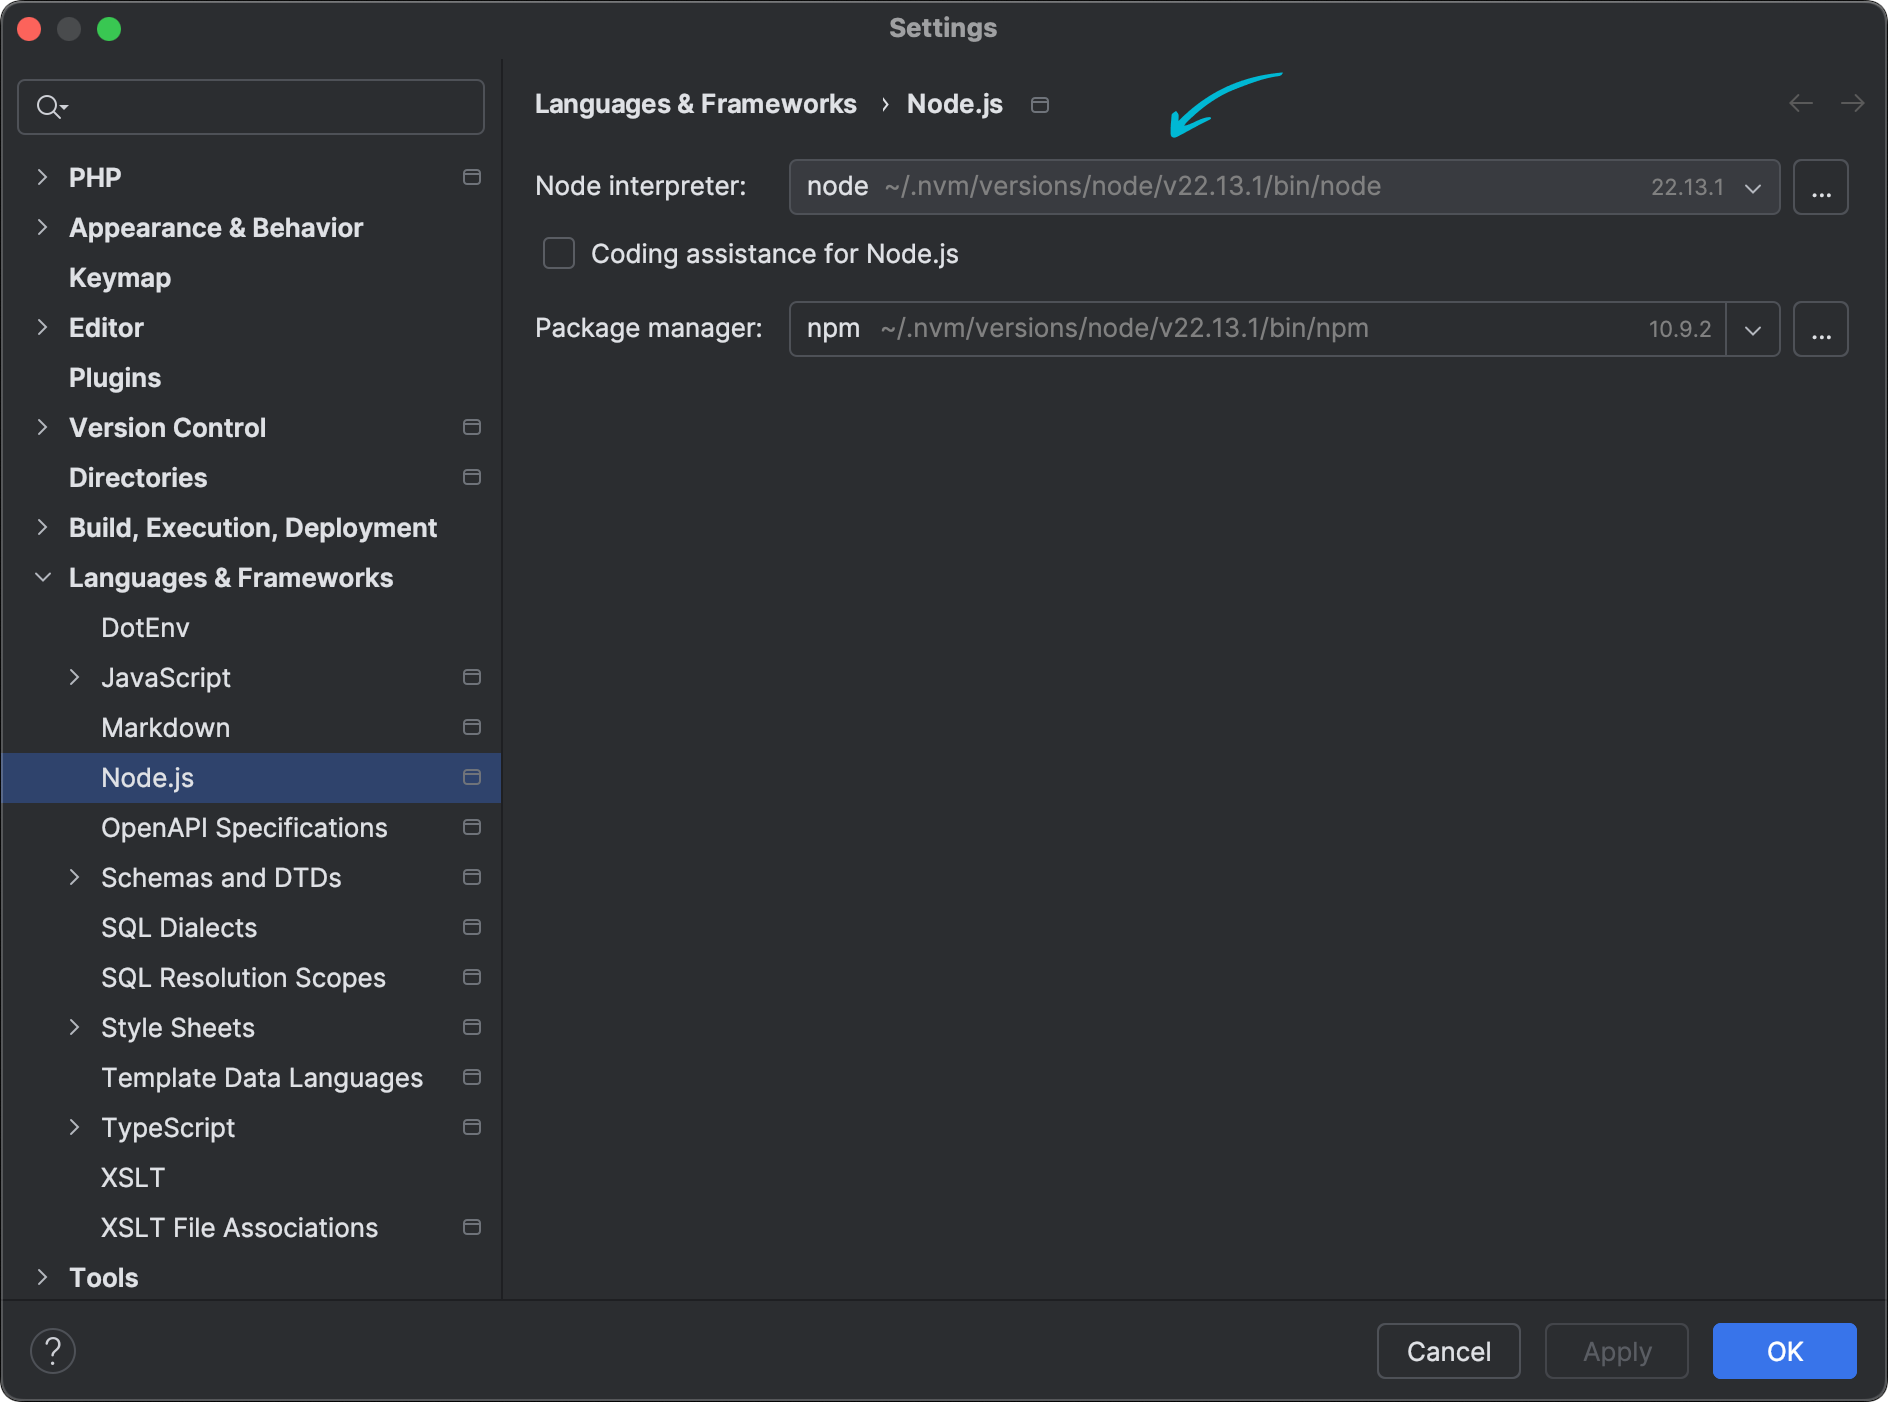 Node.js settings in PhpStorm
Then go to Settings → Languages & Frameworks → JavaScript → Code Quality Tools → ESLint, and configure the settings.
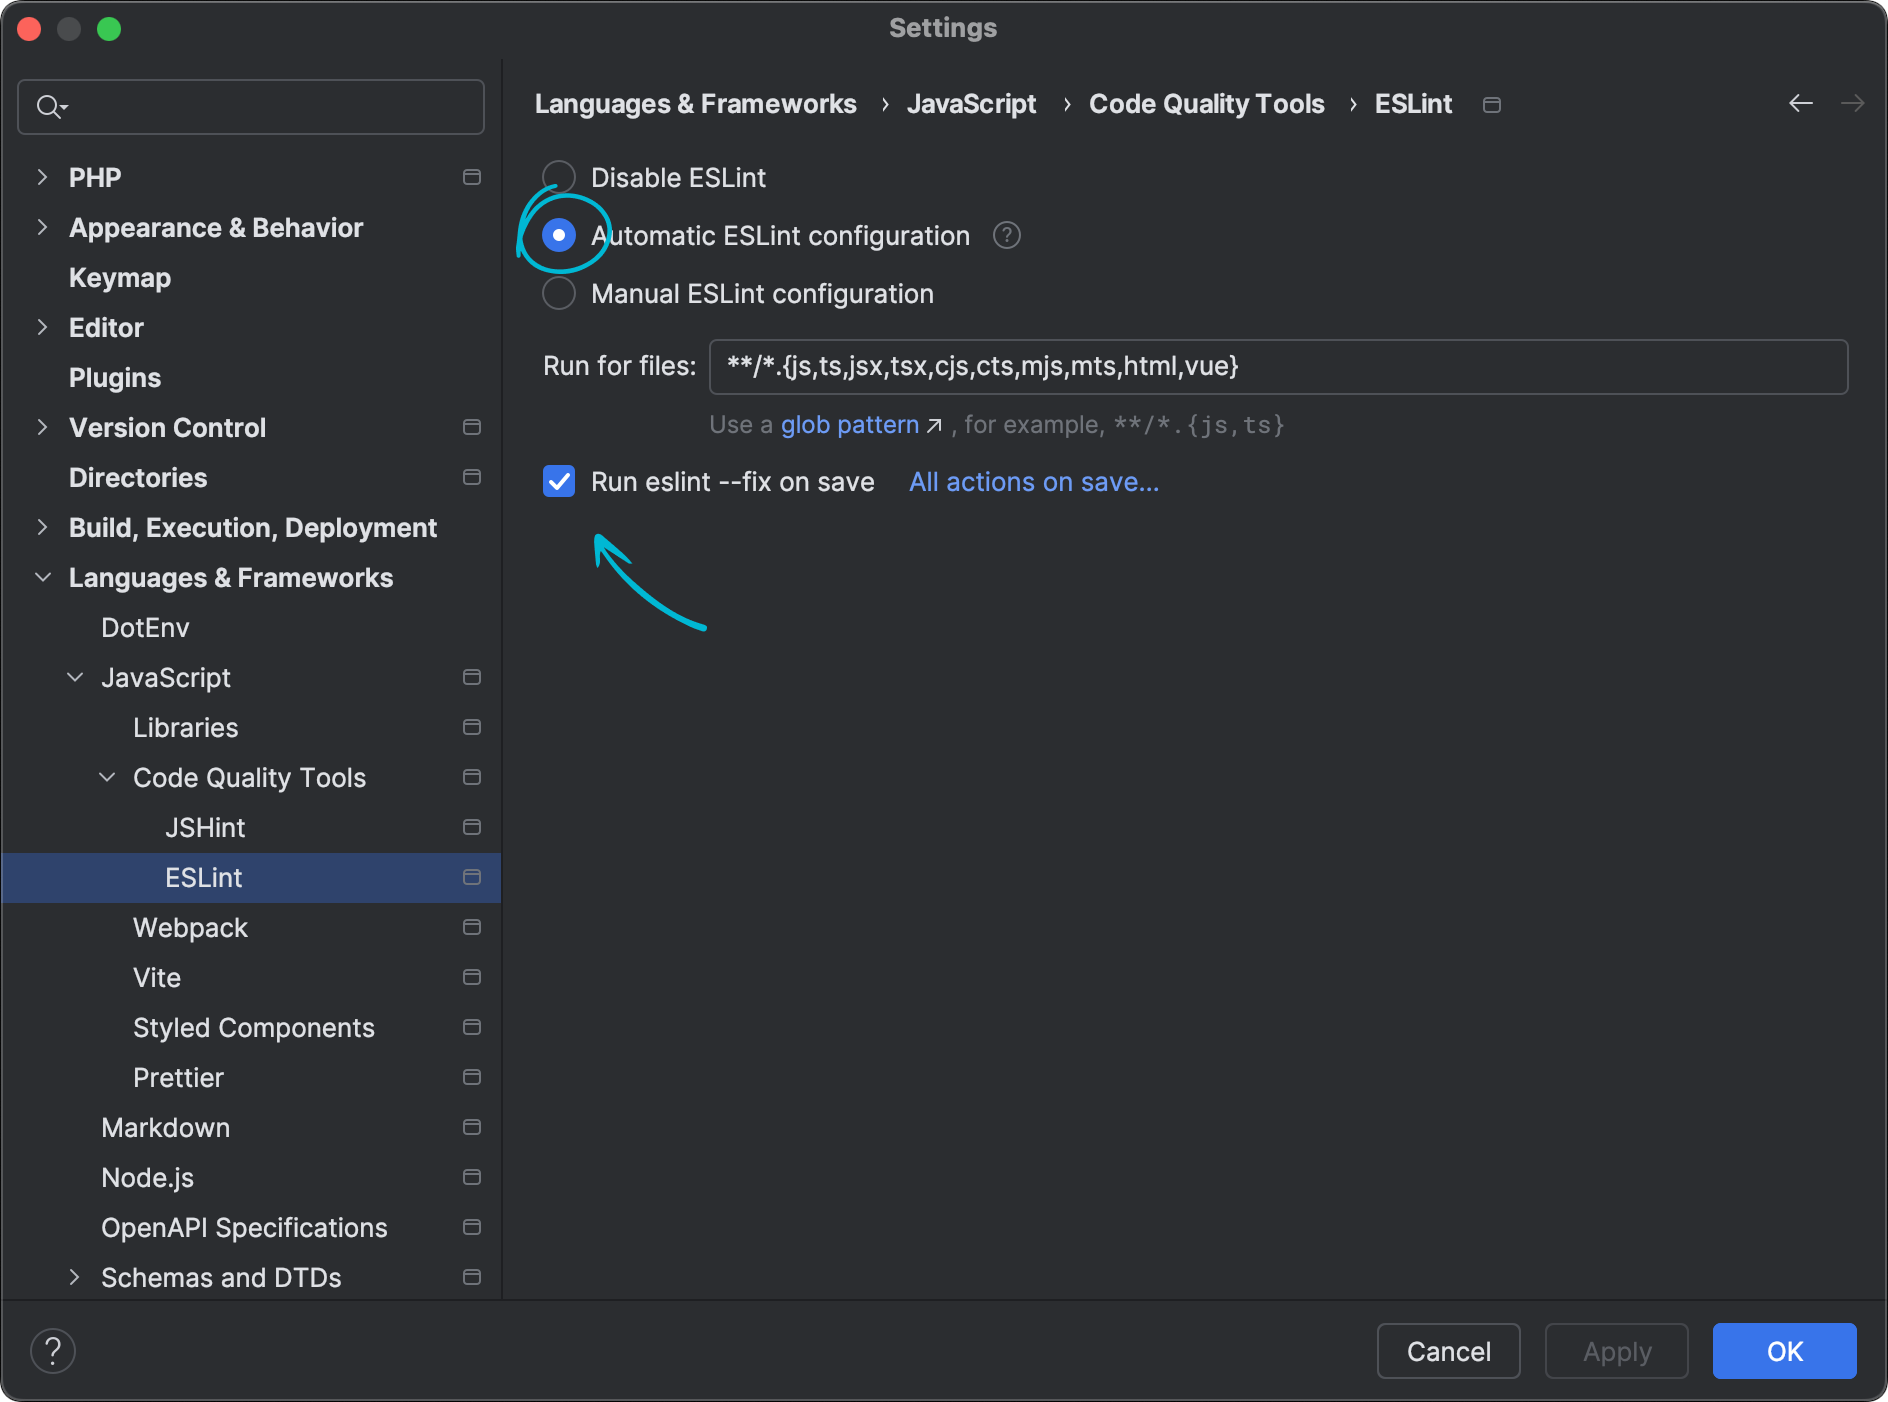 ESLint settings in PhpStorm
Select these settings:
- "Automatic ESLint Configuration"
- Optionally tick the "Run eslint --fix on save" checkbox if you want issues fixed when the file is saved.
Go to Settings → Languages & Frameworks → JavaScript → Prettier, and configure the settings.
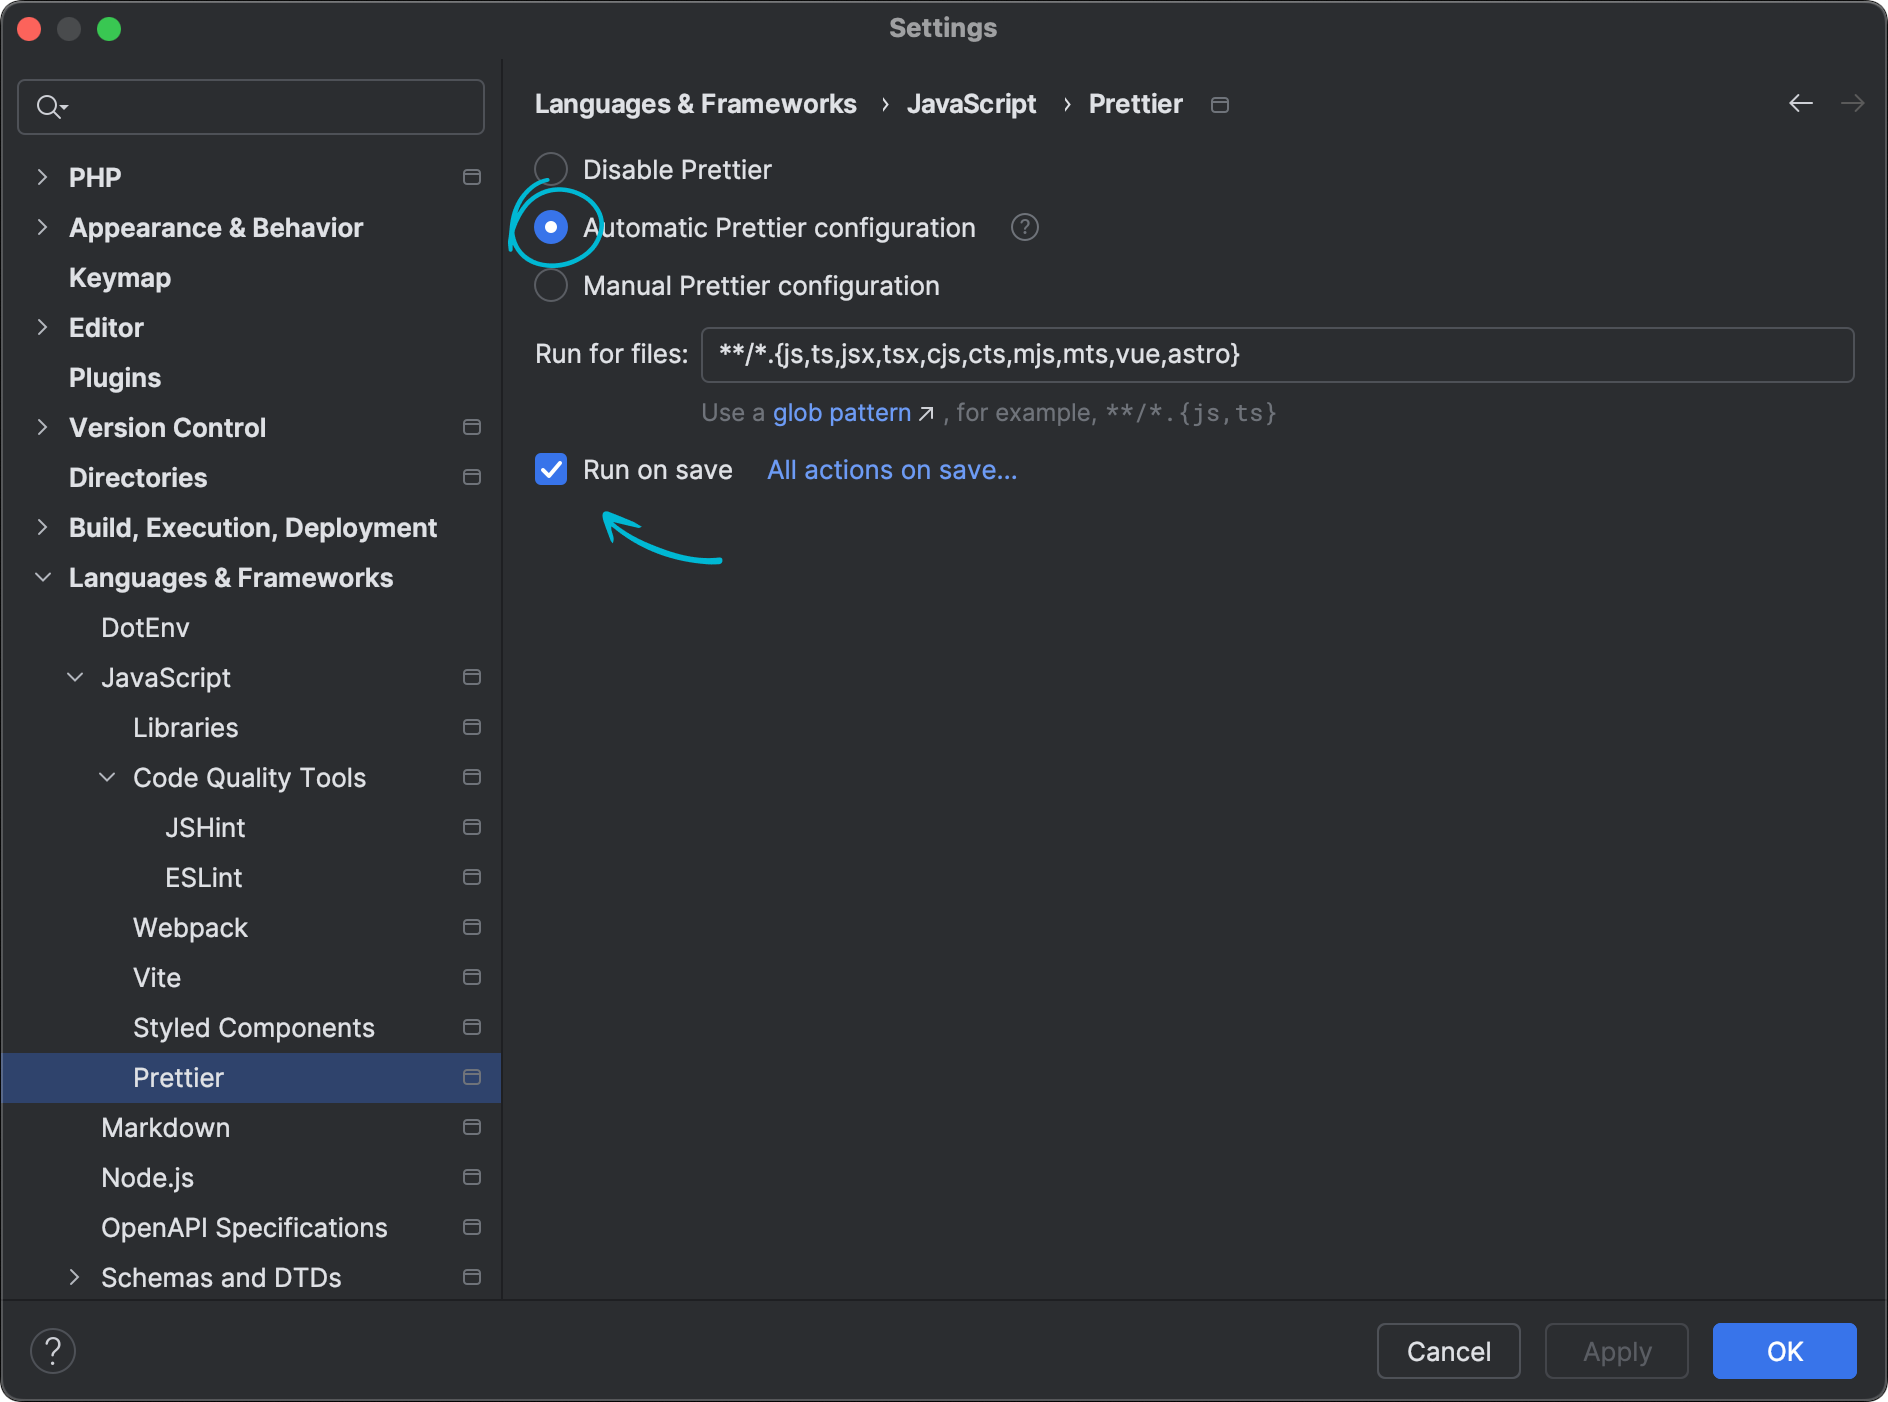 Prettier settings in PhpStorm
Select these settings:
- "Automatic Prettier Configuration"
- Optionally tick the "Run on save" checkbox if you want code formatting when the file is saved.
Also, both actions are available in the "right mouse click" menu.
Ignoring ESLint issues
Sometimes issues reported by ESLint can't be fixed for some reason. If you don't want to see them, there are several options:
- Ignore some files and folders. See the documentation.
- Ignore specific code parts or lines. See the documentation.
One of the simplest examples for the last case is adding the following comment before the line you want to ignore.
// eslint-disable-next-line
Styles quality: Stylelint
It may seem less critical to have the quality checking for styles. You will be surprised how helpful it can be.
The most popular tool for finding and fixing problems in styles is Stylelint. It also plays nicely with Prettier we installed and configured in the previous section.
Installing Stylelint and necessary dependencies (from the inside of the DDEV container).
npm install -D stylelint stylelint-config-standard-scss stylelint-prettier
The stylelint-config-standard-scss is responsible for Sass checking.
Stylelint configuration
Stylelint configuration sits in the stylelint.config.js file, which could be placed in the module root folder. Here is an example of the configuration which you can use as is:
export default {
  extends: ['stylelint-config-standard-scss', 'stylelint-prettier/recommended'],
  rules: {
    /** selector class pattern must match [BEM CSS](https://en.bem.info/methodology/css) — [Regex](https://regexr.com/3apms) */
    'selector-class-pattern': [
      '^[a-z]([-]?[a-z0-9]+)*(__[a-z0-9]([-]?[a-z0-9]+)*)?(--[a-z0-9]([-]?[a-z0-9]+)*)?$',
      {
        /** This option will resolve nested selectors with & interpolation. — https://stylelint.io/user-guide/rules/selector-class-pattern/#resolvenestedselectors-true--false-default-false */
        resolveNestedSelectors: true,
        /** Custom message */
        message: function expected(selectorValue) {
          return `Expected class selector "${selectorValue}" to match BEM CSS pattern.`;
        },
      },
    ],
  },
};
In this configuration, the CSS class pattern is redefined to match BEM standards. Feel free to adjust it to your team's standards.
And here are the package.json scripts for running linting tasks and an updated script for formatting.
"scripts": {
  "stylelint": "stylelint 'scss/**/*.scss'",
  "stylelint-fix": "stylelint 'scss/**/*.scss' --fix",
  "format": "prettier --write \"**/*.+(js|cjs|mjs|ts|jsx|tsx|json|scss)\"",
},
Stylelint manual usage
Running the linting outside the container:
ddev npm run stylelint --silent --prefix web/modules/custom/MODULE_NAME
Running the error fixing outside the container:
ddev npm run stylelint-fix --silent --prefix web/modules/custom/MODULE_NAME
Running code and style formatting outside the container:
ddev npm run format --silent --prefix web/modules/custom/MODULE_NAME
Stylelint configuration for PhpStorm
PhpStorm can run linting and formatting checks in the background and show notifications right in the code editor.
To run the checks, we can use the same Node interpreter we configured for ESLint in the previous section.
Go to Settings → Languages & Frameworks → Style Sheets → Stylelint, and configure the settings.
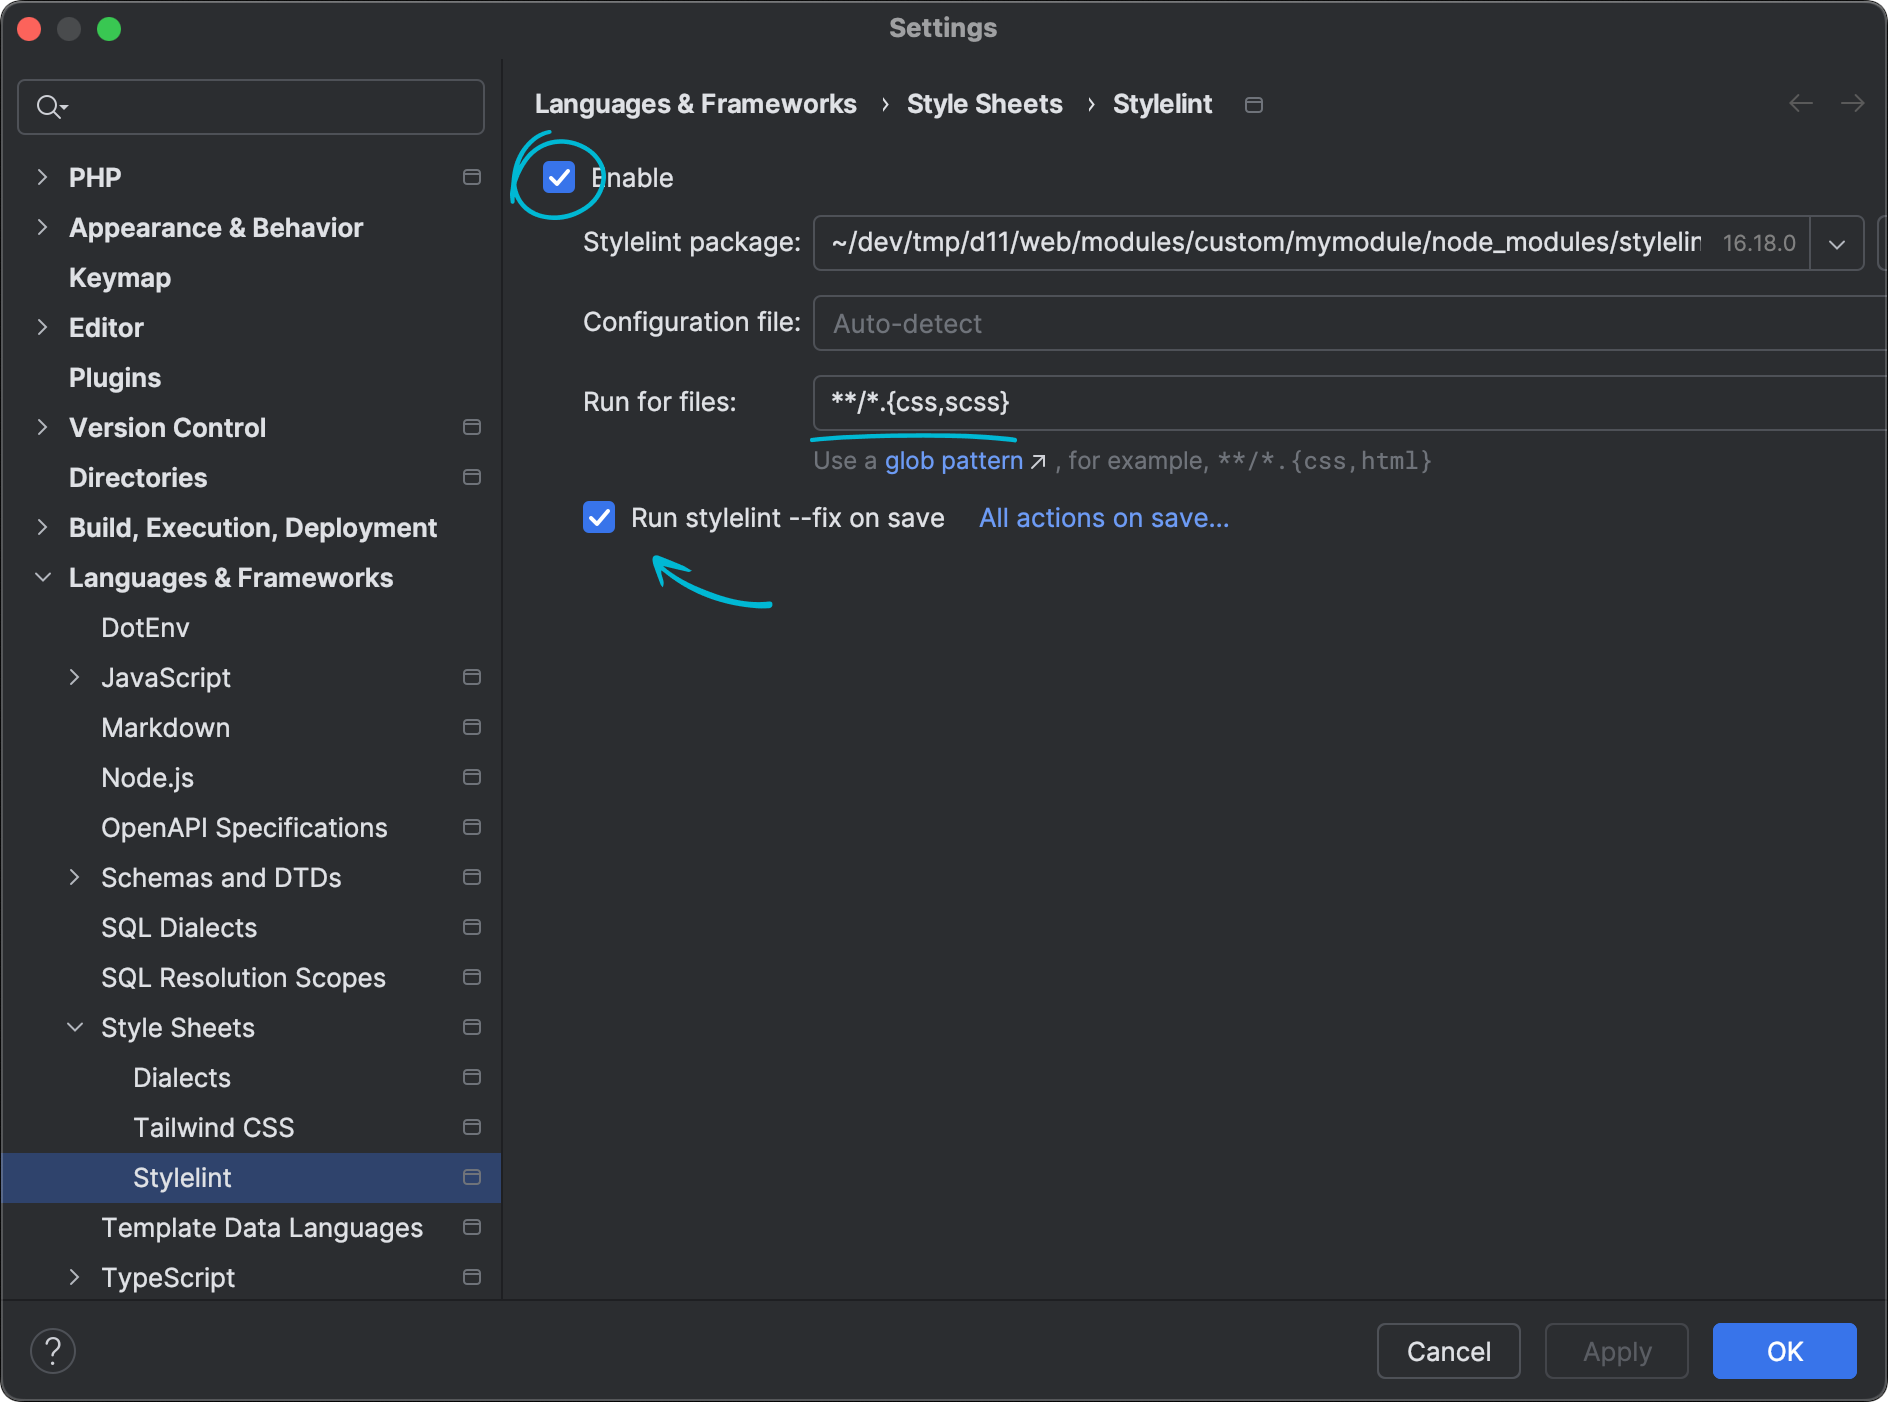 Stylelint settings in PhpStorm
Specify these settings:
- Tick "Enable" checkbox
- Check/update "Stylelint package" path
- Adjust "Run for files" value to
**/*.{css,scss} - Optionally tick the "Run stylelint --fix on save" checkbox if you want issues fixed when the file is saved.
Also, the "Fix Stylelint problems" action is available in the "right mouse click" menu.
Ignoring Stylelint issues
Sometimes issues reported by Stylelint can't be fixed for some reason. If you don't want to see them, there are several options:
- Ignore some files and folders. See the documentation
- Ignore specific code parts or lines. See the documentation
One of the simplest examples for the last case is adding the following comment before the line you want to ignore.
/* stylelint-disable-next-line */
Debugging PHP: Xdebug
A debugger is an irreplaceable tool during complex development and troubleshooting. The most popular tool for debugging PHP applications is Xdebug.
For me, it is a must-have tool when working with things like Drupal forms, AJAX, REST endpoints, and decoupled Drupal.
PhpStorm and DDEV have great Xdebug support out of the box. Moreover, it works without any configuration.
Just enable Xdebug in the DDEV container:
ddev xdebug on
In PhpStorm, go to the place in the PHP code you want to debug, select the inspecting line and click on the line number to set the breakpoint.
Click on Run → Start Listening for PHP Debug Connections. The corresponding button is usually also available on the toolbar.
Now visit the page related to inspecting code in your Browser. Xdebug pauses code execution on the breakpoint you added, and PhpStorm shows available data at this particular moment of execution.
You can find more info about debugging with PhpStorm in the documentation.
If the "zero-configuration" option doesn't work for you, there is another configuration option, described in DDEV documentation.
When the debug session is finished, for the sake of performance, it is recommended to stop listening for debug connections and turn off Xdebug in the DDEV container.
Click on Run → Stop Listening for PHP Debug Connections (or corresponding button on the toolbar).
Run:
ddev xdebug off
Conclusion
Writing long but comprehensive articles is becoming a tendency for me. I often used the provided configurations in everyday work, and combining them in one place will simplify installing tools on new and existing projects. I hope it helps you too.
I would welcome you to share your wishes and ideas in the comments, and would be happy to improve the provided suggestions based on shared experience.
I especially like how you apply linting to everything, including CSS and JS too.
Great post, very detailed!
Great post, and amazing to see all of the set up guides using a modern PHPStorm too.
Massive Thank you!