
This manual turned out to be quite voluminous, but I did not break it down into several parts for at least two reasons:
This is not an article for one-time reading, but a kind of list of ready examples, available in one click, in which you can quickly find the necessary example and use it in your task.
This manual is based on the experience of using the solutions described in real tasks, and I plan to continue to maintain it in an up-to-date state and supplement it with new examples as they appear.
Table of content
- Basics
- Template file names
- Outputting debug information about templates
- Default template names suggestions
- Custom template names suggestions
- Defining a template in a module
- Variable values in a template
- List of variables available in the template
- Template variables types
- Passing custom variables to the template
- Attributes
- Content entity templates
- Views templates
- Page, region, and block templates
- Form templates
- Conclusion
Basics
Drupal 8 and higher utilizes Twig as a template engine.
Templates must be located in the templates folder of your theme so that they can be automatically detected by the discovery service.
Drupal has default templates, but they are spread across different modules. This "raw" markup can be viewed by enabling the Stark theme.
The template files that are directly ready for theming sit in the Stable 9 theme. This theme (as well as any other theme) can be specified as the "base" for your theme, and then all the templates of this theme will be inherited by your theme and will be automatically detected by the discovery service as if they were located in your theme.
To override any template from the base theme or the default template from Drupal, you just need to create a template file with the same name and place it in your theme's templates folder. The template from your theme will have the highest priority, then the base theme templates, then its base theme templates, and so on up to the default template.
Template file names
Template files are named like ELEMENT.html.twig.
For some elements, in addition to the general template, more specific ones can be defined, depending on some parameters of the element. For example, a node can have different templates defined depending on the content type, display mode, or ID.
The file name format will look like ELEMENT--SOMETHING.html.twig. The delimiter for parameters and words in the template name must be double and single dashes, respectively.
For example, the following template names are defined for nodes: node--NODE-TYPE.html.twig, node--VIEW-MODE.html.twig, and node--ID.html.twig (the list is not exhaustive).
Template files are applied according to their specificity, so for example, a template with a content ID will generally be more specific than a template for a content type.
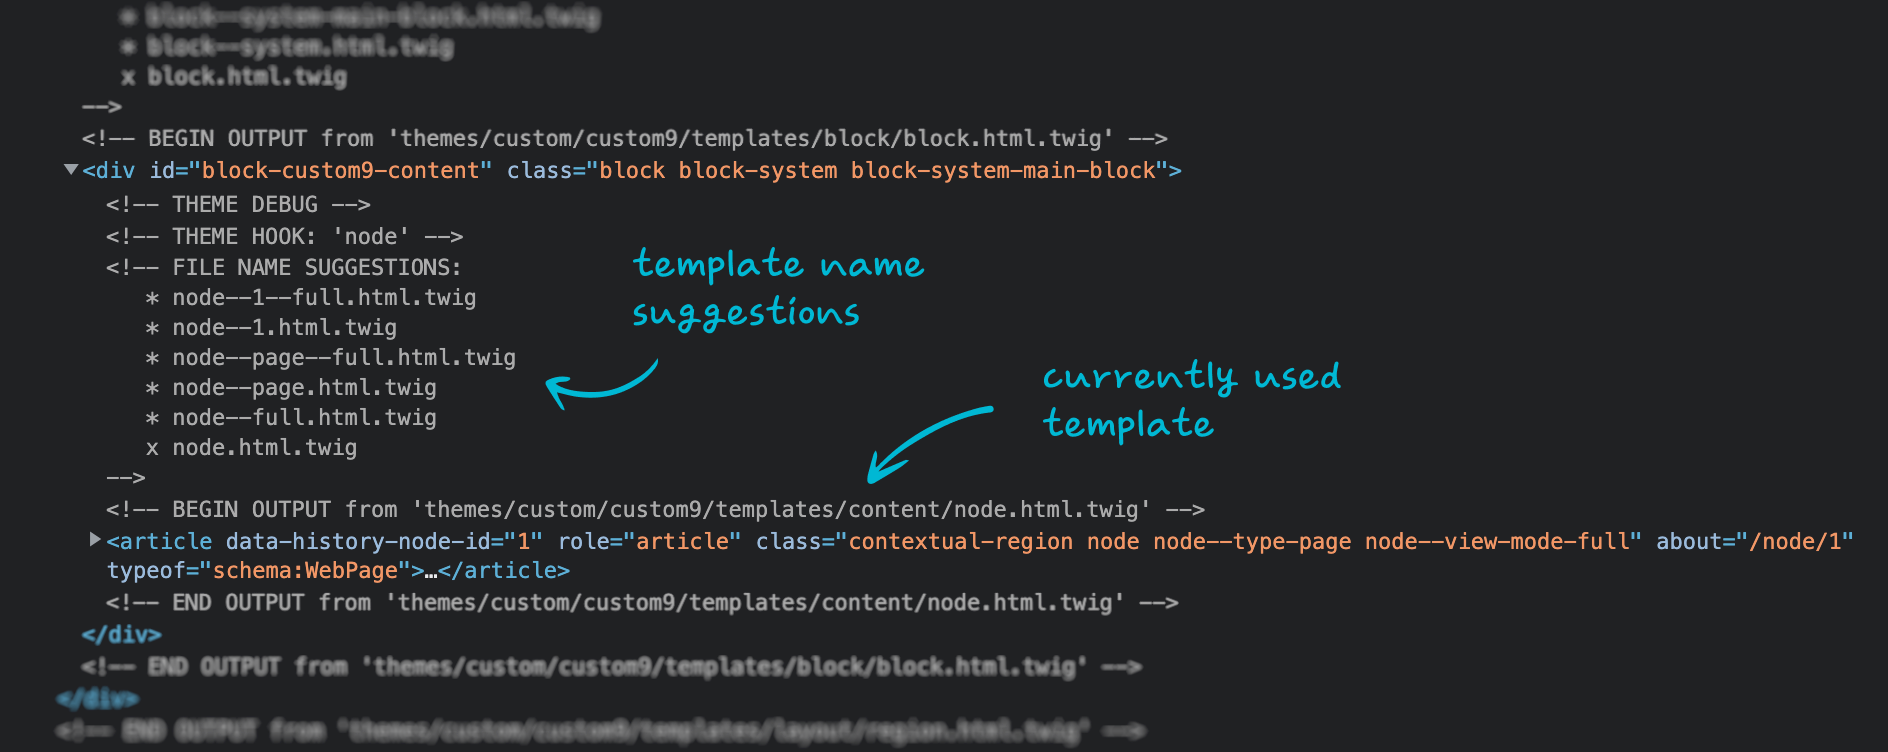
Outputting debug information about templates
To find out what template names are available for an element, their specificity, and what template is currently used for an element, the debug output can be enabled.
To do this, it needs to add the following lines into the sites/development.services.yml file, in the parameters section:
twig.config:
  debug: true
  auto_reload: true
  cache: false
Full sites/development.services.yml file content:
# Local development services.
#
# To activate this feature, follow the instructions at the top of the
# 'example.settings.local.php' file, which sits next to this file.
parameters:
  http.response.debug_cacheability_headers: true
  twig.config:
    debug: true
    auto_reload: true
    cache: false
services:
  cache.backend.null:
    class: Drupal\Core\Cache\NullBackendFactory
It also needs to make sure that development.services.yml is included in the sites/SITENAME/settings.local.php file, which, in turn, is included in the sites/SITENAME/settings.php file (a common way for enabling development services).
After that, the template names will be outputted directly in the page markup as comments.
 Template debug information
Default template names suggestions
The file name format for templates can be defined both on the core level, and extended in modules and themes using special functions — "hooks".
For example, for nodes, on the core level, the following template name suggestions are defined (in descending order of specificity):
node--ID--VIEW-MODE.html.twignode--ID.html.twignode--NODE-TYPE--VIEW-MODE.html.twignode--NODE-TYPE.html.twignode--VIEW-MODE.html.twignode.html.twig
Documentation for template naming.
Custom template names suggestions
To define a custom template name format, it needs to create a function in your theme's THEMENAME.theme file that implements hook_theme_suggestions_HOOK_alter.
For example, for nodes, the function might look like this:
/**
 * Implements hook_theme_suggestions_node_alter().
 */
function THEMENAME_theme_suggestions_node_alter(array &$suggestions, array $variables) {
  if (SOME-CONDITION) {
    $suggestions[] = 'node__' . 'SOMETHING';
  }
}
The delimiter for parameters and words in the suggestion name must be double and single underscore, respectively.
As a result of the function, for an element that satisfies the condition, your template name will be added to the list of suggestions.
Defining a template in a module
If you need to create or override a template in a module, just placing a template file in your module's templates folder is not sufficient. It also needs to create a function that implements hook_theme in your module's MODULENAME.module file.
For example, a function to override a node template might look like this:
/**
 * Implements hook_theme().
 */
function MODULENAME_theme() {
  return [
    'node__SOMETHING' => [
      'template' => 'node--SOMETHING',
      'base hook' => 'node',
    ],
  ];
}
Variable values in a template
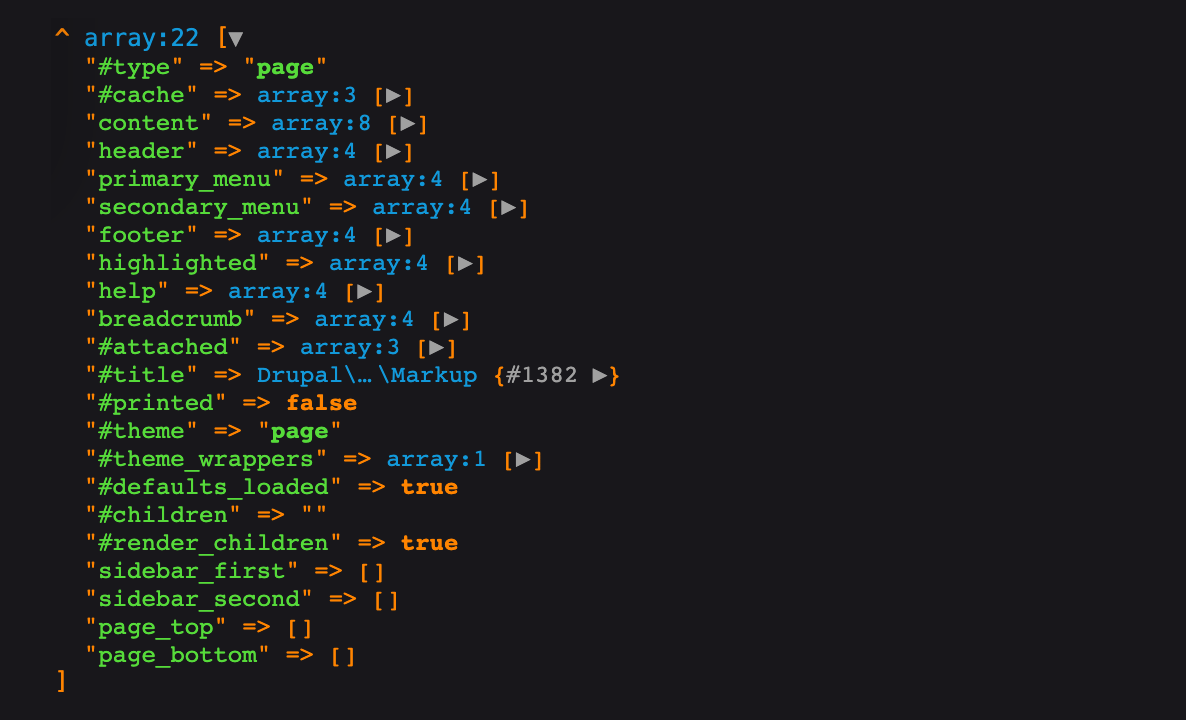
To work with templates, it is often necessary to find out the values of variables in the template before it will be rendered, what happens after rendering, we will see directly in the element's markup.
For Drupal 9.4 and lower, this can be achieved with the dd function. The Twig Tweak module needs to be installed and enabled first, and this module is an absolute must-have for working with templates.
An example of usage (in template file):
{{ dd(VARIABLE_NAME) }}
Starting from Drupal 9.5, a similar function exists in the core:
{{ dump(VARIABLE_NAME) }}
 Dump of variable value
List of variables available in the template
Sometimes it is useful to know what variables are available in a template. The comment at the top of the template usually does not list all available variables.
Two ways of outputting all template variables:
{{ dd() }}
{{ dd(_context) }}
For Drupal 9.5 and higher, dump should be used instead of dd.
Template variables types
Variables in a template can be renderable or non-renderable.
Renderable variables can be outputted on the page, either as text or as markup.
Renderable variables are printed using double curly braces:
{{ VARIABLE_NAME }}
Rendered variables include:
- boolean value
true, will be outputted as1; - number;
- string;
- objects that implement
MarkupInterface, for example,MarkupandTranslatableMarkup; - render arrays, they can be determined by the presence of an element with the key
#typeor#theme; - arrays that contain render arrays.
In the case of regular arrays, the Twig handler will iterate through all the elements of the array in order, drawing them if possible, while elements with keys starting with # will be treated as supporting data.
The Twig handler tolerates various kinds of empty values and does not throw an error when trying to output them. These include:
- empty strings;
- boolean
false; nullvalue;- empty arrays;
- arrays that do not contain render arrays (may throw warnings).
Non-renderable variables include:
- non-printable objects (not implementing a
__toString()method).
An attempt to output such an object will throw an error on a white screen.
But some object properties can still be outputted — by using methods specially defined for them or by the value method. Such properties will typically be listed in an array with the #values key. For multiple value objects, the #values array will be defined for each element of the array with the #list key.
Abstract examples:
{{ OBJECT.id }}
{{ OBJECT.PROPERTY.value }}
{{ OBJECT.PROPERTY.0.value }}
Passing custom variables to the template
To pass a variable to the template, it needs to create a function in your theme's THEMENAME.theme file that implements hook_preprocess_HOOK().
For example, for a node template, the function might look like this:
/**
 * Implements hook_preprocess_HOOK().
 */
function THEMENAME_preprocess_node(&$variables) {
  $variables['VARIABLE_NAME'] = VARIABLE_VALUE;
}
After that, the variable will become available in the node.html.twig template.
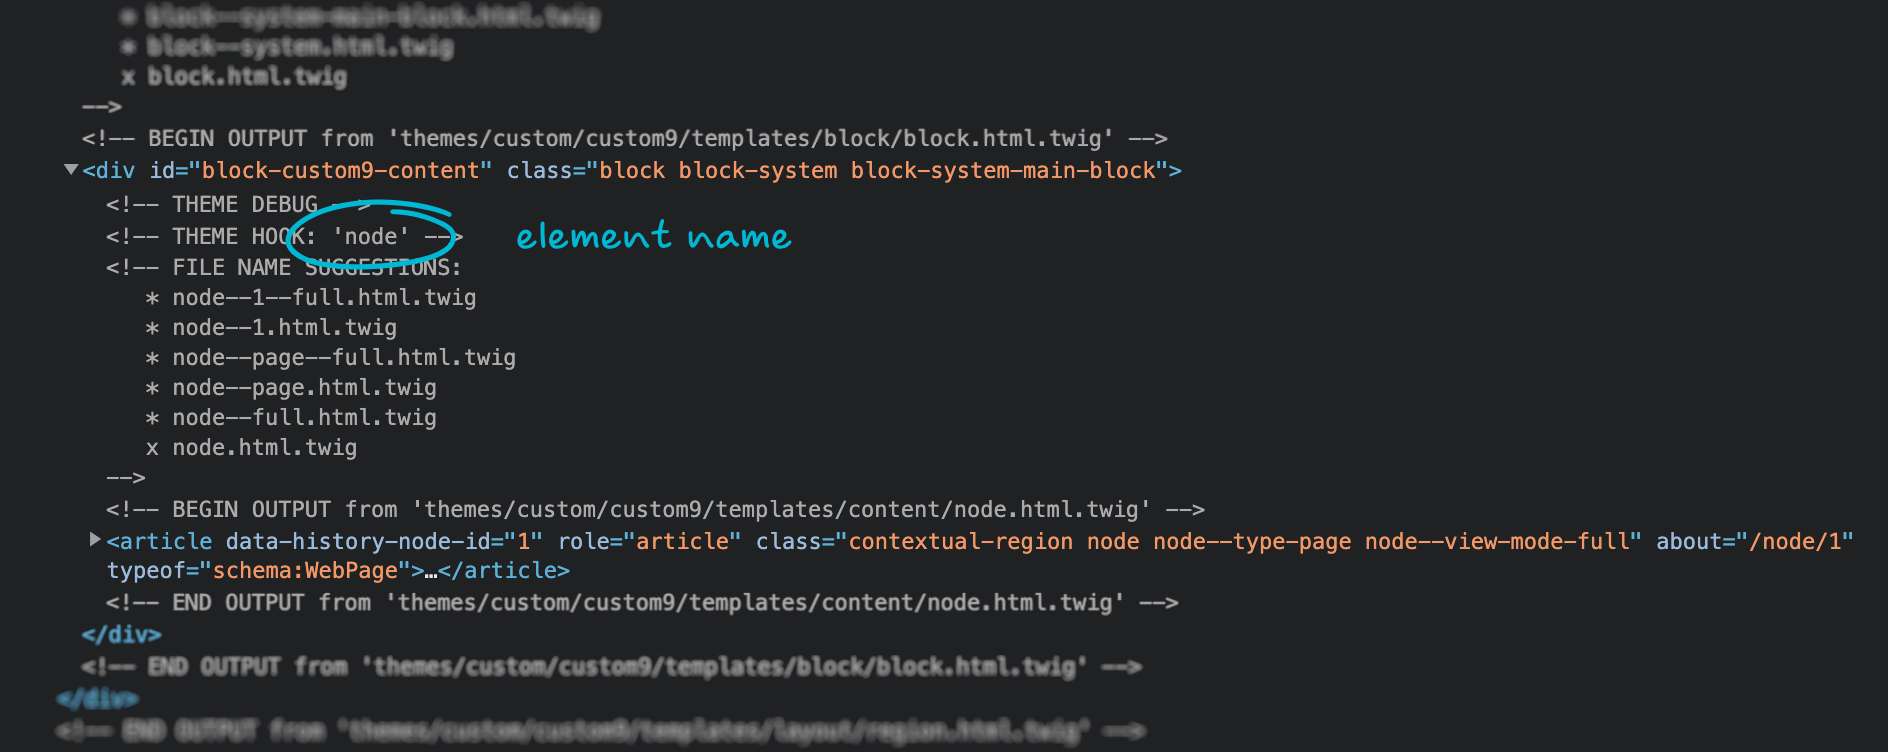
To find out the last part of the function name (it's the name of the element, and it's also the name of the template), you can use the hint from the debug information.
 Element name in debug information
Attributes
If a variable is intended to be rendered in markup, such as the name of a CSS class or the value of some other HTML attribute, then Drupal provides a special structure for dealing with them.
On the PHP code level, there is a Drupal\Core\Template\Attribute class that allows you to initialize an attribute object:
use Drupal\Core\Template\Attribute;

$attributes = new Attribute([
  'class' => ['class-1', 'class-2'],
]);
If the object already exists, you can treat it like an array:
$attributes['class'][] = 'class-3';
$attributes['id'] = 'some-id';
The class also defines several methods for working with attributes.
On the Twig template level, the attributes object is rendered like a regular variable, but inside a tag:
<div{{ attributes }}>Some value</div>
Example markup output result:
<div id="some-id" class="class-1 class-2 class-3">Some value</div>
But the most important thing is that all methods for working with attributes from the PHP class are available in the template:
attributes.addClass('class-4', 'class-5')— adds one or more class values;attributes.removeClass('class-1', 'class-2')— removes one or more class values;attributes.hasClass('class-1')— checks for the existence of a class value;attributes.setAttribute('id', 'some-another-id')— adds or replaces the value of one attribute;attributes.removeAttribute('id', 'class')— removes one or more attributes.
Methods can be chained:
<div{{ attributes.addClass('class-4', 'class-5').removeClass('class-1') }}>Some value</div>
It is possible to output only a specific attribute:
<div class="{{ attributes.class }}">Some value</div>
It is possible to exclude certain attributes using the without filter:
<div{{ attributes|without('class', 'id') }}>Some value</div>
It is possible to create an attribute object directly in a Twig template:
{% set attributes = create_attribute() %}
It is also possible to create an attribute object with initial values:
{% set attributes = create_attribute({
  'id': 'some-id',
  'class': ['class-1', 'class-2'],
}) %}
Content entity templates
There are many different templates in Drupal: global templates, entity templates, element templates, and others.
In this section, we'll look at templates for content entities. These include:
- node;
- custom block;
- taxonomy term;
- media;
- comment;
- user;
- paragraph;
- and other entities that support field management.
The main template files for these entities in the Stable 9 theme are:
core/themes/stable9/templates/content/node.html.twig;core/themes/stable9/templates/block/block.html.twig;core/themes/stable9/templates/content/taxonomy-term.html.twig;core/themes/stable9/templates/content/media.html.twig;core/themes/stable9/templates/content/comment.html.twig;core/themes/stable9/templates/user/user.html.twig;PARAGRAPHS-MODULE/templates/paragraph.html.twig(defined in the Paragraphs module).
The templates of these entities are very similar in structure. An example of a block template:
<div{{ attributes }}>
  {{ title_prefix }}
  {% if label %}
    <h2{{ title_attributes }}>{{ label }}</h2>
  {% endif %}
  {{ title_suffix }}
  {% block content %}
    {{ content }}
  {% endblock %}
</div>
Several variables are defined for the template (usually the list of main variables is given in the comment at the top of the template) that can be outputted or used in control structures. The following types of variables can be passed to the content entity template:
- supporting variables (for example,
attributes,view_mode,title_prefix,title_suffix); - base field values (
label,date, etc.); contentvariable, which is an array with fields created by the user;- object of the entity itself (usually, there is a variable, but it may not be used in any way in the template).
Do not confuse the content variable with the name of the block in the {% block content %} structure, these are different things, for more information about the block structure, see the Block Templates section.
Documentation of Twig functions and features.
The "content" variable
content is the most important variable in the entity template, some templates outputs only it at all. content is an array of render arrays of entity fields, ready to be rendered most simply:
{{ content }}
The content of this array is determined by the fields listed on the Manage display tab for the current View mode. The order of the fields in the list determines the output order.
Therefore, the display format of each field is determined by the Widget and its settings for each field, including for displaying the field header.
 Manage display tab
If you move a field to the Disabled group, then the render array will not be created for it, and the corresponding element will not be present in the content array.
Outputting entity fields
Fields from the content variable can be outputted not only all at once but also one at a time:
{{ content.FIELD_NAME }}
An example of the output result of a simple non-multiple text field with a title on top:
<div class="field field--name-FIELD_NAME field--type-string field--label-above">
  <div class="field__label">Field title</div>
  <div class="field__item">Field value</div>
</div>
It is also possible to exclude some fields from the output using the without filter (for example, to output them separately in a different place in the template):
{{ content|without('FIELD1_NAME', 'FIELD2_NAME') }}
This can be useful when creating custom layouts, for example:
<div class="cols">
  <div class="col-1">
    {{ content.FIELD1_NAME }}
    {{ content.FIELD2_NAME }}
  </div>
  <div class="col-2">
    {{ content.FIELD3_NAME }}
    {{ content|without('FIELD1_NAME', 'FIELD2_NAME', 'FIELD3_NAME') }}
  </div>
</div>
In this case, for each field, a full-fledged rendering will be performed using the template of this field. Information about which template to use is present in the field render array itself — the element with the #theme key, and the value itself is in the element with the 0 key (or another numeric index if the field is multiple).
If you need to output only the value of the field, without invoking a template, then this can be achieved using the without filter:
<div class="field-wrapper">
  {{ content.FIELD_NAME|without('#theme') }}
</div>
This way is the main and optimal, in terms of performance and security, to output the value of a field using custom markup. With it, you can output the values of fields of any type, both simple and references to other entities (images, media, taxonomy terms, paragraphs, etc.). Output result example:
<div class="field-wrapper">
  Field value
</div>
If the field is multiple, then the values must be iterated. The structure is not the most elegant, it looks like this:
<div class="field-wrapper">
  {% for key, item in content.FIELD_NAME if key|first != '#' %}
    <div class="field-item-wrapper">
      {{ item }}
    </div>
  {% endfor %}
</div>
This way is also main and optimal for outputting the value of a multiple field. This way is especially useful when outputting field values that reference other entities, in particular when working with paragraphs.
In the Twig Tweak module, there is a children filter that simplifies the above entry:
<div class="field-wrapper">
  {% for item in content.FIELD_NAME|children %}
    <div class="field-item-wrapper">
      {{ item }}
    </div>
  {% endfor %}
</div>
An example of the output result:
<div class="field-wrapper">
  <div class="field-item-wrapper">
    Field 1 value
  </div>
  <div class="field-item-wrapper">
    Field 2 value
  </div>
</div>
If the markup needs to reflect the index of the element and/or their amount, then the entry will look like this:
<div class="field-wrapper items--{{ content.FIELD_NAME['#items']|length }}">
  {% for key, item in content.FIELD_NAME if key|first != '#' %}
    <div class="field-item-wrapper item--{{ key + 1 }}">
      {{ item }}
    </div>
  {% endfor %}
</div>
When outputting field values without a template, the widget settings will still be respected, but the title settings will not. Title output example:
<div class="field-title">
  {{ content.FIELD_NAME['#title'] }}
</div>
It is important to note that the field values in the content variable, even if they are outputted without a field template, are still in the render array format, so, they went through all the necessary processing and are rendered by the Twig without any further handling. In particular, if there is an HTML markup in the field value, Twig will not escape it.
The content variable itself can be used in control structures (since it is a regular array), but using render arrays of fields in control structures can lead to unexpected results. Even if no value is set for the field, the render array for it is still created and contains supporting data. So, for example, the following conditions will always be true, regardless of the presence of a value:
{% if content.FIELD_NAME %}

{% if not content.FIELD_NAME is empty %}
In the case of using field templates, the template cares about the necessity of outputting markup for empty fields, but when outputting values directly, checking for the presence of a value can be very useful. The correct way to do this is provided in the Entity object methods section.
Entity object variable
Another very important variable in the entity template is the variable containing the entity object itself.
Such a variable exists in almost every entity template, but is called differently, depending on the entity type:
node.html.twig—node;taxonomy-term.html.twig—term;media.html.twig—media;comment.html.twig—comment;user.html.twig—user;paragraph.html.twig—paragraph.
The situation with blocks is slightly more complicated. Custom block, namely such blocks can be created through the Admin UI, is just one of the possible plugins of the block system. In addition to these, there are other block plugins in Drupal, such as the Main page content block, Page title block, menu blocks, etc. Such blocks are not content entities, and the Custom block is. And despite the fact that the main template for all blocks is common — block.html.twig, the entity object will be available only in the custom block template, it will be represented by the #block_content element in the content array.
For the convenience of using the block entity object, you can give it a shorter name directly in the template of a specific custom block:
{% set block_content = content['#block_content'] %}
Or define an entity object variable for all blocks during the preprocess step:
/**
 * Implements hook_preprocess_block().
 */
function THEMENAME_preprocess_block(&$variables) {
  // Pass block object shortcut to template.
  if (isset($variables['content']['#block_content'])) {
    $variables['block_content'] = $variables['content']['#block_content'];
  }
}
After that, the block entity object can be accessed simply through the block_content variable, similar to other entity templates.
Entity object methods
In Twig template entity object supports some of the methods defined for it in the PHP class. Specifically, these are methods starting with get, has or is, and the following "base" methods:
bundle()— returns the machine name of the "bundle" or, in simple terms, the content type (for taxonomy terms, this is the machine name of the vocabulary, for users, it is alwaysuser);id()— returns the content ID;label()— returns the title or name of the content.
An example of using a method in a template (hereinafter, all examples of working with an entity object will be given for the nodes):
node.bundle()
In most cases, the parentheses after the "base" methods can be omitted, but there are exceptions, so for reliability's sake, I still recommend specifying.
A few useful methods that are supported by most content entities:
isPublished()— returns publication status;hasField('FIELD_NAME')— checks whether a field (not a value) is defined for the given content type;getCreatedTime()returns a Timestamp of the creation date and time;getOwnerId()— returns the ID of the user who created the entity.
Also, the entity object supports accessing the field object using the get method and directly by name.
node.get('FIELD_NAME')
node.FIELD_NAME
The existence of a field value can be checked using the isEmpty method of the field object. An example of usage:
{% if not node.FIELD_NAME.isEmpty %}
  <div class="field-wrapper">
    {{ content.FIELD_NAME|without('#theme') }}
  </div>
{% endif %}
Entity object fields values
Unlike the content variable, the value of a field in the entity object is in its raw form, as it is stored in the database. Combined with the methods available on the entity object, this gives you more flexibility in working with templates.
But you need to use raw values consciously, only when it is really necessary. When accessing a field value through an entity object, access rights on the field level are not taken into account and caching does not work. Raw values may not be safe, so for example, if the raw value contains markup, then when you try to output it in the template, the HTML tags will be escaped and displayed as text.
Therefore, the proper way is always try to use the value from the content variable first, and use the entity object only if this is not possible for some reason.
By the way, there is still a way to output a raw value while preserving the markup, it is provided in the example of outputting a value for formatted text.
Cases where using raw values might make sense:
- when the
contentvariable is not available; - when you need to generate markup yourself (for example, for a link or an image);
- in control structures, CSS class names, and markup;
- when you need to output the field value several times, in different ways;
- when you need to output a translation or value in multiple languages;
- when you need to know the value of the child entity field in the parent entity template.
If you don't need the raw value itself, but just need to output a field with some special widget settings, then you can use the view filter (parameters are optional) or the drupal_field function from the Twig Tweak module. The field will be outputted using the field template as if it were rendered from the content variable, but in fact, the render array will be re-created from the entity object.
{{ node.FIELD_NAME|view('VIEW_MODE', 'LANGCODE') }}

{{ drupal_field('FIELD_NAME', 'node', node.id(), 'VIEW_MODE') }}
The manual of the Twig Tweak module features.
Entity fields can be conditionally divided into two general types:
- Simple field (text, number, list, date, link) — contains the value directly.
- Entity reference (file, image, media, node, taxonomy term, etc.) — points to an entity whose fields contain values (or other entity references).
Simple field values
Getting and outputting the raw value for most simple fields:
<div class="field-wrapper">
  {{ node.FIELD_NAME.value }}
</div>
Outputting the raw value of a multiple field:
<div class="field-wrapper">
  {% for item in node.FIELD_NAME %}
    <div class="field-item-wrapper">
      {{ item.value }}
    </div>
  {% endfor %}
</div>
An option, using the order of the value:
<div class="field-wrapper items--{{ node.FIELD_NAME|length }}">
  {% for key, item in node.FIELD_NAME %}
    <div class="field-item-wrapper item--{{ key + 1 }}">
      {{ node.FIELD_NAME[key].value }}
    </div>
  {% endfor %}
</div>
Next, specialties of the output of simple fields will be provided.
Text (plain), Email, Telephone number
There are no specialties.
Examples of outputting email and phone as a link:
<a href="mailto:{{ node.field_email.value }}">{{ node.field_email.value }}</a>

<a href="tel:{{ node.field_telephone_number.value }}">{{ node.field_telephone_number.value }}</a>
Text (plain, long)
Long text supports line breaks, which will be removed by the Twig handler if the output is attempted in the normal way. To avoid this, it needs to pass the value through the text handler, for which you need to prepare the value as a render array:
{% set rendered_text = {
  '#type': 'processed_text',
  '#text':  node.field_text_plain_long.value,
  '#format': 'plain_text',
} %}

{{ rendered_text }}
Text (formatted), Text (formatted, long)
Formatted text supports markup in a variety of formats. To output markup, you need to pass the value through the handler for the appropriate text format:
{% set rendered_text = {
  '#type': 'processed_text',
  '#text': node.field_text_formatted.value,
  '#format': node.field_text_formatted.format,
} %}

{{ rendered_text }}
Text (formatted, long, with summary)
Formatted text with a summary has two text fields — the text itself and a summary in long plain text format. An example of the output:
{% set rendered_summary = {
  '#type': 'processed_text',
  '#text':  node.field_text_formatted_summary.summary,
  '#format': 'plain_text',
} %}
{% set rendered_text = {
  '#type': 'processed_text',
  '#text': node.field_text_formatted_summary.value,
  '#format': node.field_text_formatted_summary.format,
} %}

{{ rendered_summary }}
{{ rendered_text }}
Number (integer), Number (decimal), Number (float)
An example of outputting a value with a prefix and a suffix:
{% set number_prefix = node.field_number.getSetting('prefix') %}
{% set number_suffix = node.field_number.getSetting('suffix') %}

{{ number_prefix }}{{ node.field_number.value }}{{ number_suffix }}
Drupal stores the values of different types of numeric fields differently (which can be important when used in control structures):
- Integer stored as a signed number, minimum value
-2147483647, maximum value2147483647; - The decimal is stored as a number with two digits after the dot, minimum value
-4194303.99, maximum value4194303.99. Examples:3.14,24.00,-256.00; - A real number is stored as a floating point number. The value that is eventually stored depends on the precision, but in general, the rule is: the value must be no longer than seven characters including the dot. If the value is longer than seven characters, and there is no dot at all, then all characters after the sixth must be zeros. Examples:
3.14159,2.71828,234.544,4894860,489489,-5555.56.
List (text), List (integer), List (float)
The key is used as the value that Drupal keeps in the database. Key and label output example:
{% set list_item_key = node.field_list.value %}
{% set list_item_label = node.field_list.getSetting('allowed_values')[list_item_key] %}

{{ list_item_key }}
{{ list_item_label }}
In the case of a multiple list, there is a small specialty — it is better to get the labels before iterating the values:
{% set list_labels = node.field_list.getSetting('allowed_values') %}
{% for list_item in node.field_list %}
  {% set list_item_key = list_item.value %}
  {% set list_item_label = list_labels[list_item_key] %}

  {{ list_item_key }}
  {{ list_item_label }}
{% endfor %}
When using numeric lists, the keys must match the type of the numeric field, otherwise, the field value will be adjusted on save and will not match the key defined in the field settings. So the value will not be set by default the next time the entity editing page is opened, and it will not be possible to get a label by it.
Boolean
By structure, a boolean field is a special case of a list field, with two fixed keys (0 and 1) and two labels defined for them.
{% set boolean_value = node.field_boolean.value %}
{% set boolean_label = boolean_value ? node.field_boolean.getSetting('on_label') : node.field_boolean.getSetting('off_label') %}

{{ boolean_value }}
{{ boolean_label }}
A multiple boolean field only allows you to select both values at once. Multiple values are outputted similarly to a list.
Date
Date field values are stored in the "HTML Datetime" format (looks like 0000-00-00T00:00:00) or "HTML Date" format (0000-00-00), depending on the selected storage type.
An example of outputting a value in this format:
{{ node.field_date.value }}
The proper way to output the date in a different format is to use the content variable and field widget settings, but if it is not an option, there is still a way, even several.
Output using the Twig date filter:
{{ node.field_date.value|date('d.m.Y H:i:s') }}
The filter accepts various input formats and returns a string according to the specified pattern (in PHP date format), similar to how date formats are specified in the Drupal Admin UI. Documentation for the filter, documentation for the PHP date formats.
The filter supports the time zone as a second argument as well:
{{ node.field_date.value|date('d.m.Y H:i:s', 'Europe/Copenhagen') }}
The disadvantage of the filter is the output of month names in the language defined in PHP by default, and not in the language of the page.
Output using Drupal date format:
{{ node.field_date.value|date('U')|format_date('FORMAT_NAME') }}
Since the format_date filter accepts a date in the Timestamp format as input, the value must first be passed through the date filter, which will return a Timestamp.
An alternative is to get the Timestamp from the DrupalDateTime object:
{{ node.field_date.date.getTimestamp()|format_date('FORMAT_NAME') }}
In the case of using the Drupal date format, the names of the months will be outputted in the language of the page.
Date range
This field type is an extended version of the date field, the main difference is that there are always two values here: value and end_value. The field also supports another type of storage — "All day", in which dates are stored in the "HTML Datetime" format.
An example of getting values:
{{ node.field_date_range.value }}
{{ node.field_date_range.end_value }}
An example of getting Timestamp from DrupalDateTime objects:
{{ node.field_date_range.start_date.getTimestamp() }}
{{ node.field_date_range.end_date.getTimestamp() }}
Values in the required format are outputted in the same way as a simple date field.
Timestamp
This field type is a special case of the date field, which stores values in Timestamp format. Outputting the value in the needed format is even easier:
{{ node.field_timestamp.value|date('d.m.Y H:i:s') }}

{{ node.field_timestamp.value|format_date('FORMAT_NAME') }}
By the way, system dates and times (entity creation date, entity update date, etc.) are stored in this format. There are two ways to get these values:
{{ node.created.value }}
{{ node.changed.value }}

{{ node.getCreatedTime() }}
{{ node.getChangedTime() }}
Link
A link field supports different types of links and, therefore, different formats for storing them (or rather, the format is the same — URI, but it has different types):
- entity reference, stored as
entity:ENTITY_TYPE/ENTITY_ID; - a link to a path or an alias (may be with an anchor and/or parameters), stored as
internal:PATH; - a link to the "route", stored as
route:ROUTE_NAME; - external link, stored as a regular URL like
https://example.com/test.
An example of getting this value:
{{ node.field_link.uri }}
The field provides a value for the label as well, an example of getting:
{{ node.field_link.title }}
The proper way to output link markup is to use the link function, which just takes a parameter in URI format, as well as a label and an optional object with attributes. Examples:
{{ link(node.field_link.title, node.field_link.uri, { 'class': ['CLASS-NAME'] }) }}
{{ link(node.field_link.title, node.field_link.uri, { 'target': '_blank' }) }}
In addition to the URI, the link function also accepts the Drupal\Core\Url object, in which case the parameters of the object will also be taken into account. An example:
{{ link(node.field_link.title, node.field_link.0.url) }}
The link function properly handles the <nolink> and <button> paths and generates markup using the <span> and <button> tags respectively.
If the label for the link is optional, then it is better to add an appropriate check and provide an alternative value, otherwise, if the label value is empty, the output result will not be visible on the page. Examples:
{{ link('LINK LABEL'|t, node.field_link.uri) }}

{% set link_url = node.field_link.0.url %}
{% set link_label = node.field_link.title ? node.field_link.title : link_url.toString() %}
{{ link(link_label, link_url) }}
The function accepts only strings as a label, which makes this method inappropriate when you need to add some markup inside the <a> tag, such as an image or an icon. In this case, the markup can be set directly in the template, but you will have to take care of the tags yourself.
To generate the markup, you will need the value of the link as a string:
{{ node.field_link.0.url.toString() }}
It can also be obtained using the file_url filter, from the Twig Tweak module. Don't be confused by its name, in this case the filter will correctly convert any URI.
{{ node.field_link|file_url }}
A simple example of usage:
<a href="{{ node.field_link.0.url.toString() }}">{{ node.field_link.title }}<a>
Advanced example with checks:
{% set link_route = not node.field_link.0.url.external ? node.field_link.0.url.routeName : null %}
{% if link_route == '<nolink>' %}
  {% set link_alt_tag = 'span' %}
{% elseif link_route == '<button>' %}
  {% set link_alt_tag = 'button' %}
{% else %}
  {% set link_alt_tag = null %}
{% endif %}
{% set link_url = link_alt_tag ? null : node.field_link.0.url.toString() %}
{% set link_alt_title = link_url ? link_url : 'Link'|t %}
{% set link_title = node.field_link.title ? node.field_link.title : link_alt_title %}
{% set link_attributes = create_attribute() %}
{% if link_url %}
  {% set link_attributes = link_attributes.setAttribute('href', link_url) %}
{% endif %}
{% set link_tag = link_alt_tag ? link_alt_tag : 'a' %}

<{{link_tag}}{{ link_attributes }}>{{ link_title }}</{{link_tag}}>
If you need to change not the markup, but the URL of the link (for example, add a GET parameter), then you can use the path or url functions. Both take as arguments the name of the route, the parameters of the route, and the object of the properties of the link (therefore, they work only with internal paths). The path function outputs a relative URL, while url outputs an absolute one.
An example of adding the destination parameter:
<a href="{{ path(node.field_link.0.url.routeName, node.field_link.0.url.routeParameters, { 'query': { 'destination': path('<current>') } }) }}">{{ node.field_link.title }}</a>
An example of outputting an absolute URL:
<a href="{{ url(node.field_link.0.url.routeName, node.field_link.0.url.routeParameters) }}">{{ node.field_link.title }}</a>
Documentation of Drupal functions available in Twig templates.
Reference field values
The value of the reference field is the ID of the target entity. An example of getting and outputting this value for all reference fields:
{{ node.REFERENCE_FIELD_NAME.target_id }}
An example of outputting the value of a multiple field:
<div class="field-wrapper">
  {% for item in node.REFERENCE_FIELD_NAME %}
    <div class="field-item-wrapper">
      {{ item.target_id }}
    </div>
  {% endfor %}
</div>
An option, using the order of the value:
<div class="field-wrapper items--{{ node.REFERENCE_FIELD_NAME|length }}">
  {% for key, item in node.REFERENCE_FIELD_NAME %}
    <div class="field-item-wrapper item--{{ key + 1 }}">
      {{ node.node.REFERENCE_FIELD_NAME[key].target_id }}
    </div>
  {% endfor %}
</div>
Usually, it needs to output not an ID, but the target entity itself or the value of some of its fields. To do this, it first needs to get the target entity object using the entity method.
Out of the box, there is no way in Drupal to simply output the entire entity, but this can be done using the view filter from the Twig Tweak module (parameters are optional):
{{ node.REFERENCE_FIELD_NAME.entity|view('VIEW_MODE', 'LANGCODE') }}
If you already know the type of the target entity, it can be outputted using the drupal_entity function (from the Twig Tweak module) even without loading the entity object:
{{ drupal_entity('ENTITY_TYPE', node.REFERENCE_FIELD_NAME.target_id, 'VIEW_MODE') }}
All the methods for the parent entity are supported for the target entity as well, including the basic label(), bundle(), and id() (the value of the latter is easier to get through target_id without loading the target entity). An example:
{{ node.REFERENCE_FIELD_NAME.entity.label() }}
If the target entity has a representation as a page (technically speaking, it implements the toUrl() method), then you can quickly get the URL or already prepared link to this page, using the entity_url and entity_link filters from the Twig Tweak module:
Если целевая сущность имеет какое-либо представление в виде страницы (выражаясь технически — имплементирует метод toUrl()), то с помощью фильтров entity_url и entity_link из модуля Twig Tweak, можно быстро получить URL этой страницы или сразу готовую ссылку:
{{ node.REFERENCE_FIELD_NAME.entity|entity_url }}

{{ node.REFERENCE_FIELD_NAME.entity|entity_link }}
The field values of the target entity are outputted in the same way as it is done for the parent entity:
{{ node.REFERENCE_FIELD_NAME.entity.FIELD_NAME.value }}
Therefore, all examples of working with the fields of the parent entity are also valid for the target ones.
Including the possibility of using the view filter (parameters are optional) and the drupal_field function from the Twig Tweak module, which, in the case of target entity fields, becomes much more useful, since the content variable is not available for target entities.
{{ node.REFERENCE_FIELD_NAME.entity.FIELD_NAME|view('VIEW_MODE', 'LANGCODE') }}

{{ drupal_field('FIELD_NAME', 'TARGET_ENTITY_TYPE', node.REFERENCE_FIELD_NAME.target_id, 'VIEW_MODE') }}
Next, the specialties of data output for target entities of different types will be provided.
File, Image references
File and Image reference are special fields. The metadata is stored in the field itself, and the values related directly to the file are stored in the entity object.
For the File reference field, a flag for the need to display the file and a description can be defined.
For the Image reference field, alternative text, title, and size of the original image can be defined.
An example of getting these values:
{{ node.field_file.display }}
{{ node.field_file.description }}

{{ node.field_image.alt }}
{{ node.field_image.title }}
{{ node.field_image.width }}
{{ node.field_image.height }}
Both field types reference the File entity type. An example of getting information about the name, size, and Mime type of the file:
{{ node.field_file.entity.filename.value }}
{{ node.field_file.entity.filesize.value }}
{{ node.field_file.entity.filemime.value }}
Several ways to get the URI of a file (the last one from the Twig Tweak module):
{{ node.field_file.entity.uri.value }}
{{ node.field_file.entity.fileuri }}
{{ node.field_file|file_uri }}
Several ways to get the URL of a file (the last two from the Twig Tweak module):
{{ file_url(node.field_file.entity.fileuri) }}
{{ node.field_file.entity.fileuri|file_url }}
{{ node.field_file|file_url }}
You can get the URL of an image with a certain Image style using the image_style filter from the Twig Tweak module, the filter takes a URI as an argument:
{{ node.field_image.entity.uri.value|image_style('IMAGE_STYLE') }}
{{ node.field_image|file_uri|image_style('IMAGE_STYLE') }}
To simply output an image as markup (<img> tag), it would be easier and more proper to use the value from the content variable or the Twig Tweak module features — the view filter or the drupal_field function. It doesn't even need to invoke the target entity for this. Drupal will generate a markup with all the necessary attributes according to the field widget settings.
{{ content.field_image|without('#theme') }}
{{ node.field_image|view('VIEW_MODE')|without('#theme') }}
{{ drupal_field('field_image', 'node', node.id, 'VIEW_MODE')|without('#theme') }}
To customize the markup of the <img> tag itself or its attributes, you will have to generate the markup yourself. A simple example without value checks:
{% set image_attributes = create_attribute({
  'src': file_url(node.field_image.entity.fileuri),
  'alt': node.field_image.alt,
  'title': node.field_image.title,
  'width': node.field_image.width,
  'height': node.field_image.height,
  'loading': 'lazy'
}) %}

<img{{ image_attributes }}>
An example of outputting an image of a certain style:
{% set image_attributes = create_attribute({
  'src': node.field_image|file_uri|image_style('IMAGE_STYLE'),
  'alt': node.field_image.alt,
  'title': node.field_image.title,
  'width': 480,
  'height': 320,
  'loading': 'lazy'
}) %}

<img{{ image_attributes }}>
You can also output an image as markup using the drupal_image function from the Twig Tweak module. The function accepts different types of parameters to define an image and allows, if necessary, to pass attributes for the <img> tag, (documentation):
{{ drupal_image(node.field_image|file_uri, '', {
  alt: node.field_image.alt,
  title: node.field_image.title,
  width: node.field_image.width,
  height: node.field_image.height,
  loading: 'lazy'
}) }}

{{ drupal_image(node.field_image|file_uri, 'IMAGE_STYLE', {
  alt: node.field_image.alt,
  title: node.field_image.title,
  width: 480,
  height: 320,
  loading: 'lazy'
}) }}
In the case of using image styles, the disadvantage of both methods is that the actual dimensions for the generated image cannot be obtained, and it is not always possible to specify fixed ones.
Another feature of the drupal_image function is to output a Responsive image style. It would not be easy to generate markup for it yourself:
{{ drupal_image(node.field_image.entity.fileuri, 'RESPONSIVE_IMAGE_STYLE', responsive=true) }}
An example of using an image URL as the value of the background-image CSS property:
{% if not node.field_image.isEmpty %}
  {% set image_url = file_url(node.field_image.entity.fileuri) %}
{% endif %}

{% set image_attributes = create_attribute() %}
{% if image_url %}
  {% set image_attributes = image_attributes.setAttribute('style', 'background-image:url(' ~ image_url ~ ');') %}
{% endif %}

<div{{ image_attributes.addClass('wrapper-class') }}></div>
Respectively, for an image style, the URL will look like this:
{% set image_url = node.field_image|file_uri|image_style('IMAGE_STYLE') %}
To mark up the value of the File reference field, a variety of information can be useful, an example of usage:
{% set file_url = file_url(node.field_file.entity.fileuri) %}
{% set file_name = node.field_file.entity.filename.value %}
{% set file_extention = file_name|split('.')|last %}
{% set file_description = node.field_file.description %}
{% set file_size = node.field_file.entity.filesize.value %}
{% set file_size_formatted = '@size KB'|t({ '@size': (file_size / 1024)|round(2) }) %}

<div><a href="{{ file_url }}" download="{{ file_name }}">{{ file_description }}</a> ({{ file_extention }}, {{ file_size_formatted }})</div>
The formatted value of the file size can be obtained using the format_size filter from the Twig Tweak module (the unit is selected automatically):
{% set file_size_formatted = file_size|format_size %}
Media references
For the Media of types Audio, Video, Document, and Image, the resources themselves are stored using standard File reference and Image reference fields, the work with them is described above. Media is a kind of wrapper for these fields, unifying the work with resources. Media holds additional resource type data (aka "plugin") that makes Drupal provide the appropriate widgets to display the field, but in terms of raw values, there is nothing new there.
You can get the type of the Media entity itself in the standard way:
{{ node.field_media_multiple.entity.bundle() }}
The resource type can be obtained from the Source object:
{{ node.field_media_multiple.entity.getSource().getPluginId() }}
The URL of a resource, regardless of its type, can be obtained using the file_url filter from the Twig Tweak module:
{{ node.field_media_multiple.entity|file_url }}
Unlike the media types mentioned above, the Remote video media type stores resources using a plain text field. The value is handled by the oEmbed plugin, which is also often used in media types provided by contrib modules. In this case, data from the Media object can be very useful.
An example of getting media metadata from a node template (in a media template, the media variable will already contain the entity object):
{% set media = node.field_media.entity %}
{% set media_source = media.getSource() %}

{{ media_source.getMetadata(media, 'ATTRIBUTE_NAME') }}
Getting a list of all available attributes:
{{ media_source.getMetadataAttributes() }}
Most useful attributes:
{{ media_source.getMetadata(media, 'title') }}
{{ media_source.getMetadata(media, 'author_name') }}
{{ media_source.getMetadata(media, 'author_url') }}
{{ media_source.getMetadata(media, 'provider_name') }}
{{ media_source.getMetadata(media, 'thumbnail_uri') }}
{{ media_source.getMetadata(media, 'thumbnail_width') }}
{{ media_source.getMetadata(media, 'thumbnail_height') }}
{{ media_source.getMetadata(media, 'html') }}
In the case of Remote video, it often happens that the cover for the video is either poor quality or missing. Therefore, it becomes necessary to use an image from the custom field as a cover. The complication here is launching a video by clicking on the video cover, since the iframe of the resource will be inside the oEmbed iframe, and it will not be possible to control the iframe of the resource using JavaScript.
A simple markup example that works with both types of media: Remote video and Video (file):
{% if not node.filed_media.isEmpty %}
  {% set media = node.field_media.entity %}
  {% set media_source = media.getSource() %}
  {% set video_plugin = media_source.getPluginId() %}
  {% set video_provider = media_source.getMetadata(media, 'provider_name') ? media_source.getMetadata(media, 'provider_name') : 'file' %}
  {% set video_classess = [
    'video__video',
    'video__video--plugin-' ~ video_plugin|clean_class,
    'video__video--provider-' ~ video_provider|clean_class,
  ] %}

  <div class="video">
    <div{{ create_attribute().addClass(video_classess) }}>
      {% if video_plugin == 'oembed:video' %}
        {{ media_source.getMetadata(media, 'html')|raw }}
      {% else %}
        {{ media.field_media_video_file|view|without('#theme') }}
      {% endif %}
    </div>

    {% if not node.field_image.isEmpty %}
      <div class="video__poster">
        {{ content.field_image|without('#theme') }}
        <button class="video__play-button">{{ 'Play'|t }}</button>
      </div>
    {% endif %}
  </div>
{% endif %}
The view filter from the Twig Tweak module was used to output the File reference field markup from the Video media as a <video> tag, but the same result can be achieved without it. You can leave the rendering of the field_media_video_file field in the media template:
{{ content.field_media_video_file|without('#theme') }}
And in the node template, output the value of the field_media field from the content variable:
{{ content.field_media|without('#theme') }}
A simple option of JavaScript "Play" button click handler for the above markup, without using the video hosting APIs:
(function ($, Drupal, drupalSettings) {
  'use strict';

  Drupal.behaviors.LIBRARYNAMEFunctions = {
    attach: function(context, settings) {

      // Handling media video playback starting when custom poster is used.
      $(context).find('.video__play-button').click(function() {
        var videoWrapper = $(this).closest('.video').find('.video__video');

        // Getting plugin type and video element.
        if (videoWrapper.hasClass('video__video--plugin-video-file')) {
          var plugin = 'file';
          var video = videoWrapper.find('video')[0];
        }
        else if (videoWrapper.hasClass('video__video--plugin-oembedvideo')) {
          var plugin = 'oembed';
          var video = videoWrapper.find('iframe')[0];
        }

        // Removing poster.
        $(this).closest('.video__poster').remove();

        // Starting playback.
        if (plugin && plugin === 'file') {
          video.play();
        }
        else if (plugin && plugin === 'oembed') {
          video.src += "&autoplay=1";
        }
      });

    }
  };
}) (jQuery, Drupal, drupalSettings);
Node (Content), Taxonomy term, User references
Fields that reference different entity types (including media) actually use a common field type — Entity Reference.
The target entity has no difference from the parent entity in terms of working with raw field values. But obtaining the processed values of the fields of the target entity (as in the content variable) from the parent template will not work.
If the values of the fields of the target entity are not used in the logic of the parent entity template, but should simply be outputted, then it would be more proper to leave the rendering of the target entity to the template of the entity itself (that is, output the value of the reference field from the content variable of the parent entity).
If the values of the target entity fields are needed in the parent entity template, then Twig allows you to get the values of any fields at any level of nesting, using the field object and the entity method that returns the object of the target entity.
A simple example of using both approaches is displaying target entities in tabs. Tab labels and IDs use values from the entity object, while tab content uses field values rendered using the target entity template:
<div class="tabs">
  <div class="tabs__list">
    {% for object_item in node.REFERENCE_FIELD_NAME %}
      <div class="tabs__list-item" data-target="tabs__content-item--{{ object_item.target_id }}">
        {{ object_item.entity.label() }}
      </div>
    {% endfor %}
  </div>

  <div class="tabs__content">
    {% for content_item_key, content_item in content.REFERENCE_FIELD_NAME if content_item_key|first != '#' %}
      <div class="tabs__content-item tabs__content-item--{{ node.REFERENCE_FIELD_NAME[content_item_key].target_id }}">
        {{ content_item }}
      </div>
    {% endfor %}
  </div>
</div>
Another use case is generating markup for a slider or carousel, where the slides are the content of an entity, and the slider controls must be represented by some value of that entity (an image or other parameter).
Paragraph reference
An Entity reference revision field, an example of which is a Paragraph reference, in addition to the ID of the target entity, also stores the ID of the revision. A new paragraph revision is created each time the parent entity changes. Paragraph revisions are needed so that previous revisions of the parent entity point to corresponding revisions of their built-in child entities.
When invoking the target entity using the entity method, the correct revision will always be returned, so there is no practical use for a revision ID in a Twig template. But if necessary, you can get it like this:
{{ node.field_paragraph.target_revision_id }}
Field translation values
You can output the translated field value using the translation method:
{{ node.translation('LANGCODE').label() }}
{{ node.translation('LANGCODE').FIELD_NAME.value }}
In addition to the obvious use for outputting the value of a field in different languages, it may happen you need to output in the parent entity the translated value of a translatable field from an untranslatable target entity. For example, a translation of a taxonomy term (a translatable entity) referenced by a user entity (a non-translatable entity) in a node template (a translatable entity).
In this case, the term value will be rendered in the language of the user's entity (that is, the default language) and not the language of the node. An example of outputting translated value:
{% set langcode = node.langcode.langcode %}
{% set user = node.field_user.entity %}
{% set term = user.field_taxonomy_term.entity %}
{% set term_label = term.hasTranslation(langcode) ? term.translation(langcode).label() : term.label() %}

{{ term_label }}
If you need to output a value in a language other than the current language of the entity or output a value in a template in which the langcode object is not available, then the language code can be passed to the template using the function implementing hook_preprocess_HOOK() in the THEMENAME .theme file of your theme. An example of passing the current language code to an abstract element template:
/**
 * Implements hook_preprocess_HOOK().
 */
function THEMENAME_preprocess_ELEMENT(&$variables) {
  $variables['langcode'] = \Drupal::languageManager()->getCurrentLanguage()->getId();
}
Views templates
View templates come in several types, or more correctly, several levels. The following template files are defined for the Stable 9 theme.
The View level:
core/themes/stable9/templates/views/views-view.html.twig— defines the container layout for the view title, header, expanded filters, attachments, rows themselves, pager, and footer.
The View format level:
core/themes/stable9/templates/views/views-view-grid.html.twig— defines the markup for the Grid format;core/themes/stable9/templates/views/views-view-list.html.twig— defines the markup for the HTML list format;core/themes/stable9/templates/views/views-view-table.html.twig— defines the markup for the Table format;core/themes/stable9/templates/views/views-view-unformatted.html.twig— defines the markup for the Unformatted list format.
Row style level:
Templates of this level are available for all standard view formats, except the Table format (in which row processing happens in the view format template).
Out of the box, two row styles are available: Content and Fields.
The Content row style will use the already familiar content entity templates, and the Fields row style will use the core/themes/stable9/templates/views/views-view-fields.html.twig template.
Looking ahead, I will say that the most interesting, in terms of working with markup, are the templates views-view.html.twig, views-view-unformatted.html.twig and views-view-fields.html.twig.
The Views module also defines several templates for supporting markup, but working with them should not be difficult.
Template names suggestions
All View templates, including supporting markup templates, have the following naming formats:
BASE-TEMPLATE--VIEW-ID--DISPLAY-ID.html.twigBASE-TEMPLATE--DISPLAY-ID.html.twigBASE-TEMPLATE--VIEW-ID--DISPLAY-TYPE.html.twigBASE-TEMPLATE--DISPLAY-TYPE.html.twigBASE-TEMPLATE--VIEW-ID.html.twigBASE-TEMPLATE.html.twig
Also, additional name formats will be available for content entity templates if the appropriate row style is used. An example for a node template:
node--view--VIEW-ID--DISPLAY-ID.html.twignode--view--VIEW-ID.html.twig
At the time of publication, suggestions for View template names do not appear in debug output. This can be fixed by applying the patch from issue #2118743 manually.
The View template
views-view.html.twig is the main view template that defines the general markup. Many different variables are passed to it: the content of the View blocks (the header, footer variables, etc.), the results itself (the rows variable), and the View object (the view variable).
The View object is available in all view templates, at all levels, it is a kind of global variable.
A few useful values can be obtained from it, for example:
view.getTitle()— a common title of the view, not the current display;view.exposed_raw_input— an array of values of all exposed filters;view.getExposedInput.FILTER_NAME— value of theFILTER_NAMEexposed filter;view.args— an array of values of all arguments;view.args.0— the value of the first argument (the rest can be obtained in a similar way);view.result|lengthis the number of results in the current View.
It is only possible to get the total number of results with "Display all items" and "Paged output, full pager" pagers:
{{ view.total_rows }}
Usually, in a general View template, it may be necessary to output a summary of query results, the values given above should be sufficient for this. A simple example of a search summary:
{% set key = view.getExposedInput.KEY_NAME %}
{% set count = view.result|length %}
{% set total = view.total_rows %}

{{ 'Search results for <strong>"@key"</strong>'|t({ '@key': key }) }}
{{ 'Displayed @count of @total results'|t({ '@count': count, '@total': total }) }}
Pretty much the same can be done in the Header, through the Views UI, but the template is the right place for it.
By the way, the fields of the Header, Footer, and "No results behavior" can be outputted separately, and excluded from the output. Examples:
{{ header.FIELD_NAME }}
{{ header|without('FIELD_NAME') }}
The View format template
In the templates of this level, the main variable is rows, which contains the results of the current display. Also in the template, in one form or another, there are settings for the View format. For different formats, different variables are used for settings.
The View format templates are typically used when the structure of the output needs to be changed. For example: change the order of results, remove or add results, display results using a non-standard layout, etc.
Templates for Сontent row style
It's my personal feeling that the Content row style is unfairly underrated in the Drupal developer community. I haven't come across any mention of it in articles or videos about theming. Nevertheless, I consider it the most convenient option in terms of working with markup.
For use in a View, you can create a separate View mode, add all the necessary fields, and configure the widgets in the usual way on the Manage display tab. If necessary, you can create a separate template file according to the naming suggestions.
Yes, the Views UI also allows you to do this, but not in the most optimal way.
For the sake of flexibility, the Views UI has a bunch of non-obvious solutions and features:
- overloaded markup management UI (wrappers, tags, classes, and other attributes):
- meaning of some options is not obvious;
- controls are distributed in different places;
- the same settings look different for different elements;
- logic management mixed with markup management;
- the need to add fields and hide them from the output, in order to then use their value in another field;
- the need to add an additional field with markup in order to have a certain value at the desired nesting level;
- markup is generated programmatically, based on the parameters that are stored in the database;
- inconvenient process of working with translations.
Compared to the capabilities of Twig templates, these features can be considered disadvantages. Yes, for experienced Drupal developers, the Views UI may not cause problems, but it's just not the right tool for the task, unlike Twig, which is designed specifically for this.
As you can see, entity templates have enough flexibility and functionality to fully control the markup, display logic, and field values. At the same time, the format and values of the fields are separated from HTML markup, processing happens on the right level, extensibility is preserved, caching and escaping work properly.
One more pro of using Content row style and entity templates is that you don't need to add Relationships to the View. You can get values from related entities directly in the template, or pass them to the template at the preprocess step.
Templates for Fields row style
Despite all the advantages of the Content row style for most common tasks, the Fields row style also has its uses — when the value of the field or its format is provided by the View. For example, fields with overwritten value, fields with value aggregation, fields of related entities obtained through a View plugin, etc.
The good news is that it is possible to use the full power of Views and the functionality of Twig together — in a template for the Fields row style.
The Views UI also allows using Twig in some places, but its capabilities are quite limited there.
In turn, the views-view-fields.html.twig template is one of the most convenient, it passes all the values and variables that may be needed.
The default template markup looks pretty standard (which is to be expected), but you probably won't need it at all.
The values and settings of the fields are in the fields array, in the template they are processed one after another, and markup is generated for each field in accordance with the settings in the Views UI.
To create custom markup, settings from the Views UI, usually, are not needed, it can simply be set in the template.
It is quite easy to get the values themselves. An example of outputting the value processed by the Views plugin (that is, just a value, without wrappers):
{{ fields.FIELD_NAME.content }}
An example with checking for the presence of the value before outputting:
{% if not fields.FIELD_NAME.isEmpty %}
  {{ fields.FIELD_NAME.content }}
{% else %}
If the field value is multiple and "Display all values in the same row" is enabled, then the values will be merged into one by the view handler, in which case the Display type and/or Separator settings will be used from the Views UI.
If multiple field values are displayed in different rows, then a separate row with its own set of fields will be generated for each value, as if they were from different results.
For some fields, a raw value is also available:
{{ fields.FIELD_NAME.raw }}
The rest of the display settings, such as label, wrapper tags, classes, and other attributes are also available in the field object, but there is not much practical use for them, it is easier to set them directly in the template itself, and not in the Views UI (to then simply pass them to the template).
Also in the template, there is an object with the result of the request — the row variable. It has several useful values.
The ID of the entity on which the request is generated. In the case of nodes, the property will be called nid:
{{ row.nid }}
The object of the entity on which the request is generated. If you are going to use it, then it makes sense to create a variable with a familiar name right away. An example for node:
{% set node = row._entity %}
Essentially, the entity object allows you to use the Fields row style template similarly to the content entity template: get, use in logic, and output any field values of the entity itself and its related child entities.
Page, region, and block templates
The markup of a page is defined by templates on several levels — page, regions, and blocks. Relevant template files in the Stable 9 theme:
core/themes/stable9/templates/layout/html.html.twig— defines page markup on the level of<html>,<head>and<body>tags;core/themes/stable9/templates/layout/page.html.twig— defines the page markup inside the<body>tag, in particular, the markup of regions;core/themes/stable9/templates/layout/region.html.twig— defines markup on the page region level;core/themes/stable9/templates/block/block.html.twig— defines markup on the block level.
Entity and View templates are included inside the Main page content block, usually located inside the Content region.
Page templates
Two templates define the global page markup, html.html.twig and page.html.twig.
Several name suggestions are available for both templates, depending on the module responsible for processing the page. Examples:
html--node--NODE-ID.html.twightml--node.html.twightml--VIEW-NAME.html.twigpage--node--NODE-ID.html.twigpage--node.html.twigpage--VIEW-NAME.html.twig
The set of available global variables in both templates is very similar. The main variable in both templates is the page array containing the page elements sorted by region. But each template also has unique variables due to the purpose of the template.
Useful variables in the html.html.twig template:
attributes—<body>tag attributes;html_attributes—<html>tag attributes;head_title— contains the title of the page and site;root_path— base component of the page path;node_type— node type (for node pages).
Useful variables in the page.html.twig template:
front_page— path to the front page;language— an object of typeDrupal\Core\Language\Languagefor the current page language;node— node entity object (for node pages).
Generally, editing the html.html.twig template makes sense in the following cases:
- managing
<body>tag classes; - add inline JS or CSS code (often required for integration with metrics and analytics systems).
An alternative way to manage the <body> tag classes is doing it at the preprocess step by defining a function that implements hook_preprocess_html() in your theme's THEMENAME.theme file:
/**
 * Implements hook_preprocess_HOOK().
 */
function THEMENAME_preprocess_html(array &$variables) {
  if (SOME-CONDITION) {
    $variables['attributes']['class'][] = 'SOME-CLASS';
  }
}
To add elements inside the <head> tag, it is better to use special modules or do it programmatically, this will allow Drupal to optimize page loading. An example of adding an element programmatically:
/**
 * Implements hook_preprocess_HOOK().
 */
function THEMENAME_preprocess_html(array &$variables) {
  $preload_font_roboto = [
    '#tag' => 'link',
    '#attributes' => [
      'rel' => 'preload',
      'href' => 'https://fonts.googleapis.com/css?family=Roboto:300,400,500,700&display=swap',
      'as' => 'style',
    ],
  ];

  $variables['page']['#attached']['html_head'][] = [$preload_font_roboto, 'preload_font_roboto'];
}
Editing the page.html.twig template is usually required when creating any unique theme. This is the main template that defines the layout of the page elements, and its structure highly depends on the design.
If the page layout depends on some parameter, including those defined in the theme settings, then the values of these parameters can be passed to the template by creating a function that implements hook_preprocess_page() in the THEMENAME.theme file of your theme:
/**
 * Implements hook_preprocess_HOOK().
 */
function THEMENAME_preprocess_page(array &$variables) {
  if (SOME-CONDITION) {
    $variables['VARIABLE1'] = 'SOME-VALUE';
  }
  $variables['VARIABLE2'] = theme_get_setting('SETTING_NAME');
}
Region templates
By default, one common template is used for all regions — region.html.twig.
A name suggestion that includes the region name is available for the template, and this is usually sufficient:
region--REGION-NAME.html.twig
Useful variables in the region.html.twig template:
region— the region name;elements— contains render arrays of all blocks in the region;content— the main template variable, contains the rendered markup of all blocks in the region.
The composition, order, and visibility conditions of blocks for a region are determined by the Block layout page of the Admin UI.
But it is also possible to output the blocks manually, separately:
{{ elements.BLOCK_NAME }}
Using the functions of the Twig tweak module, you can output blocks from other regions or blocks that are not placed into any region at all (without the Block configuration entity), there are a lot of options, see the documentation for more details.
If some part of the region markup is static or does not require configuration from the administration interface, then it can be set directly in the template, this is quite the proper place.
Block templates
The main template for all blocks is common — block.html.twig.
Standard name suggestions:
block--PLUGIN-NAME--BLOCK-ID.html.twigblock--PLUGIN-NAME.html.twig
At the time of publication, the list does not include suggestions that contain bundle and display mode for custom blocks. They can be added by applying the patch from issue #3062376 manually.
block--block-content--BLOCK-ID--VIEW-MODEblock--block-content--BLOCK-IDblock--block-content--BUNDLE--VIEW-MODEblock--block-content--BUNDLEblock--block-content--VIEW-MODE
Core base themes already have overridden templates for some block types (plugins), menu blocks, status messages block, blocks with action tabs, etc.
Blocks are controlled by different plugins and often require different markup. For example, non-standard markup of wrappers, or a wrapper is not required at all. In the block template (and many other templates), this is implemented using the Twig functionality — the block structure.
Twig allows you to put markup inside a block structure, thus specifying the parts of a template that are meant to be overridden. Another template might use a template with a block structure as a base (extends it), overriding only the markup inside the block structure. The remaining parts of the template will be inherited unchanged. An abstract example:
{# base-template.html.twig #}

<div class="globabl-wrapper">
  {% block content %}
    <div class="content-wrapper">
      {{ content }}
    </div>
  {% endblock %}
</div>
{# extended-template.html.twig #}

{% extends "base-template.html.twig" %}

{% block content %}
  <div class="content-wrapper">
    <div>Before content</div>
    {{ content }}
    <div>After content</div>
  </div>
{% endblock %}
Twig documentation on using the block and extends structures.
When creating a custom template for a block, you can use either an extending (the extends structure) or a complete overriding, depending on whether you need the standard block wrappers in your template or not. See the Stable 9 theme (core/themes/stable9/templates/block) for examples of both approaches.
Since the blocks are controlled by different plugins, there is no common set of useful variables for them, except perhaps base_plugin_id. But in one form or another, the template will necessarily contain the values of the configuration parameters defined on the Block layout page (the configuration variable) and the content of the block provided by the plugin (the content variable).
Creating custom Block plugin
Sometimes you may want to make certain markup (both static and programmatically defined) available as a block, for example, to control visibility with a block configuration.
To create your own programmatic block type, you need to define a block plugin PHP class in your module.
Any more or less complex markup is more convenient to set in a template. There are several ways to declare a template for a block. A simple option is to define the necessary variables in your block plugin, define the template in a function that implements hook_theme, and pass the variables themselves to the template. The specialty of this option is that in this way you can set a template only for the block content, but not for the block element itself, so you will not be able to override the block wrapper in such a template. However, for a simple injection of markup into the page, this is usually well enough.
If you want to keep full compatibility with the block system, then the block content must be specified as a render array. If necessary, it will be possible to pass raw values to the template. Another advantage of this option is that it will work even with a general block template, and not just a specific one.
For example, let's make a block that displays a link to the previous page if the destination parameter is defined in the URL of the current page.
To expose all the possibilities of the block system, we will use the Dependency injection in the block plugin, add a parameter to the configuration form, additionally pass raw values to the template, and create a custom template where we will use them instead of the default output.
Let's name our module example, and assume that all the standard files for the module have already been created.
It needs to create a file for the block plugin class modules/custom/example/src/Plugin/Block/BackLinkBlock.php with the following content:
<?php

namespace Drupal\example\Plugin\Block;

use Drupal\Core\Block\BlockBase;
use Drupal\Core\Form\FormStateInterface;
use Drupal\Core\Plugin\ContainerFactoryPluginInterface;
use Drupal\Core\Url;
use Drupal\Core\Link;
use Symfony\Component\DependencyInjection\ContainerInterface;

/**
 * Provides a backlink block.
 *
 * @Block(
 *   id = "example_backlink_block",
 *   admin_label = @Translation("Back link"),
 *   category = @Translation("Example")
 * )
 */
class BackLinkBlock extends BlockBase implements ContainerFactoryPluginInterface {

  /**
   * Current request object.
   *
   * @var \Symfony\Component\HttpFoundation\Request|null
   */
  protected $currentRequest;

  /**
   * {@inheritdoc}
   */
  public static function create(ContainerInterface $container, array $configuration, $plugin_id, $plugin_definition) {
    $instance = new static($configuration, $plugin_id, $plugin_definition);
    $instance->currentRequest = $container->get('request_stack')->getCurrentRequest();

    return $instance;
  }

  /**
   * {@inheritdoc}
   */
  public function defaultConfiguration() {
    return [
      'show_home' => TRUE,
      'label_display' => FALSE,
    ];
  }

  /**
   * {@inheritdoc}
   */
  public function blockForm($form, FormStateInterface $form_state) {
    // Adding "Show home" checkbox to block configuration form.
    $form['block_backlink'] = [
      '#type' => 'fieldset',
      '#title' => $this->t('Configure backlink'),
    ];
    $form['block_backlink']['show_home'] = [
      '#type' => 'checkbox',
      '#title' => $this->t('Show a link to the Homepage as a fallback'),
      '#description' => $this->t("If the previous page can't be determined, show the link to the home page instead."),
      '#default_value' => $this->configuration['show_home'],
    ];

    return $form;
  }

  /**
   * {@inheritdoc}
   */
  public function blockSubmit($form, FormStateInterface $form_state) {
    // Handling submmit of block configuration form.
    $block_backlink = $form_state->getValue('block_backlink');
    $this->configuration['show_home'] = $block_backlink['show_home'];
  }

  /**
   * {@inheritdoc}
   */
  public function getCacheMaxAge() {
    // Preventing link from being cached.
    return 0;
  }

  /**
   * {@inheritdoc}
   */
  public function build() {
    // Determining the previous page by destination GET parameter.
    $destination = $this->currentRequest->query->get('destination');
    // Hiding the whole block if there is no link to show.
    if (empty($destination) && !$this->configuration['show_home']) {
      return [];
    }

    // Preparing block output and collecting raw values as well.
    $options = [
      'attributes' => [
        'class' => ['backlink'],
      ],
    ];

    $is_backlink = !empty($destination);
    if ($is_backlink) {
      $url = Url::fromUserInput($destination, $options);
      $title = $this->t('Back');
    }
    else {
      $url = Url::fromRoute('<front>', [], $options);
      $title = $this->t('Home');
    }

    $link = Link::fromTextAndUrl($title, $url);

    return [
      // Passing raw data for using in custom templates.
      '#is_backlink' => $is_backlink,
      '#link_url' => $url,
      '#link_title' => $title,
      // The only renderable element, it is an actual block output.
      'link' => $link->toRenderable(),
    ];
  }

}
It also needs to create a modules/custom/example/example.module file with the following content:
<?php

/**
 * Implements hook_theme().
 */
function example_theme() {
  return [
    'block__example_backlink_block' => [
      'render element' => 'elements',
      'base hook' => 'block',
    ],
  ];
}

/**
 * Implements hook_preprocess_HOOK() for block templates.
 */
function example_preprocess_block(&$variables) {
  switch ($variables['base_plugin_id']) {
    case 'example_backlink_block':
      // Passing raw values to template as root level variables.
      $variables['is_backlink'] = $variables['content']['#is_backlink'] ?? '';
      $variables['link_url'] = $variables['content']['#link_url'] ?? '';
      $variables['link_title'] = $variables['content']['#link_title'] ?? '';
      $variables['show_home'] = (bool) $variables['configuration']['show_home'];

      break;
  }
}
The default template would output markup from the content render array, in this case, an HTML link element generated programmatically from the Link object.
In a custom template, the content render array is not used, but instead, the element is defined using markup directly in the template, which allows, for example, to insert an icon inside the <a> tag.
Let's create a template file modules/custom/example/templates/block--example-backlink-block.html.twig with the following content:
{% set classes = [
  'block',
  'block-' ~ configuration.provider|clean_class,
  'block-' ~ plugin_id|clean_class,
  'block-backlink',
] %}

<nav role="navigation"{{ attributes.addClass(classes)|without('role') }}>
  {{ title_prefix }}
  {% if label %}
    <h2{{ title_attributes.addClass('block-backlink__block-title') }}>{{ label }}</h2>
  {% endif %}
  {{ title_suffix }}

  {% block content %}
    {% if link_url %}
      <a class="block-backlink__link backlink" href="{{ link_url.toString() }}">
        {% if is_backlink %}
          <svg class="backlink__icon icon icon--back" xmlns="http://www.w3.org/2000/svg" width="24" height="24" viewBox="0 0 24 24"><path d="M20,11H7.83l5.59-5.59-1.42-1.41L4,12l8,8,1.41-1.41-5.58-5.59h12.17v-2Z"/></svg>
        {% else %}
          <svg class="backlink__icon icon icon--home" xmlns="http://www.w3.org/2000/svg" width="24" height="24" viewBox="0 0 24 24"><path d="M12,3L1,11.4l1.21,1.59,1.79-1.37v9.38H20V11.62l1.79,1.36,1.21-1.58L12,3Zm6,16H6V10.1l6-4.58,6,4.58v8.9Z"/></svg>
        {% endif %}
        <span class="backlink__label">{{ link_title }}</span>
      </a>
    {% endif %}
  {% endblock %}
</nav>
Form templates
Most often, the theming of forms is carried out programmatically. Drupal has a Form API specifically for this, it is quite powerful and flexible, many articles have been written about it and many examples are available.
But using templates for forms theming is also possible, although the principle of working with them is slightly different from provided above.
By default, all forms use one common template — form.html.twig. This template is very simple, it outputs the <form> tag and the compiled markup of the entire form from the children variable.
For some forms, in addition to the main template, the form content template is also used. It renders what will be the value of the children variable.
The Stable 9 theme defines several of such templates, for example:
core/themes/stable9/templates/views/views-exposed-form.html.twigcore/themes/stable9/templates/content-edit/node-edit-form.html.twig
These templates are also very simple and usually just output the contents of the form variable, but its value is no longer the compiled markup, but a render array. And it, in turn, can be effectively used in custom markup.
Therefore, to theme forms using templates, you need to use the form content template, and not the form template itself. In the case of forms, this approach replaces template name suggestions, which is the reason why we don't see default template name suggestions.
At the same time, the form content template is also not defined for most forms. This is because there is no default template for form content, and if you define a template, you must provide one.
To define a form content template for a form that doesn't already have one, it needs to create a function that implements hook_theme in your module's MODULENAME.module file.
/**
 * Implements hook_theme().
 */
function MODULENAME_theme() {
  return [
    'FORM_THEME' => [
      'render element' => 'form',
    ]
  ];
}
As the value of FORM_THEME, you can use the existing value of the $form['#theme'] element of the $form array, usually, it partially or completely matches the form ID ($form_id). The same value will be the name of the template, but dashes should be used instead of underscores.
If the existing value of FORM_THEME does not suit or is not set, then it can be set using the function that implements hook_form_alter in your module's MODULENAME.module file or in your theme's THEMENAME.theme file.
use Drupal\Core\Form\FormStateInterface;

/**
 * Implements hook_from_alter().
 */
function MODULENAME_form_alter(&$form, FormStateInterface $form_state, $form_id) {
  switch ($form_id) {
    case 'FORM_ID_VALUE':
      $form['#theme'] = 'FORM_THEME'

      break;
  }
}
Form content template
The main variable in the form content template is the form variable, which contains the render array of form elements.
When outputting this variable, the handler iterates through all the elements in order and renders them if necessary, similar to how it is done when outputting the content variable in content entity templates.
But the elements of the render array are other fields, these are not objects of the Field type, but the HTML form elements fields (and supporting markup) defined as render arrays.
As in the case with content fields, form elements can be outputted separately, wrapping them in your markup if necessary. It is also possible to exclude certain elements from the output using the without filter. Moreover, in the case of forms, this is the recommended approach, since forms always contain hidden system elements that are necessary for the form to work correctly.
An abstract markup example in a form content template:
<div class="cols">
  <div class="col-1">
    {{ form.ELEMENT1_NAME }}
    {{ form.ELEMENT2_NAME }}
  </div>
  <div class="col-2">
    {{ form.ELEMENT3_NAME }}
    {{ form|without('ELEMENT1_NAME', 'ELEMENT2_NAME', 'ELEMENT3_NAME') }}
  </div>
</div>
Conclusion
This manual is the essence of my experience working with Twig. It does not claim to be complete or absolutely true, it does not replace the official documentation. Instead, it contains examples of solutions to real issues, so that they can be easily found, understood, and used to solve your issue.
I will be happy if the manual is useful to you. If you have ideas for improving and supplementing the manual, share them in the comments.
Amazing work, thanks Andrey!
Absolutely agree, fantastic work Andrey!
I love this encyclopedia of twig manual! Great work Andrey! Its also cover a lot topics what is in Aqcuia Drupal Frontend exam!
Fantastic, thank you!
You are far too modest calling this merely a "Twig" resource. This is the single best explanation of Drupal theming I've ever found. You need to write a book!
Thanks for the feedback.
I already got similar advice from colleagues, yes, it makes sense too, thanks.
But for now, I see the most value in updating it, adding new points, and gathering feedback.
A great work. Magnifique travail !
You are amazing, thanks a lot.
Thanks its works:
{% set list_item_key = node.field_list.value %}
{% set list_item_label = node.field_list.getSetting('allowed_values')[list_item_key] %}
{{ list_item_key }}
{{ list_item_label }}